

It is recommended that you should be running LW 7.0b as we do not test it on anything else but the latest. If you find anything lacking or incorrect, contact us immediately and it will be fixed right away.
Muscle bone concept:
Use a bone to simulate the sliding of skin and muscle deformation, especially for the face.
Advantage:
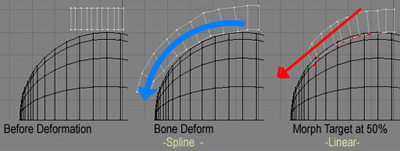
Advantage over morph targets is that morphs use a linear motion path (straight line), which looks unnatural at times. Deformation using bones has a smooth spline based motion path (curved).
How it works:
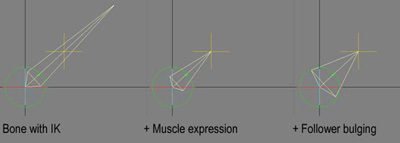
A muscle bone uses IK to follow a goal. Through using an expression the bone adjusts its Z scale to keep its tip in contact with the goal. To add the effect of volume the muscle bone can bulge or stretch when the muscle expands and contracts using follower to follow how much the Z scale increases/decreases adjusting the X and Y scales to give the effect.
How to create one:
Step 1: Getting the parts ready.
Create a Null (this represents your mesh object)
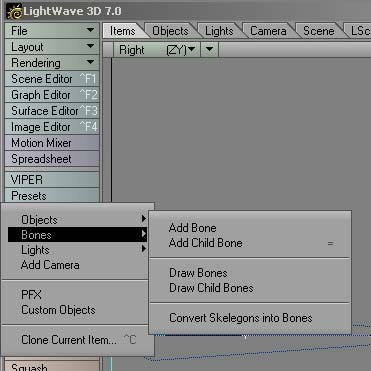
Add bone call it "MuscleBone" (it will be the deforming muscle bone)
Add child bone call it "Pointer" (it is used just for the purpose of IK goaling)
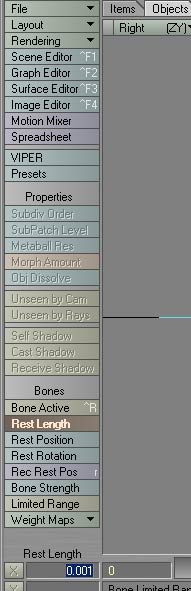
Set the "Pointer" bone`s rest length to 0.001 (since the pointer bone is a child of the muscle, any stretching will be inherited. So making it small will be visually easier to deal with)
Tip! Use the spacebar to exit from the rest length tool.
Create null call it "MuscleGoal" (goal for muscle bone to follow)
Move the MuscleGoal so that it is touching the end tip of the MuscleBone.
Record rest position for both the muscle bone and "Pointer" bone.
Make the "Pointer" bone inactive (remember its only for IK purposes)
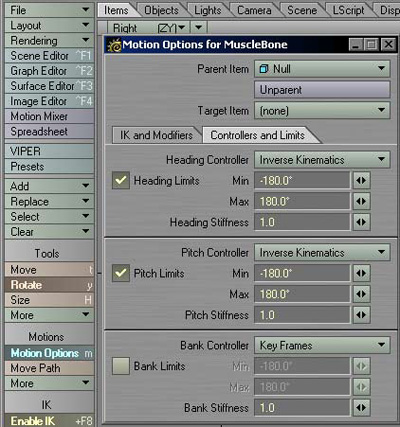
Step 2: IK Setup
Turn on IK for the pitch and heading channels of the Muscle bone.
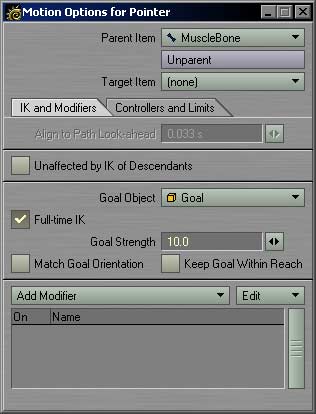
Select the pointer bone and set the null "Goal" as the goal for the pointer bone
Turn on Full Time IK for the pointer bone (depending on the grid size you may have to adjust the goal strength anywhere from 0.1 for big grids to 500 for small grids)
Step 3: Expression Placement
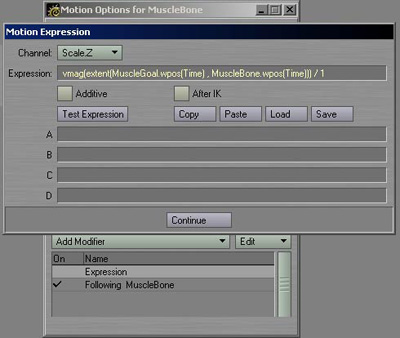
Open up the motion options for the muscle bone
Add an expression modifier. (Personally this modifier is superior to the graph editor expression engine)
Double click the expression modifier
Select Scale Z from the pull down
Tip! The expression modifier has the ability to store multiple expressions in each channel pull down. So when you reload the scene if you do not see anything that is because you forgot to select the channel pull down where the expression is.
Paste this expression in to the expression entry lot.
"vmag(extent(MuscleGoal.wpos(Time) , MuscleBone.wpos(Time))) / 1"
Explanation: This expression is really saying that this channel equals the length of a line drawn from Goal to Bone world positions at Time (Time) and divided by 1 (which is actually the value of the MuscleBone.RestLength from the interface).
Tip! To use the expression swap the name of your muscle bone and IK goal into the expression. The last part "/1" represents the rest length so select your muscle bone hit the rest length button select the numerical value, copy and paste it in place of the 1. Bada bing how easy was that?
Step 4: Optional Squash and Stretch Setup
Open the motion options for the muscle bone
Add a Follower modifier
Double click Follower
From the pull down select MuscleBone<=Null (The <= simply means that it is a bone that belongs to Null)
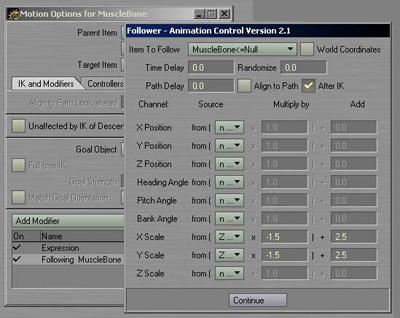
Set all the channel pull downs to none except for X and Y scale.
Set the X and Y scale to follow the Z scale in the pull down
Set the multiply and add to numbers like the one in the picture.
For the Follower bit: "Multiply" controls the distance the bone stretches to the point of collapsing into its self. " Add" controls how many times fatter the bone gets when compressed.
A summary for now:
Single muscle bones are really useful in areas in places like the neck, stomach and other places where you want to simulate muscle volume or gain control of mesh deformation in a lattice style fashion.
This was a quick run through so you are confident setting up a muscle bone. Muscle bones gain even more power when used in chains. If you are interested go to the multi- chain setup section.