

Using masks rather than the selection tools is somewhat like working in grayscale instead of bitmap mode. Masks offer much finer control of how filters, effects, and colors are applied.
To continue the analogy, in bitmap color mode, a pixel is either black or it is white. In grayscale, you have 256 levels of color, ranging from black through gray to white. With a basic selection, a pixel is either inside the selection marquee or outside. Two simple marquee selections have been made, without feathering or anti-aliasing.
When you make a basic selection and, for example, apply a color, those pixels inside the selection receive the color, those outside do not.

With the selections shown in the first image, I pressed D for default colors, then X to swap the foreground and background colors. Pressing Delete (Backspace on PCs) fills the selection with the background color. Note that this is an RGB image, although black and white are at this point the only colors visible.
Zooming in, we see how the selection works. Pixels within the “marching ants” have been colored black, those outside the selection remain unchanged.
Altering the selection a bit, we check the option for Anti-aliasing for the Elliptical Marquee tool, leaving the Rectangular Marquee tool as a basic selection. Now when we fill the selections, Photoshop uses anti-aliasing to smooth the appearance of the curved selection. (This circle does not have the jagged edges of that seen in the second picture, above.)

Zooming in to the same area seen earlier, you’ll see how gray pixels were added, both inside and outside the selection, to visually smooth the transition from black to white.

Now we re-select with the Rectangular Marquee, this time set to feather the selection 3 pixels. Feathering also offers a transition between the selected and unselected pixels. Rather than producing a smoothed curve, feathering is designed to allow you to fade the edges of a selection.

Another zoom to 800% and we can see up-close the effects of feathering.

Although the feathering was set to three pixels, the effect on either side of the selection marquee is more extensive. Using a maximum zoom (1600%) along the selection border shows the extent of the feather.
In the following figure, the lower part of the Info palette is visible, showing the color values for the four Color Samplers. Number 1 is black, number 4 is white, while numbers 2 and 3 show the extent from the selection border to which the feathering was applied. Remember that the Marquee tool’s options were set for a three pixel feather, yet the color is changed for a distance of seven pixels on either side of the selection marquee.
The following graph shows the distribution of color values of the fourteen shades of pixels. From the neutral gray at the selection board (in the middle of the graph), to the extreme color changes at the left and right ends of the graph (represented by Color Samplers 2 & 3 in the preceding image), the graph shows how Photoshop uses feathering to blend the colors.
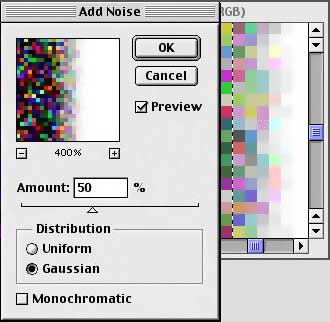
Remember that these simple examples of selection, anti-aliasing, and feathering carry over to more than just black and white. Just as the black-to-gray-to-white transition used numerous levels of gray, so to would a filter applied to a feathered edge use varying values. As just one example, the mage below shows how feathering softens the effect of the Add Noise filter.
Next week, in Part 2 of this series, we’ll take a look at how masks work.
 Pete
Bauer is the Help Desk Director for NAPP, as well
as a Contributing Writer for Photoshop User and Mac Design
magazines. His books include "Special Edition Using
Adobe Photoshop 7" (with Jeff Foster), "Special
Edition Using Adobe Illustrator 10," "Sams Teach
Yourself Adobe Illustrator 10 in 24 Hours" (with Mordy
Golding), and "Special Edition Using Adobe Illustrator
9." Pete writes documentation for a variety of computer
graphics related products, as well as testing software
for a number of companies. As a computer graphics efficiency
consultant, Pete specializes in customized training programs.
He is based in Columbus, Ohio, and can be contacted via
Pete
Bauer is the Help Desk Director for NAPP, as well
as a Contributing Writer for Photoshop User and Mac Design
magazines. His books include "Special Edition Using
Adobe Photoshop 7" (with Jeff Foster), "Special
Edition Using Adobe Illustrator 10," "Sams Teach
Yourself Adobe Illustrator 10 in 24 Hours" (with Mordy
Golding), and "Special Edition Using Adobe Illustrator
9." Pete writes documentation for a variety of computer
graphics related products, as well as testing software
for a number of companies. As a computer graphics efficiency
consultant, Pete specializes in customized training programs.
He is based in Columbus, Ohio, and can be contacted via