


One of the biggest challenges facing many Photoshop users is maximizing compression while minimizing file size. This is an especially tough balancing act when working with photographs for the Web. Selective blurring can help.
Jpeg is still the file format of choice for continuous tone Web images, such as the vast majority of photos. However, jpeg is a lossy compression system -- it throws away some of the image's data to reduce file size. The smaller the file, the more lost data. (Gif and png are lossless compression systems. They save all the data, but png files can't come close to jpeg for size reduction.)
Because of the way jpeg looks at image data, blurring an image can assist it in compressing the file. In fact, Photoshop's Save for Web even has a blur feature built in.
The slider allows for compression from zero to two pixels.
Let's take a look at how blurring with Save for
Web affects file size. We took the same image and, using otherwise
the same jpeg settings, tried different amounts of blur to check
their effect on compression. The base image is a photo 512 pixels
by 341 pixels, with a size of 512 KB as a Photoshop file. Jpeg's
High Quality setting (60%) was used.
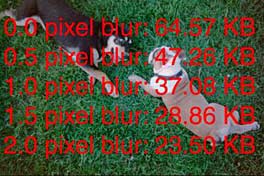
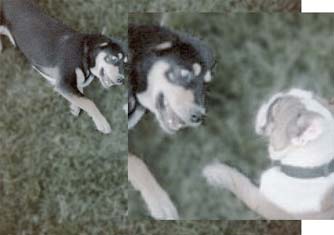
Under 30 KB is a good compressed size for this image,
but the price to pay to get there is high. The composite image
below shows the result of the various Save for Web blurs on the
two doggies' heads.
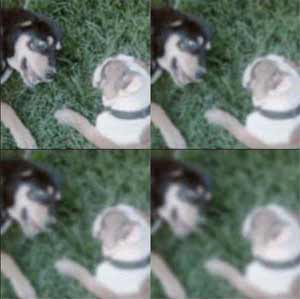
(The four images show the four levels of compression tested.)
There is, certainly, another way to drop the file
size below 30 KB. By increasing the amount of jpeg compression
we can continue to shrink the file. To break the 30-K barrier,
this particular image needs a jpeg setting of 22% in Save for
Web.
(The poor doggies!)
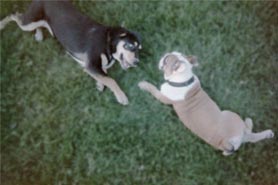
So we know blurring is good for file compression, but bad for poor Madison and Hugo. Why not have the best of both worlds? We're Photoshop people, we know how to make masks and selections and stuff! There's no reason why the grassy background can't be blurred while the dogs stay in focus.
Making a mask of the dogs isn't too difficult using Select> Color Range, since the green of the grass does not appear in our subjects. The mask doesn't need to be too precise either, because this will be a Web-based image, viewed only on screen at 100% magnification.
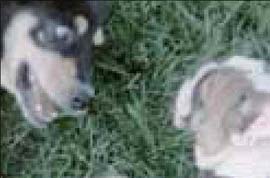
Once we've isolated the dogs, we can blur the background
with a Gaussian Blur of 1.5 pixels. The effect is visually-pleasing
and, with the same 60% jpeg quality, reduces the file size from
67.57 KB to a tidy 32.84 KB, less than half as large. But not
quite our target size of under 30 KB.
But wait! There's more! We can sneak this image
down even further by combining our blurs. After we've blurred
the original image 1.5 pixels in Photoshop with Gaussian Blur,
we can use the blur feature in Save for Web to take it down another
0.5 pixel. That gives us a minor savings to 29.54 KB without any
noticeable change to the image quality.
As can be imagined, this technique works most effectively with detailed backgrounds. The more large color variations in small areas, the more trouble jpeg compression can cause you. A bit of blur can also head off those tell-tale 8 pixel by 8 pixel blocks that jpeg creates. (What I call, none-too-fondly, "the blockies.") *****
 Pete
Bauer is the Help Desk Director for NAPP, as well
as a Contributing Writer for Photoshop User and Mac Design
magazines. His books include "Special Edition Using
Adobe Photoshop 7" (with Jeff Foster), "Special
Edition Using Adobe Illustrator 10," "Sams Teach
Yourself Adobe Illustrator 10 in 24 Hours" (with Mordy
Golding), and "Special Edition Using Adobe Illustrator
9." Pete writes documentation for a variety of computer
graphics related products, as well as testing software
for a number of companies. As a computer graphics efficiency
consultant, Pete specializes in customized training programs.
He is based in Columbus, Ohio, and can be contacted via
Pete
Bauer is the Help Desk Director for NAPP, as well
as a Contributing Writer for Photoshop User and Mac Design
magazines. His books include "Special Edition Using
Adobe Photoshop 7" (with Jeff Foster), "Special
Edition Using Adobe Illustrator 10," "Sams Teach
Yourself Adobe Illustrator 10 in 24 Hours" (with Mordy
Golding), and "Special Edition Using Adobe Illustrator
9." Pete writes documentation for a variety of computer
graphics related products, as well as testing software
for a number of companies. As a computer graphics efficiency
consultant, Pete specializes in customized training programs.
He is based in Columbus, Ohio, and can be contacted via