

I remember back in the days when Resident Evil 1 was released. One of my friends had a Play station and we used to sit for hours just playing. The game story was about a few soldiers investigating some mysterious incidents up in the mountains, just outside Racoon City. During their mission, they are being chased by something they can’t identify, and they end up in the Hall of a big Mansion, and this is where the game begins for the player. I remember the first time I saw that Hall, and I was very impressed. I’ve always wanted to create graphics like Resident Evil 1, and since I was about to write a new tutorial, I thought I’d try it out, and the result is quite pleasing if you ask me. This is the first part of the tutorial, where we will start out with creating simple Black & White drawings of the room shape. The tutorial is a step by step, so even if you are a complete beginner, you should be able to manage this, although, I will not explain what the different Tools do.
Designing the Room before building it can be a wise choice, and for this I use Photoshop, because all I need to do is draw a few lines, set a few measurements, so I have something to start with. Any 2D paint program should be able to do this, since it’s just a simple B&W image. The pictures below are the ones I made, and these are the ones we will use.
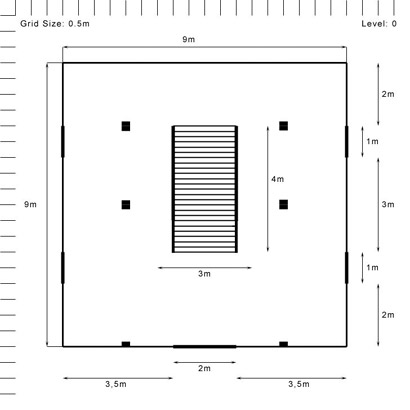
Picture 1: Level 0
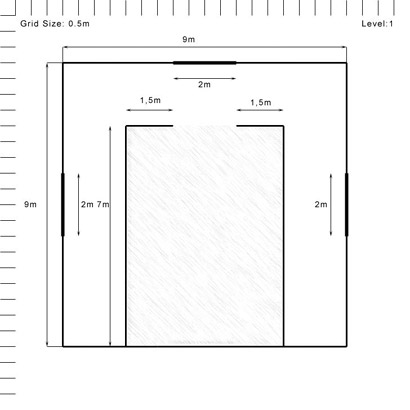
Picture 2: Level 1
Building the Level 0 Walls
Okay, I take it you took a look at those Black & White drawings and got some sort of idea of what we are going to build here. The Hall will have two levels, Level 0 and Level 1, and we will start out with building the walls of Level 0. Before we start out building, lets make sure you have the same configuration as me.
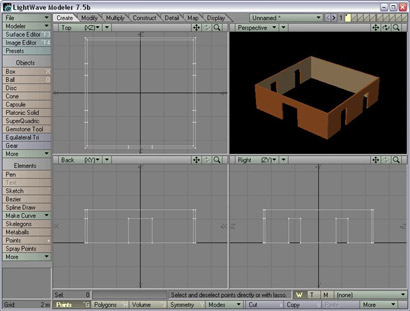
Start by loading up Modeler, and then bring up the Display Options Panel by hitting “d” on your keyboard. Click the Viewports Tab and change the second Viewport to the following.
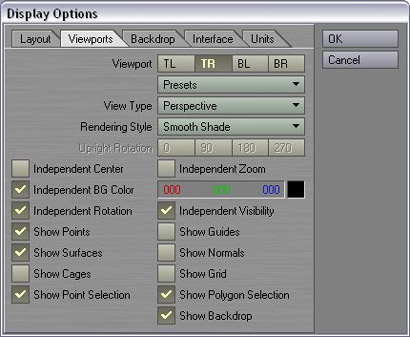
Picture 3: The Viewport 2 settings
Next click the Units Tab and set the following settings.
Unit System: SI
Default Unit: Metres
Grid Units: 125
Grid Snap: Standard
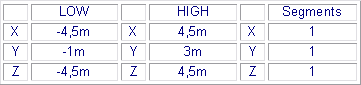
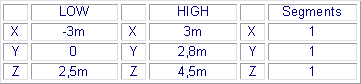
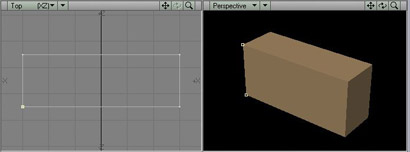
Click OK when you’re done to save the new settings. Activate the Box tool, bring up the Numeric Panel and enter the following settings.
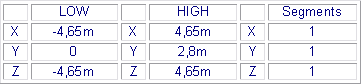
Close down the Numeric Panel after you’ve entered the values and hit Space to create the box and to deselect the Box tool. Hit “a” on your keyboard to fit this new box in all views, it should look something like picture 4.
Picture 4: The first box created (Click to enlarge)
This will be the main wall for level 0, but we need to deform it a bit. Bring up the Change Surface panel by hitting “q”, and then create a new surface called “Walls_Wood”. Give it a brown colour (R: 170 B: 90 B: 40), enter 75% for specular and keep the rest to the default values, then click OK. The box should now turn into a brown colour in the perspective view. Switch to Layer 2 and activate the Box tool, bring up the Numeric Panel and enter the following values.
Close down the Numeric Panel and then hit Space to create the box.
Switch to Layer 3 and activate the Box Tool again, bring up the Numeric Panel and use the following settings.
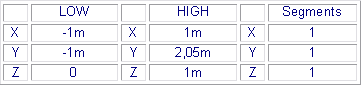
Close down the Numeric Panel and hit Space to create the Box. Activate the Move Tool by hitting “t” on your keyboard, bring up the Numeric Panel and use the following values.
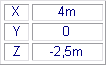
Once the values are entered, click Apply and then close down the Numeric Panel. We will mirror this box twice, so activate the Mirror Tool by hitting “Shift+v”, then open up the Numeric Panel and set the axis to Z. Keep the other settings to the defaults, close down the Numeric Panel and just hit Space to finish the Mirror operation. Activate the Mirror Tool again, bring up the Numeric Panel and this time set the axis to X, keep the other settings to the defaults and close down the Numeric Panel. Hit Space on your keyboard to complete the operation.
There should now be 4 boxes in Layer 3, and we need one more. Activate the Box Tool again and bring up the Numeric Panel. The values we used the last time we created a box should still be inserted in the Numeric Panel, so just close it down again and hit Space to create the box.
We will move this box, so use your mouse in the Top View (Top Left Viewport) and drag a lasso around it to select its points, like in picture 5.
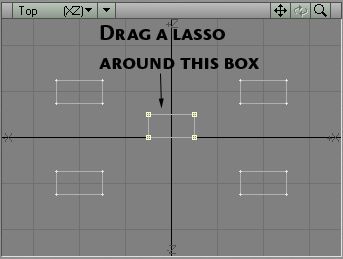
Picture 5: Drag a lasso around the middle box
When the points have been selected, activate the Move Tool again and bring up the Numeric Panel, use the following settings.
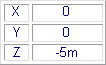
Like before, enter the values and then hit Apply to move the box, and then close down the Numeric Panel.
Deselect everything now and switch back to Layer 2. Open up the Change Surface Panel by hitting “q” and name this surface “Wallpaper”. Give it a light brown-grey colour (R: 180 G: 150 B: 110), set the specular to 0% and click OK.
What we have in Layer 2 will make up the Inner Walls. Layer 3 is where the doors will be; now we just need to subtract this out of the Main Wall in Layer 1.
Now we are going to perform two Boolean Subtract operations, so switch to Layer 1 and put Layer 3 in the background. Activate the Boolean Tool by hitting “shift+b”, select the Subtract operation and click OK. Hit “m” to activate the Merge Points Panel, then just use the Automatic function here. 30 points should be eliminated.
Switch to Layer 3 and delete the 5 boxes, we don’t need them anymore. Go back to Layer 1 and put Layer 2 in the background, perform another Boolean Subtract operation, then merge the points. 28 points should be eliminated this time. Switch to Layer 2 and delete the box. The content of Layer 1 should look something like picture 6.
Picture 6: The basic Level 0 Walls (Click to enlarge)
Since we will be adding stairs later on in this tutorial, we might as well prepare some things now to make it a bit easier later on. Switch to Layer 2 and activate the Box Tool, then bring up the Numeric Panel. Enter the following values.
Once the values are entered, close down the Numeric Panel and hit Space, then hit “a” to fit this box in all views. Working in Top View, drag a lasso around the 2 points shown in picture 7.
Picture 7: Drag a lasso around these 2 points (Click to enlarge)
Activate the Set Value tool by hitting “ctrl+v”, in the Panel that comes up, set the axis to X and the value to –1m, then click OK. Do the same thing with the other side but use a value of 1m this time. The final product should look something like picture 8.

Picture 8: The deformed box (Click to enlarge)
This Box has already got the Wallpaper surface, and we don’t need to change that. Switch to Layer 1 and put Layer 2 in the background, then activate the Boolean Tool and this time use the Union function. Click OK and the both Layers will be joined. Merge the points and 4 points should be eliminated, then switch to Layer 2 and delete the box.