


This tutorial is designed for people who have little Experience of using Flash. The aim of the tutorial is to be able to create your own buttons, how to Align objects to the stage and create layers.
States of the button
The button can change it's appearance according to what 'state' it is in. There are four states: Up, Over, Down and Hit.
1. Up: Is when the mouse pointer is not over the button.
2. Over: Is when the mouse pointer is over the button.
3. Down: Is when the mouse pointer is over the button and the mouse button is down.
4. Hit: Is an invisible area of the screen. This area defines when the mouse pointer is 'over' the button or not.
Roll your mouse over the button below and click to see the Up, Over and Down states. You can't see the Hit area as it is invisible. The button has no actions so does not do anything.
![]() New: See Flash Demo Movie of how to build this Flash file
New: See Flash Demo Movie of how to build this Flash file
Step one: Setting up the Document
- Set the size of the Flash Movie: Modify > Document
The movie above is: 200 x 130pxNote: You can either have a Flash movie which contains a number of buttons or you can have a Flash movie that is a single button and no more.
Step two: Creating the button symbol
A button is a type of Symbol, so the first to do is create a 'Button Symbol'.
- Go to Insert > New Symbols
(or hit CTRL+F8 on your keyboard)
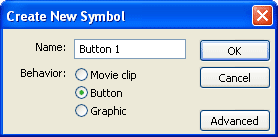
The "Symbols Properties" dialogue box will open. - Name it: Button 1
- For Behavior select: Button
- Click: OK
You will go to a new stage, called Button 1. In this stage, you will have four frames:
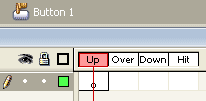
Frame 1 - Up
Frame 2 - Over
Frame 3 - Down
Frame 4 - Hit
Step three: Creating the up state
- In the middle of the stage draw a rectangle with the rectangle tool:

When you have finished drawing your rectangle, make sure you go back to the Selection tool:
If you do not do this you will draw more rectangles by mistake. - With the selection tool
, single click on the rectangle fill and select any colour you may want with the Fill Color tool:

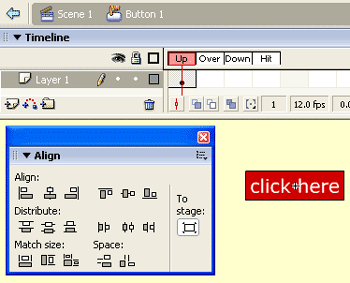
- You need to align your rectangle to the centre of the stage using the Align panel. Go to: Window > Design Panels > Align (Ctrl K)
- Double click on the coloured fill of the rectangle. This should select both the fill and the stroke (outline).
 Fill and stroke highlighted: Both are dotty!
Warning: If the fill and stroke are not both highlighted you will only move part of your rectangle. Often the stroke will get left behind, even if the stroke is white, and cannot be seen, be careful not do to do this, as this 'debris' may cause problems latter.
- In the Align panel click the 'To Stage' button:

- With the rectangle selected click on the Align Vertical centre button:

- Click on the Align Horizontal centre button:

- Use the Text tool
 to type 'Click Here' (or whatever else else you might want your button to say).
Note: If you are familiar with the use of Layers in Flash it would be better to have the text in its own layer. This makes it easier to change the rectangles colour or shape latter (you simply need to lock the text Layer). Having said that it not essential, so I have not used layers in this tutorial.
- The text must be set to Static. To check this open the Property panel: Window > Properties.
With the text still selected the panel should say: . If it does not, use the drop down arrow to select static text.
 - Select your text with the Arrow tool:
- In the Align panel the 'To Stage' button
should still be selected (it will be white, not gray, see picture below).
- Click on the Align Vertical centre button:
- Click on the Align Horizontal centre button:
- After you have finished the text you may need to re-size your rectangle. Because the text is on top of the rectangle it may be difficult to select. If need be just move the text out of the way - you can always re-position it using the Align Panel later.
To re-size the rectangle double click on it with the: Selection Tool
Then either use the: Free Transform Tool
Or use the Property Inspector and type in the size you want. If it is not open go to: Window Properties

After you have re-sized your rectangle you will need to re-centre it with the Align Panel. You may also need to re-centre the text.
Step four: The over state
- Right click in the 'over' frame in the 'text' layer and select: Insert Keyframe
You will notice the play head has moved to the 'over' frame and your text and rectangle from frame 1 is copied to the over frame. - Select the text with the Selection tool
and change the text to bold by going to Text > Style > Bold
Note: Instead of changing the text to bold you could do any other change you wanted such as size, colour or position.
- You may need to align the text centre of the stage again.
- Right click in the 'over' frame in the 'background' layer and select Insert Keyframe.
- Change the rectangle to another colour by single clicking the fill colour of the rectangle (only the fill will be dotty). Select a colour by clicking on the Fill Color tool:
Step five: The down state
Do the same as step three by:
- Inserting new Keyframes in the Down frames of both layers.
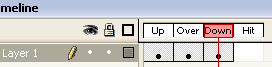 Your timeline should look like this: Note the keyframes - black dots.
- • Change the colour of the rectangle and/or...
• Change the colour or the look of the text.
Step six: Placing the button on the main stage:
- Click on the Scene 1 Tab:

You will return to the main stage, which should be empty. Don't panic you haven't lost your symbol. - Click on Window > Library . Your symbol will be in the library.
- Drag your symbol from the Library onto the main stage.
Step seven: Actions
You now have a new button which you will need to add actions to so that it does something. See previous tutorial for details of how to do this: Simple Links
The hit state
The hit area is normally the same as the rectangle. You do not need to create this unless the hit area is different to the original rectangle you created on frame one.
Note: If your button does not have a solid background (in this case a rectangle) but only text, you will have to create a rectangle (or other solid shape), in the hit area frame. Otherwise when the mouse pointer goes over the gaps between the letters, the button will go back to frame one: The over state.
Very slowly move the mouse over button 1 below and you will see the problem.
Button 1 is not stable and moves between states with small movements of the mouse.
Button 2 is stable. Button 2 has a rectangle in the 'Hit' frame. This is not visible in the movie, but controls the 'Up', 'Over' and 'Down' states.
Have fun with your buttons, make them wild and wonderful!