Ever wanted to know how to make a digital clock. This tutorial shows you how easy it is to create a digital clock in Flash. Have a look at the time below:
Note: This clock is taking the time off your local computer and displaying it on the web page through Flash. This is not perfect as I don't know if the local users clock is correct. There are other ways of finding out the time and displaying the time but they are so much more complicated and not necessarily more accurate. So I have gone for a very simple method of creating a digital clock. It works and is very easy to create.
Cross Ref: If you want to make an Clock with a face see the: Analogue Clock Tutorial
An analogue clock.
Step one: Setting Up the Flash Document
- Open a new: Flash Movie
- Go to: Modify > Document (Ctrl J)
- Set the size to: 220 x 50 pixels
- If you wish select a: Background Colour
- Click: OK
Step two: Creating the Clock Movie Clip - The Dynamic Text Box
- Go to: Insert > New Symbol
- Type the Name: Time MC
- Select behavior: Movie Clip
- Click: OK
- If the Tools panel is closed, open it: Window > Tools
- Select the Text tool:

- Drag out a: Text Box
- If the Property Inspector is closed, open it: Window > Properties (Ctrl F3)
- Set the Text Box's width to about: 200 pixels
- In the Property Inspector set the X Y values to: 0 , 0

- In the Property Inspector select: Dynamic Text
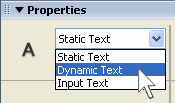
- In the Property Inspector set the Variable Name to: myTime
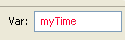 Variable name is: myTime
- Set the Line type to: Single

- Set any Font styles such as: Size, Colour, Font etc.
Mine are like this:
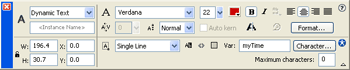 Text Box Properties. (Click to enlarge)
The Text Box is now complete. If you wish to reduce the Download time do the Following steps:
- In the Property Inspector click the Character Button:

- Select the radio Button: Specify Ranges
- Select: Numerals [0..] (11 glyphs)
- In the Include these characters box type a colon:

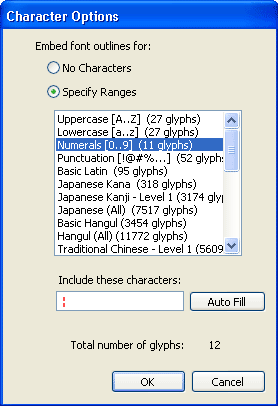 The Character Option Box complete.
- After you have typed the colon click: OK
Note: In the Property Inspector you can see the Text Box's width and height. Select the Text Box with the Text Tool and drag the small square in the corner: Do not do it numerically or with the Transform tool as this will stretch the font size.
 To re-size a Text Box select it with the Text tool and drag the small square.
 The small square may be in either the top or bottom left corner:
 The small square may even be a circle!
Step three: Creating the Clock Movie Clip - Actions
You should still be in the Time MC. If you are not open the Library and find the symbol and select Edit from the drop down menu.
- Re-name layer 1 to: Text Box
- On frame 2 right click (Mac: Ctrl click) and select: Insert Frame
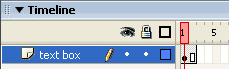 Timeline with two frames.
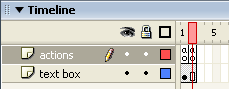
- Create a new layer by clicking on the Insert Layer button:

- Rename this new Layer: Actions
 New Actions Layer.
- In frame 1 of this new Layer place the following ActionScript:
// Gets the date and time info from the local computers clock
myDate = new Date();//Gets the hours and adds a zero if the number is a single digit like this: 01
var hours = myDate.getHours()>9 ? myDate.getHours() : "0"+myDate.getHours();//Gets the minutes and adds a zero if the number is a single digit like this: 01
var minutes = myDate.getMinutes()>9 ? myDate.getMinutes() : "0"+myDate.getMinutes();//Gets the seconds and adds a zero if the number is a single digit like this: 01
var seconds = myDate.getSeconds()>9 ? myDate.getSeconds() : "0"+myDate.getSeconds();// Displays the time like this: 00 . 01 : 01
myTime = (hours + " . " + minutes + " : " + seconds); - In Frame 2 of the Actions Layers right click and select: Insert Blank Keyframe
- Place the following ActionScript in frame 2 of the Actions layer:
gotoAndPlay(1); - The Movie Clip is now complete so return to the Main Stage by clicking the Scene 1 Tab:

Note: If you cannot see the Scene 1 Tab open the Edit bar: Window > Toolbars > Edit bar
Note: Your Timeline should look like this:
 Timeline.
Step three: The Main Stage
- If the Library is closed, open it: Window > Library (F11)
- Drag on to the Main Stage the Symbol: Time MC
- If the Align Panel is closed, Open it: Window > Design Panels > Align (Ctrl K)
- With the Movie Clip selected click on the
- Align to Stage button:

- Align Vertical Centre:

- Align Horizontal Centre:

Your Movie Clip should now be in the centre of the Main Stage:
- Align to Stage button:
- Save your work: File > Save (Ctrl S)
- It is time to Test your Movie: Control > Test Movie (Ctrl + Enter)
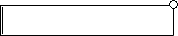
Your clock should look like this:
The clock works fine but has no border.
Your clock is now finished. You may wish to add a border:
Clock with a border.
Note: The border is simply a rectangle with the centre deleted.
To get the rounded corner look use the Rounded Corner option:
This option button is visible once you select the Rectangle tool:
That's all there is to it!