- Create a new file, any size just make it pretty square.
- Fill the background with black. And create a new layer.
- Create a big bloby shape in the center with the lasso tool
 and
fill it with white.
and
fill it with white.
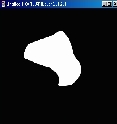
- Deselect. Filter>Gaussian Blur...>Size about 10 depending on the size of your blob.
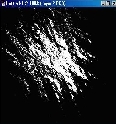
- Filter>Distort>Ripple...
Amount: 999%
Size: Large - Ctrl+F to repeat the effect.
- You should end up with something like in the picture on the top left.
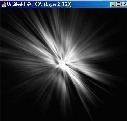
- Filter>Blur>Radial Blur...
Amount: 100
Blur Method: Zoom
Quality: Best - Ctrl+F to repeat the effect.
- You should end up with something like that (top left)
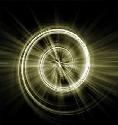
- Filter>Distort>Polar Coordinates... Rectangular to Polar.
- Filter>Distort>Twirl...
Angle: 999 - Create a new layer, on it create an elipse in the middle of the image using
the elipticle marquee tool
 and
fill it with white.
and
fill it with white. - Repeat steps 4-9 (ignore step 7).
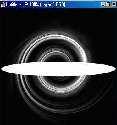
- Create a new layer fill it with the color of your choice: i chose yellow.
- Set the layer mode to Overlay and walla.
- I suggest going to Image>Adjust>Hue/Saturation... and
play around, lower the saturation, play with the hue and lightness to get
the disired effect.
Her
Creating a Vortex
Added:Sep 26, 2005 Rating:


 Level: Beginner Software:
Photoshop
Level: Beginner Software:
Photoshop
Level: Beginner Software:
Photoshop