

In this toturial, you're going to learn how to create a tweened animation: Motion Tweening.
To those who panic and don't know what to do when they load flash, I assure you, this tutorial will be your first step towards the right path.
1:
-
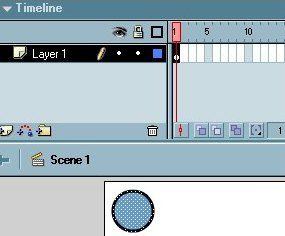
Start by clicking on the first frame of "Layer 1", just to be sure the object we are going to draw will be placed there.
- Now draw a circle on the stage using the "Oval Tool", as shown in Fig 1.
Next, we are going to apply "Motion Tween" to the KeyFrame.
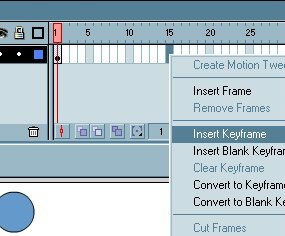
- Right-click on the first frame and select "Create Motion Tween"
Good job, we are almost there!
2:
- Right-click on the 15th frame, and select "Insert Keyframe" as shown in fig 2.
You're going to see an arrow connecting the first frame with the 15th, as an indication there's "Motion tween" between the 2 keyframes we made.
3:
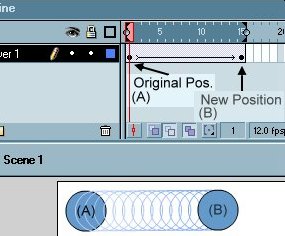
- Select the 15th frame, now click on the circle and drag it to any place on the stage other than the original position. as show on the right.
- Got to the "Control" menu, and select "Test Movie".
You're done! You'll notice the animation going in loop, just like in fig 3
That was your first animation, good work!
4:
To stop the animation when it reaches frame number 15, which is the end of the movie, right click on the 15th frame and select "Actions"
- In the left column, under Actions>Movie Control, double click on "stop"
- Test your movie, it should stop when the animation ends, unlike Fig 3
Pretty cool hu!
Conclusion:
- We created 2 points, the first point is A and the second one is B.
- We changed the position of the second point, B.
- Because there's Motion Tween, flash animated the object and moved it from A to B!
The same applies if you change the size of the circle instead of moving it to somewhere else, try it and see what happens!
Download *.fla