

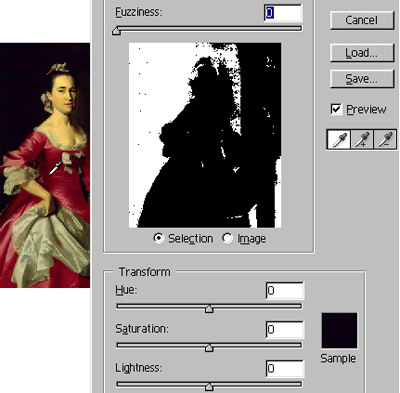
Let's try to change the color of Mrs. Watson's dress without changing that of her face.
1. Open Replace Color dialog (Image > Adjustments > Replace Color...). The masking and adjusting tools are in one box here; a hybrid of Hue/Saturation and Select Color Range commands.
2. First of all, we have to select the dress. Click with the eyedropper ![]() (it is already selected) somewhere on the red. See on the preview what areas
are selected.
(it is already selected) somewhere on the red. See on the preview what areas
are selected.
3. Adjust the color sensitivity of the tool with the Fuzziness slider.
4. Activate the Add to sample ![]() eyedropper and
click a few times on other hues of red so that to select all the red tissue (movie).
eyedropper and
click a few times on other hues of red so that to select all the red tissue (movie).
5. It seems that the dress is completely separated from Mrs. Watson*; let's adjust it. Move Hue, Saturation and Lightness sliders
until you achieved a desired result.
*Note though that the lips are separated as well.
 Since 1999, Andrei has run the digiCollage – an online image editor's shop. Having edited all kinds of customers' images, he has vast Photoshop experience that he willingly shares with you in this course. You are invited to look over an expert's shoulder and see Photoshop in action.