
The following tutorial is courtesy of "Mac Design Magazine"
Illustrator CS's 3D Effect is a powerful tool for creating three-dimensional objects-but it doesn't give you a true 3D environment that lets your objects interact with each other. So what do you do if you want a vase with rings floating around it or intersecting wedding bands? With some careful grouping and layer arrangements, you can coax Illustrator into simulating a real 3D world.
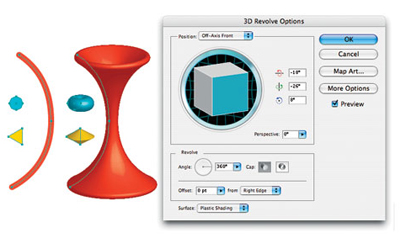
Step 1 Create and Revolve Your Objects
Start by creating a circle, a left-facing triangle, and a backward C using any tools you'd like. Now open the Color palette (Window>Color) and give the circle and triangle a Fill color (make sure there's no stroke applied). Click on the half-circle, open the Stroke palette (Window>Stroke), click the Round Cap icon, and then choose a Stroke color in the Color palette (you may need to increase the Stroke weight, as well). Select all the shapes and go to Effect>3D>Revolve. Click on the Preview checkbox and select Right Edge in the Offset From pop-up menu. You'll get interesting shapes, but we want the objects to revolve around the vase.
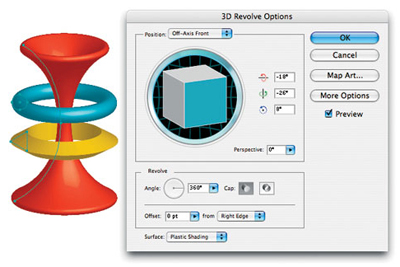
Step 2 Group and Revolve
Click Cancel in the Revolve Options dialog. This time, select all the objects and group them (Object>Group) before running the Revolve effect, and the circle and triangle will encircle the vase.
Intersecting Rings
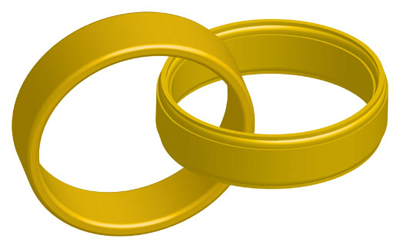
Step 1 What We're Shooting For
These two rings intersect with each other as if constructed in a true 3D program instead of Illustrator CS. The trick is in knowing how to break apart Illustrator's rings and bring them back together using different layers to give it a 3D look.
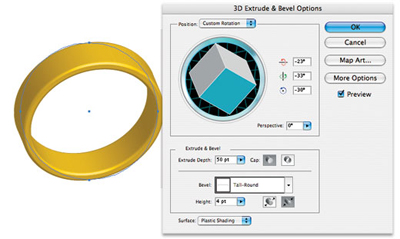
Step 2 Create the First Ring
Using the Ellipse tool (while pressing-and-holding the Shift key), make a gold-colored circle (by choosing a gold Stroke color and no Fill color) with a 5-point stroke from the Stroke palette (Window>Stroke). Then choose Effect>3D>Extrude & Bevel. We used a 50-point Extrude Depth and a Tall-Round Bevel on this ring. Rotate the ring with the rotation cube to get a slightly forward lean and click OK. Double-click the layer's name in the Layers palette and name the layer "Left ring."
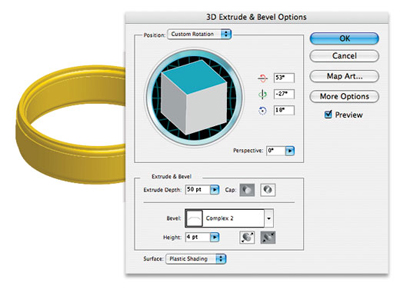
Step 3 Create the Second Ring
Option-click (PC: Alt-click) the Create New Layer icon at the bottom of the Layers palette, name it "Right ring," and click OK. Make a new ring, except this time rotate the ring for a flatter view and use a different Bevel (we used Complex 2). Hide the Left ring layer by clicking on the Eye icon next to the layer's name in the Layers palette.
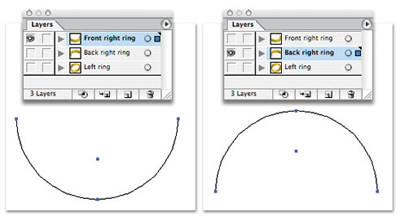
Step 4 Duplicate and Cut in Half
Duplicate the Right ring layer by dragging it onto the Create New Layer icon at the bottom of the Layers palette. Change to Outline view (Command-Y). Double-click the duplicate layer and name it "Front right ring," and rename the Right ring layer "Back right ring." Press A to switch to the Direct Selection tool, hide the Back right layer, select the top control point on the Front right layer, and press Delete to delete it. Reveal the Back right layer and hide the Front layer, and then do the same for the bottom control point on the Back right layer.
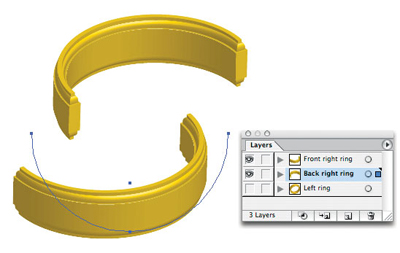
Step 5 Wait-the Half-Rings Moved!
Press Command-Y to exit Outline view, and reveal the Front right layer again. You'll notice that the half-rings seem to have moved-that's because of the rotations we used for this extrusion. Press V to switch to the Selection tool and move the front half-ring until it looks as if it's lining up with the back half-ring.
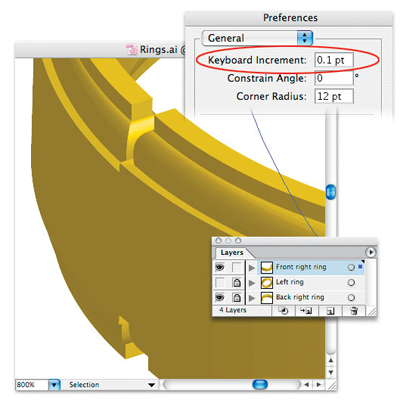
Step 6 Up Close and Personal
Change the Zoom to 800% in the bottom-left corner of your document window and use the Arrow keys to nudge the front half-ring so that it lines up with the back half-ring. Press Command-K and set the Keyboard Increment to 0.1 pt to give you a nice, small nudge. Now in the Layers palette, click-and-drag the Back right ring layer beneath the Left ring layer. Change your Zoom back to 100%, make the Left ring layer visible in the Layers palette, and then use the Selection tool to position the Left ring layer so it interlocks with the right ring.
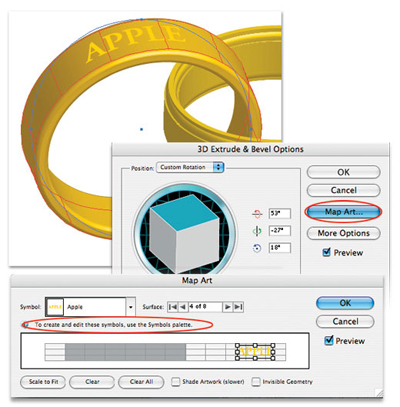
Step 7 Mapping Art
Next, we'll map artwork onto the left ring. Create a symbol first. For this artwork, we used the Type tool (T), typed the word "Apple," selected the text with the Selection tool, and then clicked on the New Symbol icon at the bottom of the Symbols palette (Window>Symbols). Select the Left ring, double-click the 3D Extrude & Bevel effect in the Appearance palette (Window>Appearance), and click Map Art. Choose the correct surface in the Surface field, select your symbol from the Symbol pop-up menu, and then move the symbol into place using the Preview option to see it live.
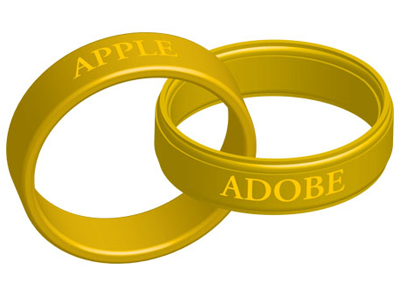
Step 8 The Final Image
Map a symbol onto the front right ring, and you're set. The result: 3D rings that interlock, all created in Adobe Illustrator CS.
Courtesy of Layers magazine.
 Rich Harris is a designer, illustrator, and teaches classes in Photoshop and Illustrator to teenagers for Saturday Academy and to graphic design students at Mt. Hood Community. He also plays a mean jazz trumpet, and can be reached at