
I'm going to learn you how to make a nice effect to your text here. Instead of your old boring text we're going to make it look like flames.
1. Make a new picture in the size you want it. I've choosen a 400*100 pixels picture here. Make the picture in Greyscale. Make a new layer by pressing "Shift+Ctrl+N"
2. Write your text with a heavy font rasterize the layer by rightclicking at the layer and choose "Rasterize"
3. Go to "Filter - Disort - Ripple" and choose 100% for amount and use medium size.
4. Go to "Image - Flatten Image" and then "Image - Adjustmenst - Invert".
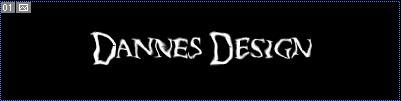
5. Yoyr picture should look like this now.
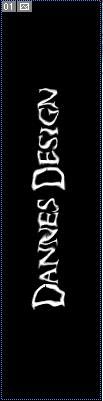
6. Go to "Image - Rotate Canvas - 90 CCW" and your picture looks like this.
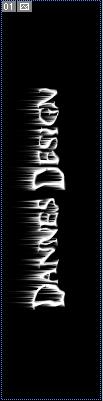
7. Then go "Filter - Stylize - Wind" and choose "Wind from right" and your picture will look like this.
8. Go to "Filter - Disort - Ripple" and choose 50% for amount and medium size. Then rotate the image back by clicking at "Image - Rotate Canvas - 90 CW". You'll get this.
9. Now on last thing to do. Go to "Image - Mode - Indexed Color" and go to "Image - Mode - Color Table" and choose "Black Body"
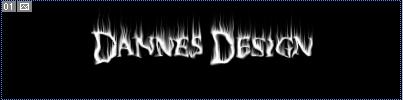
10. Now we're finished with the text! It'll look like this is you made it right.
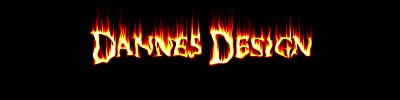
Congratulations! You've now made your own flaming text.