

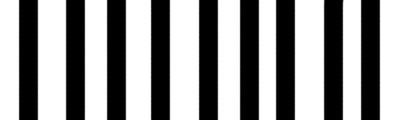
Open your photoshop and create a new document . You can choose any size you wish.
Now grab your Pencil tool and start drawing like this :
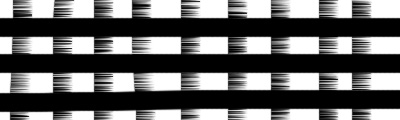
Go to Filter>Stylize>Wind and use default settings.
Ctrl + F to apply Wind filter again.
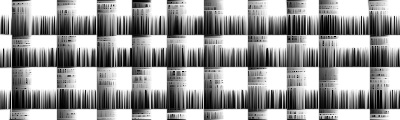
Draw another lines like this :
Go to Image > Rotate Canvas > 90 CW.
Then press Ctrl+F twice.
Now it looks like a mesh.
Go to Image > Rotate Canvas > 90 CCW to revert back.
You will get something like this:
Press Ctrl + J duplicate layer.
Go to Filter > Distort > Wave, Wrap Around option checked.
Click randomize a few times.
Set the Blending Mode to Darken
Ctrl + E to merge layers.
Ctrl + J again to duplicate and go to Filter > Distort > Waves.
Click on randomize a few times.
Go to Filter > Stylize > Wind with default settings..
Ctrl + E to merge the layers, then Ctrl + J to create new layer.
Filter > Distort > Wave, randomize.
Change Blending Mode to Darken.
Ctrl + E to merge the layers, then Ctrl + J to create new layer.
Filter > Distort > Wave, randomize.
Filter > Stylize > Wind with default settings.
Change Blending Mode to Darken.
Ctrl + E to merge the layers.
Open your color balance (Ctrl+B) with the following settings:
Midtones color levels : -100 | 0 | +100
Shadow color levels : +100 | 0 | -100
Then go to Image > Adjustments > Brightness and Contrast
Slide the sliders to get a good result:
