
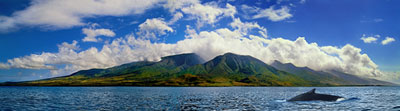
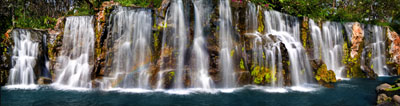
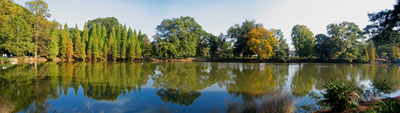
The panoramic format has always interested photographers, and with Photoshop's Photomerge automation, anyone can shoot high-resolution panoramic photos. Getting it to work smoothly, however, takes practice. With a few simple procedures on the shooting end, the composed images will work seamlessly together.
Before Photoshop's Photomerge, photographers only had the option of using specialized software programs designed for creating interactive panoramic VR to stitch images together. Photoshop can make it much easer for basic stitching projects.
The first challenge is to determine the correct exposure and white balance. Don 't use any automatic setting on your camera. If the focus, exposure, or white balance is set on auto, the camera will slightly shift the focal point, exposure, and color to reflect what it's pointing at. As you aim the camera from one area to the next, the changing exposure will make the merged images look splotchy. If you're photographing during the day, set the white balance to daylight or cloudy. For more critical color, do a custom white balance of the area you're shooting.
Handling the camera
You can hold the camera vertically for horizontal panoramas to capture more top-to-bottom height if needed. Remember, you can always make it as wide as you want by taking more photos from left to right. Each image needs to have about a one-third overlap of the scene with the next image. Overlapping too much or too little makes it harder to get seamless stitching.
When shooting, try to keep the camera as level as possible. Aligning the horizon of the scene with the centerline of the camera viewfinder will help keep the scene level. Do a practice run, looking through the camera and viewing the scene, stopping at each area to shoot. This will help you determine what's in the scene that will help as a guide to line up against. Using a tripod will give you cleaner overlapping images. The more level and even the photographs, the better the stitching.
Exposure
The proper exposure should be a balance of the brightest and darkest areas in the full subject area. For example, if the area on the far left of the scene is showing a proper exposure reading of 1/125 at f:8, and the exposure on the right side is reading 1/125 at f:11, set the camera on manual exposure at 1/125 at f:8-1/2.
If you're shooting several attempts of the same subject, shoot a blank image at the beginning and end of each run. This will make it easier to determine where to start and stop the process in Photoshop. Photomerge is not as sophisticated as high-end stitching software because it won't bend perspective with changing relationships of close-up and faraway subjects. A little trial and error in shooting will let you know what will work well and what won't.
The Photomerge dialog
Once the scenes are photographed, gather the images in a folder and view them in the Adobe Bridge (or the File Browser in Photoshop CS). Holding the Shift key, click on the first and then the last file in the sequence to select all of them. If they need to be rotated, do it now by clicking the appropriate rotate icon at the top right of the Bridge. This will make the stitching process easier to manage. From the Bridge menu bar, choose Tools>Photoshop>Photomerge (in Photoshop CS, choose Automate>Photomerge from the File Browser menu bar). The images will open in the Photomerge dialog.
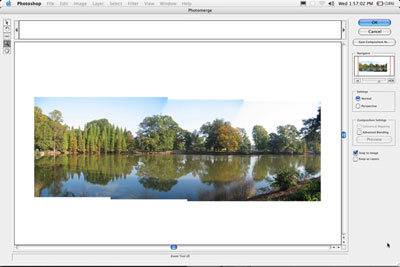
If the images are shot correctly, Photomerge will automatically arrange them for stitching. Sometimes, even though they were shot correctly, Photoshop may not be able to stitch them. When this happens, you can click on each image with the Select Image tool (A) in the Photomerge dialog and adjust them individually. Try to line up the images by looking at the overlapped areas. When the two images get close, they'll automatically snap together (as long as the Snap to Image option at the right-hand side of the dialog is checked on).
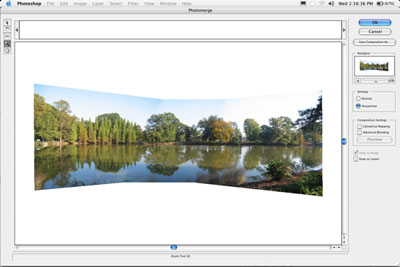
The Perspective option in the Photomerge dialog bends the panorama into an hourglass shape that can create a much better natural view of the scene. If the images aren't blending smoothly, try clicking on the Advanced Blending option. You can also keep all the images as layers so they can be adjusted if there's a problem after they've been stitched.
Back to Photoshop
Once you're happy with your panorama in the Photomerge dialog, click OK, and Photoshop will stitch the images together. In many cases, the tops and bottoms of the images may not line up perfectly so you'll have to crop those transparent areas for the final image. If there are any bad seams in the stitching, use the Healing Brush or the new CS2 Spot Healing Brush to smooth them out.
When you're finished cropping the image, you can adjust it just like any other image. But remember that panorama file sizes are much larger because you're using several images together. Many inkjet printers allow you to use a long sheet of paper in the manual tray to create longer prints. Next time you're out taking photos, try a few practice shots to get the feel of creating stitched panoramas, then you'll be ready when that special scene suddenly appears. And don't forget: Always carry your camera with you...
Courtesy of Layers magazine.
 Jim DiVitale is an Atlanta-based photographer and instructor
specializing in digital photography. His clients include Mizuno USA,
Carter’s, Genuine Part Company, IBM, TEC America, Scientific-Atlanta,
and Coca-Cola. Check out his website at
Jim DiVitale is an Atlanta-based photographer and instructor
specializing in digital photography. His clients include Mizuno USA,
Carter’s, Genuine Part Company, IBM, TEC America, Scientific-Atlanta,
and Coca-Cola. Check out his website at