Before you begin…
- The measurements given in the following tutorial are measurements at a zoom of 100%
- Guidelines are used to help you, they will not appear on the end product.
- It is suggested that you be well experienced with photoshop for over a year. If not, please see previous extreme template tutorials of lower difficulty.
Part 1: The Head
This section covers the making of the header of the template.
1. Begin with a fresh canvas, 800 by 600. Fill your whole canvas with #4e585f. Make a new layer, using the Rectangular Marquee Tool (M) select [from the top of your page] about 40% of your canvas.
2. Once you've made the select, get your gradient tool, set the gradient to 'foreground to transparent', where your foreground color should be white. Then on a new layer drag your [from the top of your select] to the end of the select. You should get some sort of shine. Now set the blending mode to overlay and duplicate the layer (ctrl+J) and then set the opacity of the duplicate to about 25%.
3. Now you can add a diagonal pattern on the whole canvas if you would like, and set it to soft light with an opacity of 10%.
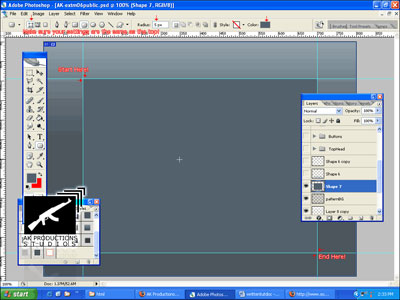
4. Next we are going to be using our guidelines. So make sure you have your ruler (ctrl+R) and also make sure the measurements are in Pixels. Now drag one guideline from 0 to 100px. The other one we will drag from 0 to 700. Please note that these measurements are according to an 800 by 600 canvas! So if you have a different sized canvas you will have to compromise and try to get the measurements similar. Basically what we are doing is the space that is in between these two guidelines is going to be the space and width of our template; we will not go and cross these guidelines.
Make sure your zoom is at 100%!
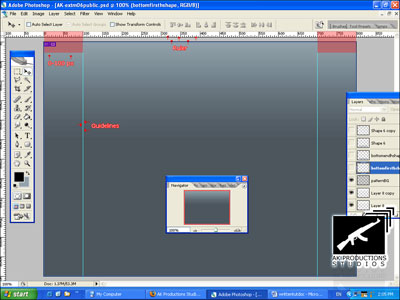
5. Once you have your vertical guidelines, we will need some horizontal ones. So drag the guidelines from the top of your canvas all the way to the 196px on your ruler. Then drag another one all the way to your 540thpx.
*Make sure your zoom is at 100%!

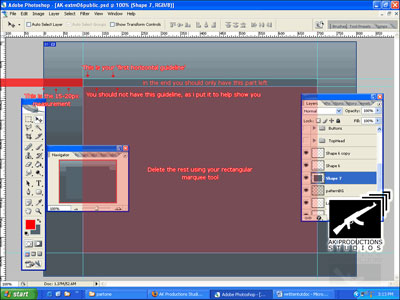
6. Next we will start creating our template. So first get your Rounded Rectangle Tool (U) set the radius to 5px, make sure 'shape layers' is set and the color should be #53616c. Now make a big rounded rectangle from the top left corner of your guidelines square [marked in red in the previous screenshot] all the way to the bottom right corner. Do NOT cross the guidelines.
7. Now we will need to delete all of it and just leave the top part. So get your rectangular marquee tool (m) and measure about 15-20px down from your first top horizontal guideline. Once you've made your measurement, select the rest of the shape except your measurement and then delete those parts.
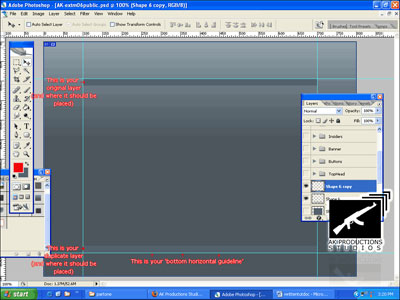
8. Once you've finished, duplicate the layer and flip it vertically, Edit > Transform > Flip Vertical. Then move the duplicate layer all the way to the bottom, so that it is placed just right above the bottom horizontal guideline.
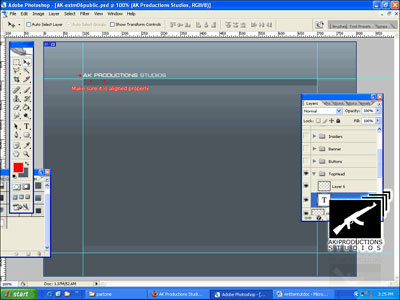
9. Next add some text on top of your first rounded rectangle shape. I used "Micra (T1)" at size 12px.