

Making retro dots with photoshop takes a long time, getting the marquee tool and cutting away and adding bits... Well, now you will learn how to do it automatically with the actions tool!
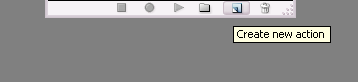
1. Open your actions window, (Windows > Actions) - and click the new action button (below) Name it "automatic retro dots" and you can have the function key as... F7 (this is just a shortcut to play it)
2. The next steps, you wont be doing again. So i will just whizz through them :) Make a new image, size 500 x 500PX with a transparent background.
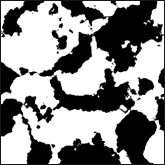
3. Press D to reset your colours, and then Filter > Render > Clouds.
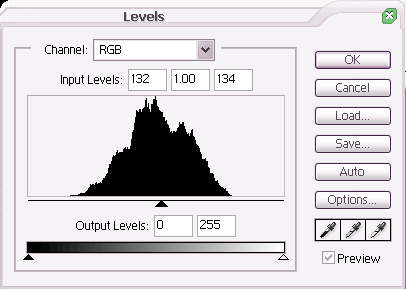
4. Ok, now click Image > Adjustments > Levels - and give it the following settings
5. Create a new layer - Layer > New > Layer - Leave it named "Layer 2". Click Filter > Render > Clouds again. And then do the Image > Adjustments > Levels with the same settings as before. Now, set the layers blending options to difference on the layers palate
6. Now, flatten the two layers by Layer > Merge down
7. Now grab your single column marquee tool - and click once in the middle of your image. Then, select > Inverse - and now hit delete. and finally select > deselect.
8. This is going to look a bit strange. Like there isn't an image, not to worry! Click Edit > Free Transform - and pull the square boxes on the middle right and middle left past the end of your image. So its completely covered.
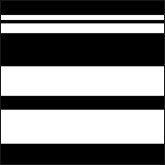
9. Now, again click Edit > Free transform - But this time, pull the middle top and the middle bottom squares in a little. So you can see through the tops and the bottoms of your images
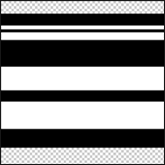
10. Now, click Select > All..... and then Edit > Cut....... and then Edit > Paste. Now, delete the bottom layer.
11. Now, click Select > Colour Range.... have the fuzziness to 100 ( Selection = Image). Click the one of the white stripes, and click ok. Now, hit delete on your keyboard.
12. Now, select > Deselect. And then, Filter > Distort > Polar Coordinates.. and you want rectangular to polar - hit ok!
13. You need to make the retro dot completely black! So, click Image > Adjustments > Hue + Saturation - and put the lightness all the way down!
14. Finally, Click Select > All..... Then Edit > Copy..... Then close your document. Now you can stop your actions!

All that's left to do, is paste your retro dot on your canvas, when you want another one.. Play the action and then click paste! Simple! Click here to download the Actions for this tutorial!