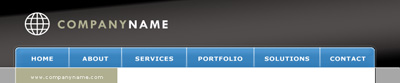
1. Start out with a new 770px wide x 160px tall image. Next create a new layer titled Black Gradient. Select the Gradient Tool, make sure Linear Gradient is selected, then double-click on the current gradient to bring up the Gradient Editor. Unless noted otherwise in the screenshot below, use #000000 for each gradient point. Then create a gradient from the top center of the image to the bottom center of the image.


2. Next create a new layer titled Gray Background and using the Rectangular Marquee Tool, create a thin selection at the bottom of the image as shown. Fill the selection with #a7a7a7.
3. Now it's time to create the navigation bar. Click on the Gray Background layer then create a new layer titled Navigation Bar. The layer should then be below the Gray Background layer. This way any excess from the navigation bar will be covered up by the background on top of it. Using the Rectangular Marquee Tool, create a selection above the gray background with a little excess space on both sides just above the gray background. Then go to Select > Modify > Smooth and enter an amount around 5px. Fill the selection in white.
4. Next right-click on the Navigation Bar layer and select Blending Options. Since there happen to be such a large number of styles used, I'm not going to make you enter all of them into Photoshop. Click here to download the style needed. Once you have downloaded the file, go back into Photoshop and import the file. To do this with Blending Options still up, click on the first item in the list on the left hand side, Styles. Then click on the little triangle button next to the OK button and select Load Styles. Find the style that was just downloaded and click Load. Then simply click on the style to use it. Your Navigation Bar should now be a blue color. If you don't want to blue, just change the color setting under Color Overlay.

5. Next create a new layer titled Left Column. Using the Rectangular Marquee Tool, create a selection as shown below and fill it in with #b0af90 or the color of your choice. Then using the Line Tool, create a white line that will act as a left side border. You can change the color of the line before creating it in the tool options bar or by clicking on the color on the layer after it is created. Next create a new layer titled Content Area. Using the Rectangular Marquee Tool, create another selection right next to the previous selection and fill it in white. Then right click on this layer and select Blending Options and add a 1px black stroke. Finally, using the Line Tool, create a line the stretches the full length of the image just above the Left Column.

6. Now it's time to add the logo and name of the business to the header. If you already have a logo, go ahead and use it. If not, use the Custom Shape Tool and use one of Photoshop's shapes until a logo is created. Then add the company name and slogan next to it.

7. Finally the navigation will be created. Since there will be such a large amount of layers used for the navigation, go ahead and create a new group titled Navigation by clicking on the new folder button at the bottom of the Layers Palette. Select the Line Tool and in the tool options bar, make sure the white is the selected color. Create a line that will serve as a divider for each of the links in the navigation bar. Then use the Blur Tool to blur the bottom end of the line so that is blends in better. Then duplicate this line as needed and add the navigation links.
That's it. You could make this into an entire layout by extending the Left Column and Content Area for the websites content. Click the image below to see the full view.