

This Adobe Photoshop tutorial will show you an easy way to make an abstract render seem as if It were being submerged into water. Photoshop is professional grade software that has quite a few useful tools that will help us in doing this such as:
- The Spot healing Brush Tool (Adobe CS2)
- Healing Brush
- The Clone Tool
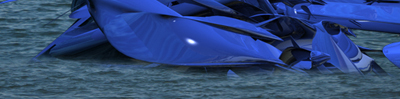
Here is an example of what we will be creating:

Versions of Adobe Photoshop prior to CS2 may be missing a few features here and there that we will be showing off, but the same result can be achieved in each version using separate tools, so do not run out and buy the newest version just yet (CS3 is already in development stages anyways, so save up for that!).
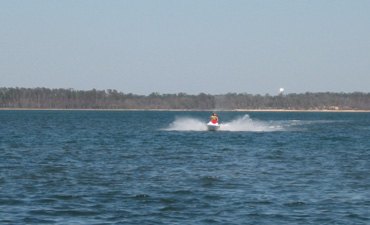
Before we dive into the tutorial, I would like to name a few things you should have prepared first. You are going to want to have a few images of water (preferably some photographs you have lying around of the ocean, a lake, or maybe the ocean). It is also important that you have some photos of Waves (clashing waves, or the white foam generated from boats are best, as they provide the most dramatic effect in my opinion. )
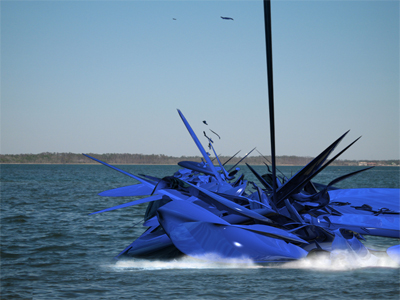
Other than that, all that you need is an abstract render (I did mine in Maxon Cinema 4D, but nearly any 3D software will do the trick), some inspiration, and the will to create something!
Lets Begin!
Step 1: Setting the Setting
Let's start with the background of our composition. I always find that by working my way from the back forward, I am able to really concentrate on the minor details better since I know what is lying in the back already.
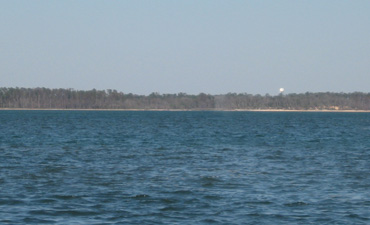
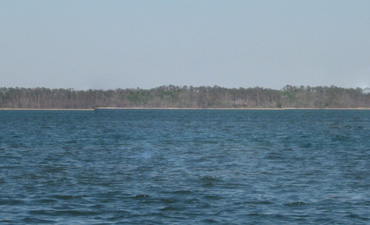
Here are some images I took at a lake nearby my house a while back:
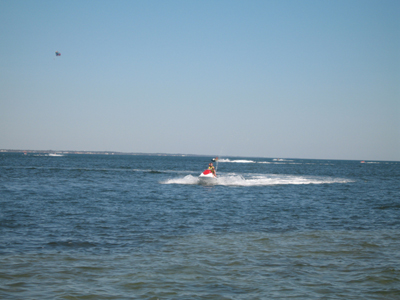
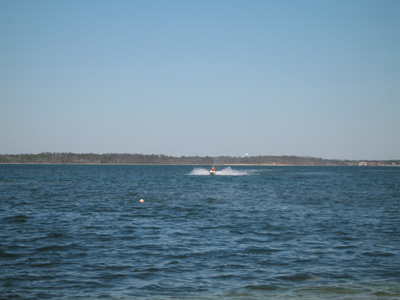

These images are all sized down for load-time purposes, and I would suggest that you use some higher res images in your work. I have selected the second image to work as my primary background since it is a picture with very little activity going on, and it will be easy to edit into a usable background.
First, we are going to remove any unwanted parts of our photo (feel free to follow right along with me by using my images for this lesson). To do this, we can use one of two tools. If you are a CS2 User, you can skip (or read if you would rather) the section about the clone tool.
The Clone Tool
Adobe CS1 Users should use the clone tool to digitally remove the jet-ski from their image. Find the Clone tool in the toolbar. Next, locate a position close to the object you are trying to remove that appears to be what the jet-skier would look like if it were not there. When you have found this area, hold alt + the left mouse button to select your source area.
In your brush settings, select a decent sized brush that will allow you to work around details, but make things easy to edit. Also, set your hardness down to a very low percentage, perhaps even 0% to help blend the clone.
Brush over the area with the unwanted object using your clone tool. Your brush will duplicate or "clone" the source area over wherever you brush. If you run out of room, simply select another source area, and repeat the process until you remove any unwanted objects from your image.
The Spot Healing Brush Tool (Adobe CS2 Users Only)
The spot healing brush tool is very similar to the clone tool in some regards, but acts more as an easy to use healing tool. Many of the healing tools in Photoshop take a few steps to create the desired effect, but the Spot Healing Brush only takes one step. It is not a perfect tool, and many people will find that they only use it in rare situations, but it can be a great help in some instances.
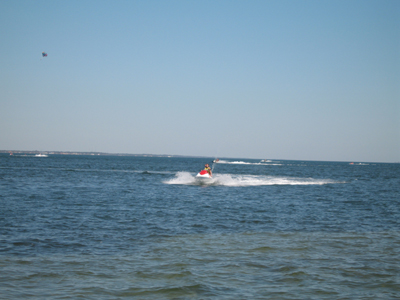
To use the Spot Healing Brush, simple draw over any unwanted areas, and it will try to "heal" those areas with surrounding spots. It basically like an automatic clone tool. Try it out on the buoy in my image:
Works like a charm, eh? However, using it on the jet-skier should be left to other tools, such as the clone tool which is explained above… Unless you want to end with results like this:
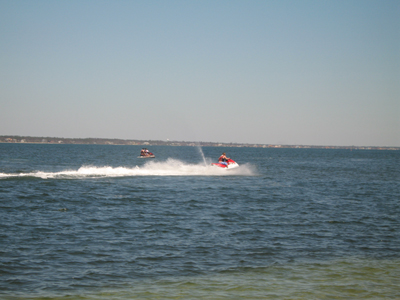
If you are really good with the spot healing brush tool, then you can probably use it in these areas. It really takes some playing around with to get used to. Try to completely surround the object with the healing brush, and with the right playing around, you can come up with results such as:
I would still personally use the clone tool in this situation since the shore and sky still seem to get a little messed up here, but in the end it is your decision that counts.
Step 2: Inserting the Abstract
Alright, so the background space is set up pretty much the way we want it. Now we need to insert the abstract and make it appear as if it is sinking into the water. If you want to tag along with me, go ahead and use the same render I am using (created in Cinema 4D, which you can find some nice tutorials on here at GreyCobra at our Cinema 4D Tutorials Section).
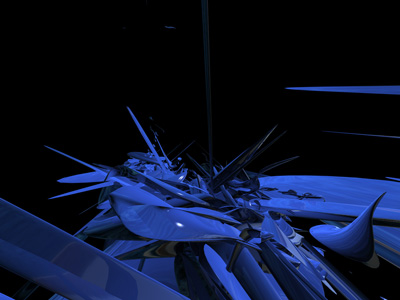
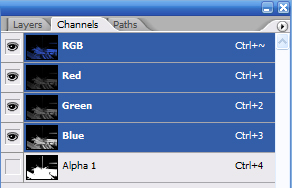
I actually rendered this abstract with the same image I used as the background as the sky, so the reflections kind of go well with the image we are working with. I also rendered this with an alpha channel which will make cutting it out and placing into our document a breeze.
Go into the channels tab (located near the layers tab) of Photoshop, and select the alpha channel (hold Ctrl + left mouse button). Copy this, and paste it into your other document.
Make your object a bit smaller (Ctrl + T to transform, then hold shift while dragging a corner box inward), and move it towards the center of your document if needed.

You may need to remove a few bits of your render here and there to make things seem a bit more believable (even though its abstract, a little polish can go a long ways). Use the selection tools to remove anything unwanted.
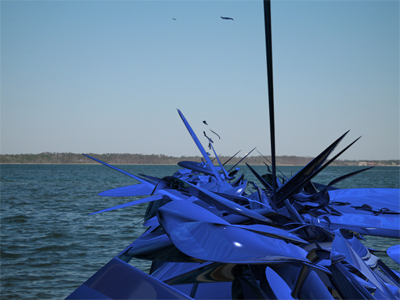
That is essentially all that is necessary for this step. The next thing we will work on Is the submerge effect.
Step 3: Creating the Submerge Effect
Have you ever watched someone cannonball into the pool, launching water several feet into the air? This effect in essence is the same thing as what you have witnessed, except our splash will be digitally created.
Remember those photos all the way back on page one? The splashes and white foam created by your object (in this case, a jet-ski) are going to be used as waves caused by our abstract object. We will be using the clone tool and some blending effects to make things seem a bit more real.
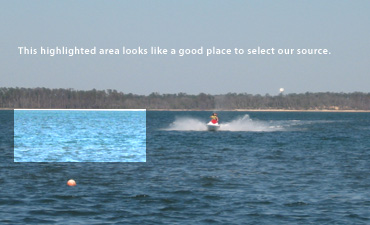
First think about where you want the effect to take place. Start by selecting a source area in one of your photographs, and then outlining the area where your abstract will "sink" with some water (Note: Do this on a new layer to keep things easy to edit if needed later):
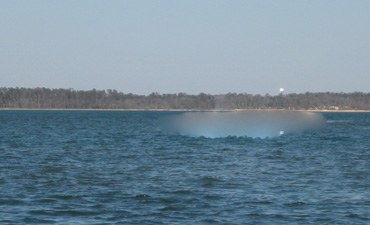
Once this is complete, start selecting source areas of waves generated by the jet-ski (or whatever you have a photograph of), and build a white foamy area around the abstract.
Set these wave layers to Luminosity. I usually finds that this give a more realistic effect since the colors of the waves tend to vary depending on lighting and location (it might not be the same case for you). You may even want to go back with an eraser to make any corrections you may see necessary.
For an even more dramatic effect, try playing around with the contrast, and levels to create a cool atmosphere effect.

Good Luck!