Step One
Open a new document using the size 100px by 20px and fill it with white.
Step Two
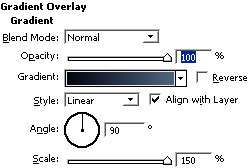
Now go to Layer>Layer Style>Gradient Overlay and click on the gradient bar and use the setting below.

Step Three
Once you done with it, click OK and use the following settings for the Gradient Overlay
Step Four
Now click Satin and use the following settings,
Blend Mode: Normal
Opacity: 20%
Angle: 179
Distance: 1px
Size: 7px
Step Five
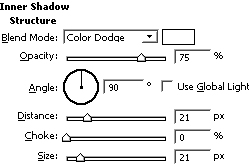
Then, click Inner Shadow and use the below settings,
Step Six
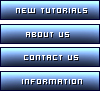
Now for the final step, click Stroke and use Size: 1px; Position: Inside; Color: #000033 and leave the rest settings as they are. You have your button now! But wait, you didn't do the text part yet.
![]()
Final Step
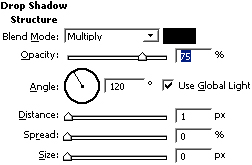
In this step I will add text to the button. I will use the font hooge 05_56 for this example. (You may download the font from here) Now type up anything using the color white and go to Layer>Layer Style>Drop Shadow and use the settings below to give your text pixel shadow effect.
Here is what I came up with,