Demon Portrait Retouch Tutorial

Step 1: Removing the hair
The model stock photo we will use as a base for this tutorial can be downloaded here.

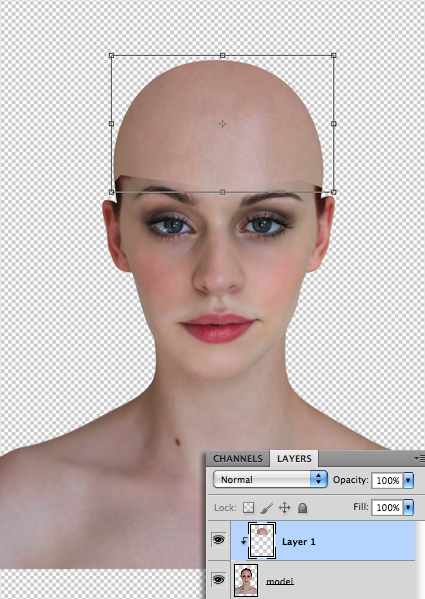
Use the Pen Tool to draw around the edge of the model.
Ignore the shape of the hair, and just round off the top of the head in line with where the scalp would be.
When you're done, use the Direct Selection Tool to right click, and choose Make Selection.
Invert the selection, and delete the background.

Next make a selection across the forehead using the Polygonal Lasso Tool.
Copy and paste the selection into a new layer with a clipping mask, then use the transform tool to stretch the area over the top of the head.
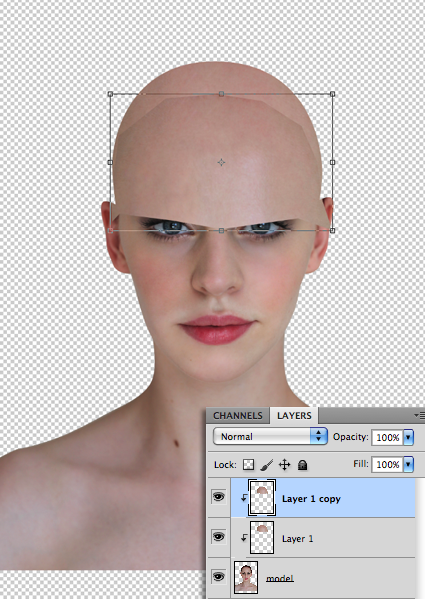
Use an additional selection of skin to cover the areas around the ears, so all of the hair is completely covered.
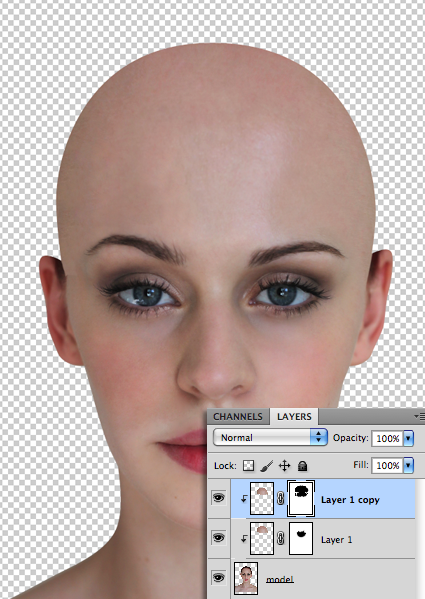
Using layer masks and a soft black brush, mask out the hard edges of the skin layers, blending them into the original layer.

use the Polygonal Lasso Tool to make a selection around the left ear, copy and paste it into a new layer. Then use the Move Tool enlarge and rotate it a little, and move it inwards to hide the hair that overlaps the ear.
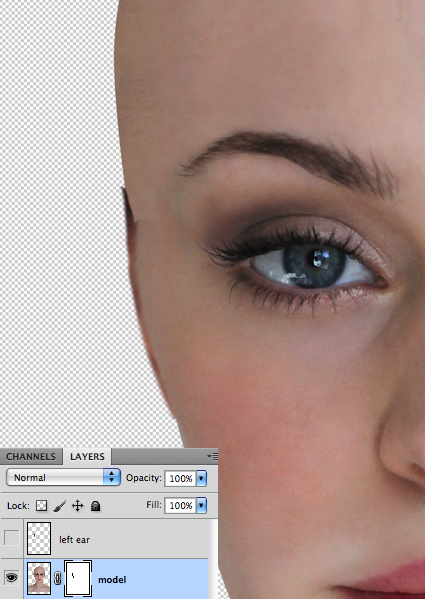
Back in the model layer, use a layer mask, and a black brush to mask out the original ear.
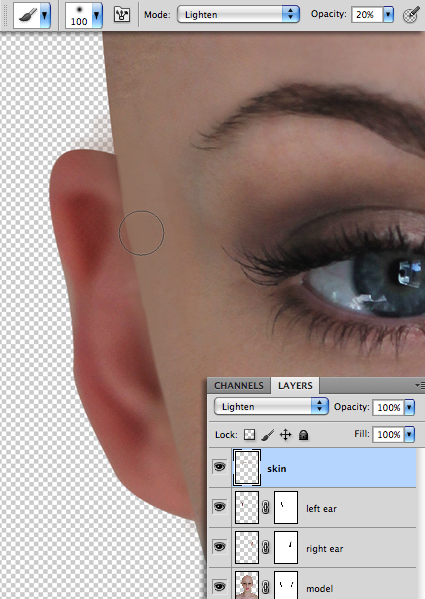
Once you've done the same for the right ear, make a new layer and set it's blending mode to Lighten.
Use the colour picker to find a suitable skin colour, then take a soft brush set to Lighten at 20% opacity and paint over any areas of shadow or unnatural colours.
Step 2: Removing the eyebrows

Back in the model layer, use the Lasso Tool to make a selection over the left eyebrow, the go to Edit > Fill, and choose Content Aware.

You may need make aditional selections over parts that the content aware fill didn't quite remove.
Once you have erased both eyebrows as best as you can, return to the skin layer that you've just used for the ears.

Using a soft brush with a colour similar to the area around the eyebrows, paint a few times over each eyebrow to even out the skin colour.
Step 3: Blackening the eyes

You can now group all the layers together, then make a new layer called 'left eye'.
Use the Pen Tool to draw around the left eye, turn it into a selection and fill it with white.

Double click on the layer to bring up the Layer Styles box.
Choose Outer Glow, set it to Linear Light at 30%, use black and set the Size to 25 pixels.

Choose Inner Glow, set to Normal, black, and set the Size to 90.

And finally choose Color Overlay and set the colour to a very dark grey (#303030).
Click OK.

Repeat exactly the same process for the right eye in a new layer.
Next we'll create two new layers for the shine on each eye.

First, with the 'right eye' layer selected, cmd or crtl click on the layer thumbnail to make a selection of the eye.
Back in the 'model' layer, copy and then paste the selection into a new layer called 'right eye shine'.

Go to Image > Adjustments > Levels.
Use the sliders to darken the eye as much as possible without losing the shiny areas.

Now, with a small black brush, paint over the whites of the eye, leaving only the eye shine visible.

Finally, change the layer's blending mode to Screen.

Repeat exactly the same process to add the shine to the left eye.
Now save the file to your desktop as a PSD, and close it.
Step 4: Creating the background
We'll now move into a new document where we'll create the background, and add the final touches.

Create a new 1900 x 3000 px document.

Click on the Adjustment Layer button at the bottom of the layers panel, and choose Gradient.
Use a black to white Radial gradient.
Take the Gradient layer's Opacity down to 20%.

Drag your PSD into your new document, and position it at the bottom of the image.
Step 5: Bleaching the skin

Add a Hue/Saturation adjustment layer, and right click on it choosing Create Clipping Mask.
Take the saturation down to -80.

Add a Levels adjustment layer, and adjust the sliders as I have above to lighten the skin.

Now in the Levels 1 layer mask, take a large soft black brush, and mask out the area from the base of the nose downwards.
Step 6: Darkening the skin

Add another Levels layer with a clipping mask, and with its layer mask selected, go to Image > Apply Image...
In the Layer field choose Levels 1, for the Channel select Layer Mask, and tick the Invert box.
Click OK.

The adjustments we make to the Levels layer will now only affect the lower part of the image.
Now adjust the sliders as I have above to darken the skin.

Add a Hue/Saturation adjustment Layer with a clipping mask, and take the saturation down to -100.
Apply the inverted layer mask like you did for the Levels 2 layer.

Finally, back in the Levels 2 layer mask, take a small soft white brush with the Opacity set to 10%, and paint over the lips a few times to gradually darken them.
Step 7: Adding the eye shadow
Add a new layer above all the others, and call it 'left eye'.

With the Pen Tool, click to add a point in the corner of the left eye closest to the nose, the drag up and across then release. Add another point a little above the eye, drag in the direction of the curve and release.
Repeat this copying the shape in my example above, and when you get to the side of the head, alt click on that point to stop the next point from making a curve, then continue as normal until you meet up with the first point again.
You can use the Direct Selection Tool to alter the points if you need to.

When you're finished, right click with the Direct Selection Tool and choose Fill Path, then select Black, to fill the shape with black.
Go to Filter > Blur > Gaussian Blur, and set the Radius to 25px.

Now you can right click with the Direct Selection Tool and choose Delete Path.

Duplicate the layer then go to Edit > Transform > Flip Horizontal.
Position the duplicated layer over the right eye with the Move Tool.

For each eye take the Eraser Tool and erase the shadow where it overlaps the eye.

Finally duplicate the shadow layer for each eye, so you have two shadow layers for each eye.
For the top right eye layer, set the blending mode to Overlay, and for the bottom one set the blending mode to Normal, and take the Opacity down to 30%.
Do the same for the left eye shadow layers.
Step 8: Adding the horns
To add the horns we'll be using a stock photo that can be downloaded here.
With the photo open in Photoshop, use the Quick Selection Tool to make a selection over each of the horns, and copy/paste them into your project.

Resize and position them as I have above.

Merge both antler layers together, then duplicate the layer.
With the duplicated layer selected, go to Edit > Transform > Flip Vertical, then use the Move Tool to line up the base of the antlers with the ones below.
Go to Image > Adjustments > Threshold and take the slider all the way to the right to blacken the antlers.

Move the 'antlers shadow' layer below the 'antlers' layer, then apply a Gaussian Blur set to 50px.
Move the antlers shadow layer down below all the eye shadow layers, and give it a clipping mask.

Duplicate the layer and give the copy a clipping mask as well.
Set the lower shadow layer's blending mode to Overlay, and set the top one to Normal at 50% opacity.
In the copy layer, use an eraser to erase the shadow from the ears and lower down the face, leaving the shadow only in the immediate area of the base of the antlers.

Finally in a new layer above the antler shadow layers, take a large soft black brush, then paint carefully around the edge of the base of the antlers to create a small shadow.
Set the layer's blending mode to Overlay, then duplicate it and set the copy's blending mode to Normal at 50% opacity.
The Final Outcome
And here's how your authentic holographic lady will end up looking.
Please leave a comment and use the share buttons below.
Thanks for reading :)
Copyright © . All Rights Reserved