Selection tools
Mastering selections is undoubtedly one of the most essential and powerful aspects of Photoshop. Below are some extremely useful (and not very well-known) selection techniques: once you learn them, you will wonder how you ever got by without them!
Here are a couple of notes before you begin:
- I tend to prefer hotkeys (e.g. [Ctrl+D] ), but I have provided equivalent alternatives (e.g. Select > Deselect - which denotes a menu command) wherever possible
- Mac users: Ctrl =


Moving Selections (While Creating Them)
Did you know that you can move a selection even while you are in the process of creating it? The technique illustrated below is invaluable for creating precise shape selections.
- Use the Elliptical Marquee tool [M] (use [Shift+M] to cycle) to draw an approximate selection (and hold the Shift key down as well to maintain a perfect circle). Don't worry about where you start the selection
- With the left mouse button (and Shift key) held down, hold the Space Bar and (use the mouse to) position the selection over the desired region
- Let go of the Space Bar (but not the mouse button or the Shift key) and continue sizing the selection to encompass the region of interest
- Repeat Steps 2 - 3 until the entire object is contained within the selection (without ever letting go of the left mouse button and Shift key)
- Finally, let go of the mouse button (and the Shift key)

Note: Even though this tip uses the Elliptical Marquee tool, it works for all of the rest of the Marquee tools [Shift+M].
Intersecting Selections
You probably knew that you could add to the current selection by holding down the Shift key, and subtract from the current selection by using the Alt key. But, did you know that you could intersect selections by using both the Shift and Alt keys together?
There are several applications for this very useful technique, but for the purposes of this example, we will keep it simple. After all, the point here is to learn, not to confuse you ;-).
- Use the Elliptical Marquee tool [M] (use [Shift+M] to cycle) to draw a horizontal oval (then let go of the mouse button)
- Now, with both the Shift and Alt keys held down, draw a vertical oval which intersects with the first selection (sort of like a rounded plus sign)
- Let go of the mouse button (first), then the Shift and Alt keys. You should be left with the portion of your selection which both ovals had in common - a kind of picture tube shape (or television screen)

Here are a couple of great applications for this useful technique:
- Try creating two overlapping shapes on two separate layers. Ctrl-click one of the layers (via its thumbnail in the Layers palette [F7] (Window > Show Layers), to load its transparency mask); then Ctrl+Alt+Shift-click on the other layer. You will end up with a selection which represents the intersection of the two layers
- Assume you have a layer containing many objects, like a type layer containing lots of words, and you want to isolate a single word. Ctrl-click on the type layer, but instead of subtracting all the words you don't want in your selection, use an intersecting selection to choose only the word you do want
Selections by Subtraction
This selection tip is unique in that it is a somewhat "backward" way of isolating an object: however, not only is it quick and easy, but it also works great on complex objects (provided that they appear on a relatively consistent color background). To illustrate this technique, we will use the smiley-face from the first tip (above), simply because it's so darn adorable ;-).
- Use the Rectangular Marquee tool [M] (use [Shift+M] to cycle) to draw a selection which is well outside the boundaries of the object you wish to isolate
- Choose the Magic Wand tool [W] and press Enter (Return) to display the Options palette (Window > Show Options). Confirm these settings: Tolerance = 0, Anti-aliased = On, Use All layers = On, Contiguous = On. Now, with the Alt key held down (subtraction mode), click on the background - inside of your selection, but outside of your object
- Float the selection onto a separate layer [Ctrl+J] (Layer > New > Layer Via Copy)

If the results are not as good as you had hoped for, try playing with the Tolerance value (particularly if your background is not a uniform color), or turn the Anti-aliased option on / off. With the right combination (and a little practice), you can quickly and easily pick a complex object off of a purple background and use it on a yellow one!
Centering with Selections
Here is another really easy selection tip which can be very useful. Let's say that you have copied an image to the clipboard and you want to center in a specific place on your canvas. The following simple steps explain how this can be accomplished using selections.
- Copy some pixels (from any image) to the clipboard using the Copy command [Ctrl+C] (Edit > Copy)
- Use the Marquee tool [M] (use [Shift+M] to cycle) to draw a selection
- Select Paste [Ctrl+V] (Edit > Paste). The contents of the clipboard will be pasted into the center of the selection (even if the image to be pasted is larger than the selection)

Here are some more really great application for this simple technique:
- Let's say you have an image that contains a television screen or computer monitor (on its own layer). To center the contents of the clipboard onto the screen, simply Ctrl-click on the screen's layer (via its thumbnail in the Layers palette - to load its transparency mask), and select Paste [Ctrl+V] (Edit > Paste)
- To have an image pasted into the center of the entire canvas, press Ctrl+A (Select > All) to select the entire canvas, followed by Ctrl+V (Edit > Paste)
As stated in the first Selection Tools tutorial, mastering selections is undoubtedly one of the most essential and powerful aspects of Photoshop. Below are some more extremely useful (and not very well-known) selection techniques: once you learn them, you will wonder how you ever got by without them.
Here are a couple of notes before you begin:
- I tend to prefer hotkeys (e.g. [Ctrl+D] ), but I have provided equivalent alternatives (e.g. Select > Deselect - which denotes a menu command) wherever possible
- Mac users: Ctrl =


Contract All
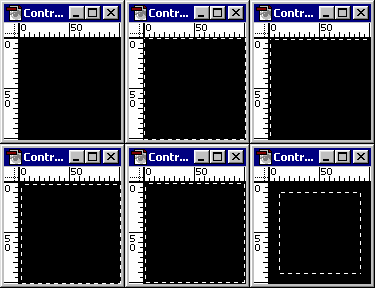
While the selection tools in Photoshop are extremely powerful, there is one thing which really irritates me: if you select the entire canvas via Select All [Ctrl+A] (Select > Select All), the Contract (Select > Modify > Contract) command is disabled (for whatever reason)! One way to get around this annoyance is to do the following:- Select All [Ctrl+A] (Select > Select All)
- Move the selection down one pixel and right one pixel (using the arrow keys next to the keypad)
- Contract (Select > Modify > Contract) the selection by one pixel
- Move the selection up and left one pixel. You should now have a selection which is one pixel away from the canvas edge on all sides
- Contract (Select > Modify > Contract) the selection by one less than the amount you originally required (i.e. if you originally wanted to contract by 10 pixels, enter 9 since the selection has already been contracted by one)

Polygonal / Freehand Lasso
Here is another useful selection secret: you may alternate between the Polygonal and Freehand Lasso tools [L] (or vice versa), while you are in the middle of creating a selection, by holding down the Alt key.

Favouring Colors
Indexing an image can be tough business. You often have to play with all available settings to achieve satisfactory results - and sometimes that may not even be enough. For example, when indexing an image containing a high color count (or when trying to force an image to use less than 256 colors for the sake of file size), bad dithering patterns / colors may result. So, what does all this have to do with selections? Well, if you use (any of) the selection tools to select / isolate problematic colors, Photoshop will favour / consider these colors while choosing the palette.

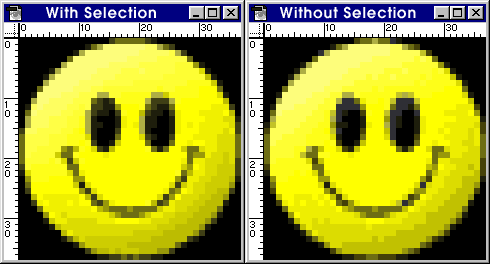
For example, the Happy Face (shown here at 600% size) was indexed to 16 colors, and while the results are not bad ("Without Selection"), we can do better. Photoshop appears to allocate an equal number of colors to both the highlights and shadows, but since the shadows have a higher contrast, we should try to allocate more colors to this area. In this case, I used the Freehand Lasso tool [L] to select a region of pixels from the shadowed area, and then reindexed the image (using the exact same settings). Although the results are not astounding (after all, it is only a 16 color image), I think the image does look better ("With Selection").
Transforming a Selection
Photoshop has always allowed you to transform a selection which contains pixels, however, version 5 introduced the ability to transform the selection outline itself (independent of any pixels within the marquee). But, regardless of whether you are transforming a selection or pixels, you should familiarize yourself with the following:
- Shift-drag a bounding box node to do uniform deformations (i.e. to maintain aspect)
- Alt-drag bounding box nodes for proportional transformations (i.e. transform from the center)
- Ctrl-drag nodes to skew / shear the selection (i.e. perspective deformation)
- Drag the mouse inside the transform bounding box to move the selection (use the Shift key to move along 45? lines)
- Drag the mouse outside the transform bounding box to rotate the selection (use the Shift key to rotate in 15? increments)
Tip: Try using combinations of the above keys (e.g. the example below uses Ctrl+Alt+Shift-drag on a node to do a proportional, uniform, perspective deformation - you might need a third hand for that one ;-).
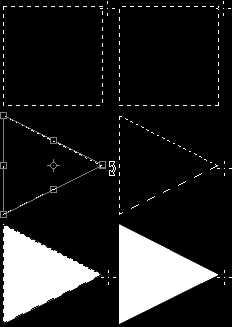
As an example, let's transform a selection to create a triangle (a frequently asked question among new Photoshop users):
- Use the Rectangular Marquee tool [M] to draw a square selection (by holding down the Shift key)
- Right-click on the selection and select Transform Selection (Select > Transform Selection)
- Ctrl+Alt+Shift-drag the top-right node down toward the center-right node (to do a proportional, uniform, perspective deformation). Press Enter / Return to accept the transform
- You should now have a triangular selection. Fill [Alt+Backspace] (Edit > Fill) the selection
- Drop [Ctrl+D] (Select > Deselect) the selection

Note: While this technique is a quick (but not always precise - the perspective transform is a little buggy) way to create a triangle, there are many other ways to accomplish similar results.
Copyright © . All Rights Reserved