Draw a small circle (use the Ellipse Tool and hold shift while drawing to create a circle)

Go to "Effect > Distort & Transform > Transform" and enter the following settings. Adjust the vertical move setting if needed so you have a little space between your circles:
Repeat step 2 using these values to repeat your circles horizontally (you will get a prompt asking if you want to apply a new effect, which you do, so click "Apply New Effect").
For this result:
Right now your object is just one circle with 2 effects applied to it. To turn this into a group of selectable and editable circles, go to "Object > Expand Appearance." Once you do this, your image should look like below:
Copy your circles group by pressing ctrl+c, then hide it by clicking the eye next to the group in the Layers window. Press ctrl+f to paste a copy on top of the old group in the exact same place (the reason for this is because you will use the hidden group later).
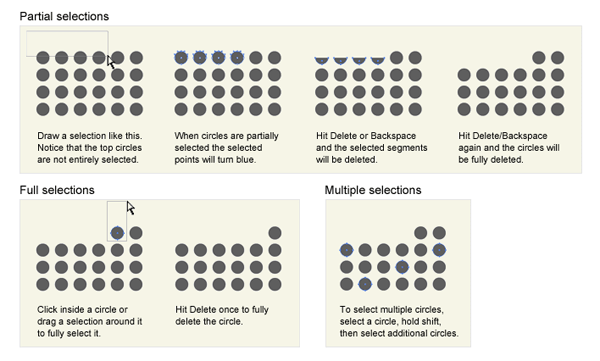
Now you will use the Direct Selection Tool (white filled cursor in the toolbar) to select and delete circles to create text. Here are some tips on using the Direct Selection Tool:
Select and delete circles until your "text" is formed. Give the text a different color fill (I used a darker grey)

Show the bottom circles group you hid earlier (click the eye area again).
Draw a black rounded rectangle around all circles. Move the rounded rectangle below all other objects by going to "Object > Arrange > Send to Back."
Click your text object with the Selection Tool (black filled cursor) and apply a gradient fill and 1pt stroke. Add an Outer Glow (Effect > Stylize > Outer Glow) to give the look of LED bulbs. Use colors similar to the ones shown:
Now you have a basic LED display. Adjust the fill of each group if necessary.
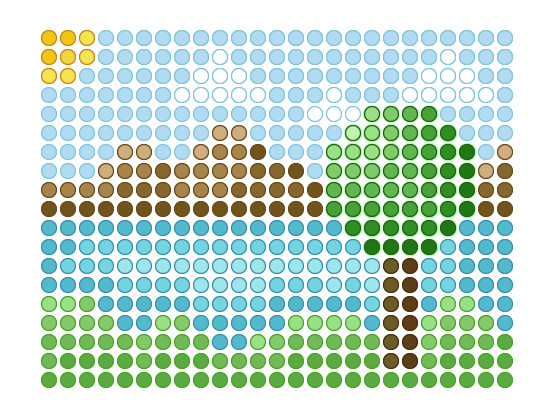
This technique can also be used to create mosaic style images. Next you will create a basic landscape using the Lasso Tool. Use the Lasso Tool like the Direct Selection Tool by dragging around circles to select them (clicking will not select a circle, though). Here's a preview of what you'll be creating:
Create a grid of circles. Select all of the circles and give them a fill and a 1pt inner stroke (bring up the Stroke window and click the option shown below). The stroke and fill color do not matter yet.
Here's what you should have:
Draw a selection with the Lasso Tool to make some hills.
Give the hills a green fill and darker green stroke. Group the hills by pressing ctrl+g.
Using the Selection Tool, double click the hills group to go into isolation mode. The rest of the image will appear lighter while in isolation mode. Now you can select the hills without selecting anything else. Draw a selection similar to the one below using the Lasso Tool:
Fill the selected circles a slightly lighter shade of green. The idea is to add a little shading to the hills.
Select more circles and give them an even lighter shade of green.
Here's the final look for your hills. Double click any blank area on your artboard to exit isolation mode.
Use the same method to create the rest of your landscape. Remember to group each section of the image and use isolation mode (hint: you can also use isolation mode on the group of circles that have not been colored yet). I made the tree next, then the water, mountains, sky, clouds and sun.
I experimented some more and came up with a 3d look. To do this, I used Effects > 3D > Extrude & Bevel with the default settings then modified/copied each object and moved them around until everything lined up. Then I tweaked the Levels in Photoshop to polish the final result. I wanted to share the process but I couldn't figure out a clear way to explain it and Illustrator was starting to get extremely slow. If you have a fast computer or a high tolerance for pain, go for it (feel free to contact me or drop a comment here if you need help).