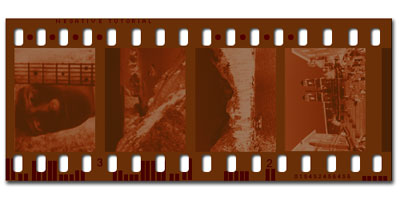
How to create a realistic film strip.
Open a new document 500 x 250, and fill background with white.
Create a new level, name it "base" and with rectangular selection tool (
![]() ) draw a rectangle a little small than the working area .
) draw a rectangle a little small than the working area .
Fill the rectangle with #692F07.
Right click on the level "base" and select "Blending Options", select "Drop Shadow" and set:
Distance: 3
Spread: 23
Size: 6

Create a new level, name it "holes" and with the Rounded Rectangle Tool (
![]() ) draw a little white (#ffffff) rectangle in the bottom of the "base" rectangle.
) draw a little white (#ffffff) rectangle in the bottom of the "base" rectangle.
Open the "Blending Options" panel and set a "Drop Shadow":
Distance: 1
Choke: 0
Size: 5

Holding Ctrl+alt and left mouse key, duplicate the "holes" layer as time as you need to fill all the film strip.
And now the photos.
Import an image on the stage, rotate it 90°ccw (Edit - transform - rotate 90°CCW) and resize it till it stay between the two "holes" lines.
Repeat this step for all yours images.
Now merge all the photo's layer pressing Ctrl-E.
Now we'll transform the photos in negative.
Open the "blending options" panel, select "Color Overlay" and set #6C3108 as color with 65% of opacity.
Now: "Image - Adjustments - Desaturate".
Then: "Image - Adjustments - Negative".
And in the end "Image - Adjustments - Hue and Saturation", check the colorize box and click ok.
And now we'll integrate the image with the rest of the image.
Go on "Image - Adjustments - Color Balance" and set:
Midtones: -36 -100 -100
Lights: -36 -100 -100
Shadows: No modify.
Well done!. Our film strip it's now finished, just add some particulars. Here is mine.