Step1: Creating the navigation bar and adding Blending Options.
Ok, let us get started. Create a new image using the dimension 800 x 600. Set the background color to white. Create a new layer, Layer > New > Layer... (Shift+Ctrl+N). Using the Rounded Rectangle Tool
![]() create a rounded rectangle using the dimensions below. Change the foreground color to #dcdcdc
create a rounded rectangle using the dimensions below. Change the foreground color to #dcdcdc
![]()
Create the rounded rectangle shown below.
![]()
Adding Blending Options.
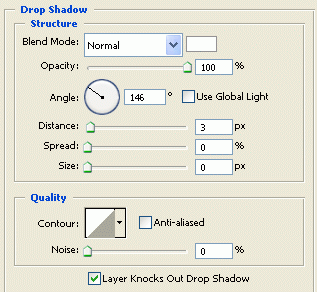
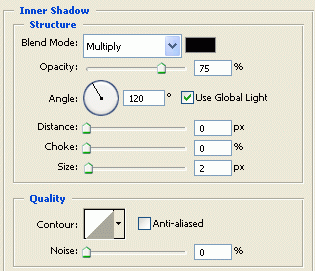
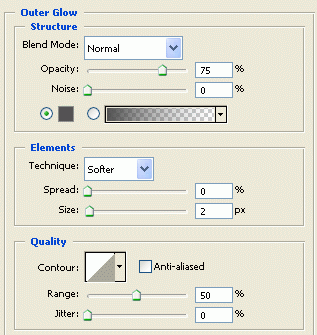
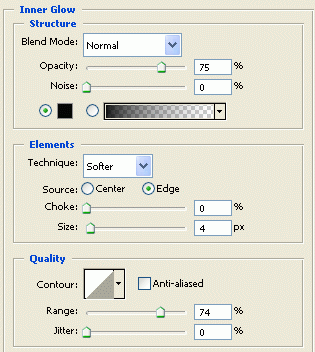
Right click on the layer you have just created and click Blending Options and add the settings shown below.
Drop Shadow
Inner Shadow
Outer Glow
Inner Glow
Gradient Overlay
Gradient Overlay (color)

Before clicking ok, Click on the New Style Button
![]() to save the style, then click ok to add the style when you are finished.
to save the style, then click ok to add the style when you are finished.
Step2: Creating the buttons.
Create a new layer, Layer > New > Layer... (Shift+Ctrl+N). Using the Rounded Rectangle Tool
![]() create a rounded rectangle using the dimensions below. Change the foreground color to #afcc36
create a rounded rectangle using the dimensions below. Change the foreground color to #afcc36
![]()
Create the rounded rectangle shown below.
![]()
Right click on the layer your just created, click Blending Options, and add the settings below. The setting is the same as the Blending Options used the main navigation bar in the first step. The Only difference is the gradient color.
Drop Shadow
Inner Shadow
Outer Glow
Inner Glow
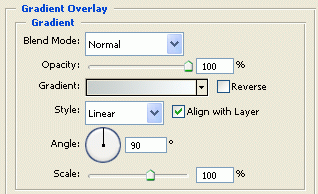
Gradient Overlay
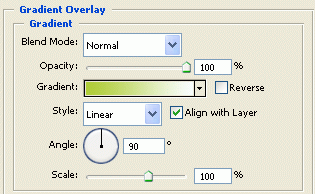
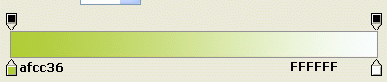
Gradient Overlay (gradient)
Tip: Changing the gradient color ( the green color ) will change the color of the button.
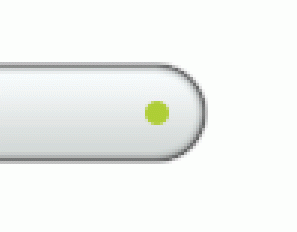
When you are finished click ok to add the setting. With that you should have the effect below.
![]()
Step3: Creating the holes at the end of the navigation bar.
Create a new layer, Layer > New > Layer... (Shift+Ctrl+N). Using the Rounded Rectangle Tool
![]() create a rounded rectangle using the dimensions below. Change the foreground color to #afcc36
create a rounded rectangle using the dimensions below. Change the foreground color to #afcc36
![]()
Hold shift and create a circle as shown below.
Right click on the layer you have just created and click Blending Options and add the settings shown below.
Drop Shadow
Inner Shadow
Outer Glow
Inner Glow
Gradient Overlay
Gradient Overlay (color)
Click ok, to add the setting when you are finished.
With that setting added your navigation bar should look like the image below.
![]()
Finished:
That is it, hope it came out to what you expected.