Turn basically anything into gold!
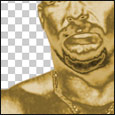
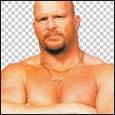
1. Open your image, we used a picutre of stone cold from the WWE
2. Cut out your person
3. Click Image > adjust > hue/saturation - and drag the saturation bar all the way to the left. On the layers palate, click the "create new fill or adjustment layer" the one that looks like 1/2 a circle coloured in, and click Curves
4. Play around with the curces, so you make a kind of "stair" shape (see image)

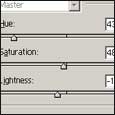
5. Now, with the create new fill or adjustment layer, and click Hue/Saturation - check the colourise button, Hue - 43, saturation - 48, and lightness -13
6. Now click back on the origonal layer on the layers palate, which should be the bottom one. and click Filter > Blue > Guassian blur - and give a setting of 0.4