Here you will be taught a simple way of avoiding the tedious task of complex mask selections or complex lasso'ing.
Beware: Though this technique is very effective for quickies and color clashing images, it is hardly ever useful for a high quality chop, but it is good to learn the technique.
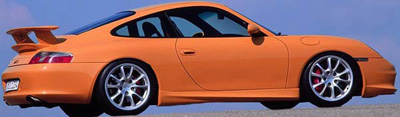
1. Open the picture that we are gonna mess with. Below, I have opened this picture because the yellow is very defined; really sticks out from the background.

2. While this layer is selected got to "Image>adjustments>hue/saturation"
3. This dialog box will pop up. Near the top there will be a drop down menu, from this menu chose whatever is closest to the color of your car picture. Since my image is bright yellow, I will chose the "Yellows" Family.
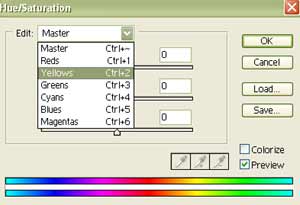
4. Now change the sliders on Hue and Saturation to change the apperance of the paint on your car. Make sure you are careful not to move the saturation to far past the middle marker, because it becomes un-realistic. When your happy with the outcome, click OK.
Here is an example of why this technique can't always be utilized for a high quality chop. You are limited to only certain Colors, within a somewhat close range of the original images color, most of the time when you go beyond this color family, your image will turn into something like this
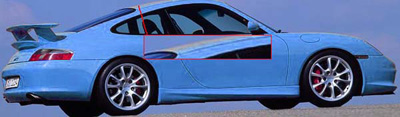
Here is what I have done to the image: