


Photoshop 6 provides many texture/pattern sets, but these may not provide the realism you are looking for in your work, so we are going to look at creating and saving your own textures for application to your design projects. Plus we will make something cool to boot!
First I want to find a few images and open them up in Photoshop.
With the images chosen and set aside (I generally use 12-18 images per set), open a new image, create a new layer and enter some large type. I'm using a font size of 160 pts, as I want to see up close and personal what my new textures will look like. The examples look smaller here, but on my monitor they are quite large.

Now we want to clear out whatever patterns may be residing in the Layer Styles, so with your text layer action, click the Layer Styles icon at the bottom. Click on Pattern Overlay.
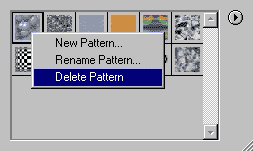
You will see a thumbnail of a pattern in the center, with a vertical arrow button next to it. Click the arrow, and begin deleting the patterns. On a PC you simply right click and scroll down to Delete Pattern... I'm sorry to say I do not know the process for Mac users.
Once these are cleared out, we are ready to start editing and defining our new patterns. Select one of the photos you opened earlier. How would this work for a texture? Does the brightness/contrast need to be tweaked? Maybe it would look cool inverted?
As I've been making dozens of these sets, I've set up my Actions Palette to help me with the process. Here's what mine looks like:
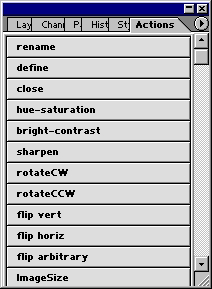
From the actions palette I'm now able to manipulate, define, and close my future texture with just a few button clicks. After I've saved/defined and closed several patterns I then open a new batch of images, edit them, and define. Once you get the hang of it you can create a set in a matter of a couple minutes.
NOTE: The 'Rename' action at the top of the list is basically an empty action. Though it performs no functions, it allows me to use the Batch option to rename and resave hundreds of images. It is only for reference, as the batch command does all the processing required.
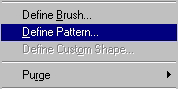
Let's define a pattern. Select a photo. Go to Edit>Define Pattern.
You may now run through this process with all of your images. Once done, go back to the layer styles of the text image, open the textures and you should see all of your new patterns in their own group.

With your type moved over so that you can see the changes, click on each texture and see the effect change on your image. Pretty cool stuff!
Ok, once you are satisfied with your texture set, you will want to save them. With the textures open, click the small arrow to the right. From this menu you can save the set for future use. A very nice thing about this feature is you can now apply the patterns to your Layer Styles. If you send your styles to others, remember they will need the texture pack as well.
Here are examples of my patterns applied to text.

 Al Ward, a certified Photoshop Addict and Webmaster of Action FX Photoshop Resources (