


Open photo (you can download it from here).
Zoom out using Ctrl + -.
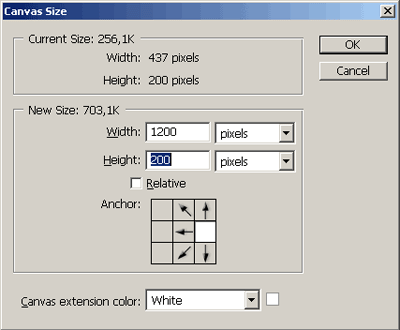
Now you must enlarge canvas size. Dimension of new canvas are 1200x200. Set anchor to right.
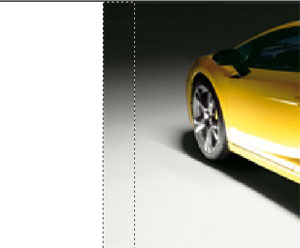
Now use marquee tool and select part of image on the left side.
Now copy selection (Ctrl + C) and paste it back (Ctrl + V). This will copy the selection onto a new layer. Call it "back". Now use Transform tool (Ctrl + T) and scale this layer.

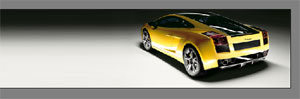
Now we have to fix transition between these two layers. First merge down these two layers using Ctrl + E. Now zoom in and select Healing brush tool and choose brush with smooth edges. Correct errors on these two layers.
Our picture should look something like this after healing.
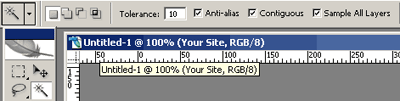
Now we have to select only a car. The simplest way to that is with Magic Wand tool (W). Set tolerance to value of 10 (if you want to go faster then select higher value). Click on some part of picture and then hold Shift and continue clicking on other areas of picture. Be careful not to select car.
Now we have to fine tune this selection, mostly on the car itself. So, invert selection (Select - Inverse) then press Q on keyboard to enter quick mask mode. Everything except the car is red. Take a brush and paint red area around the car. You have to be precise not to paint on the car. Paint the shadows also. You can zoom in and this is way the start picture is so large.
When you are finished exit quick mask mode (press Q again). This will left the selection around the car only. Duplicate it to another layer (press Ctrl + J on keyboard) and call that layer "front".
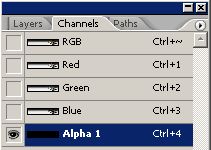
Now we have to perform a small trick. Go to Channels palette and create new channel. It's called Alpha1.
Now select Gradient tool, choose black to white and make gradient on Alpha1.
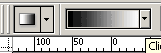
You make gradient like picture below
![]()
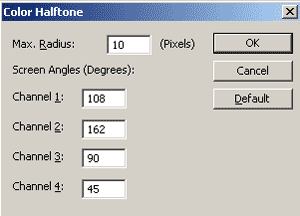
Now go to Filter - Pixelate - Color Halftone and choose values as it is on the picture below.
After clicking OK your Alpha1 channel looks like this

Now go back to Layers palette, click "back" layer, click on Create New Layer. Name it "black color". Click on Paint Bucket Tool, select black color and fill "black color" layer with black.

Now back to Channels palette, click Alpha1 channel then hold Ctrl and click Alpha1 layer. This will make selection. Now click Layers palette, select "black color" layer and make sure that white is background color. Hit Del on the keyboard.
Now remove selection by pressing Ctrl + D.
Go to Image - Image Size and select size of picture you want. I entered width of 700 pixels.
And that is it. You can now enter some text and experiment a little bit with this.

Enjoy.