Step 1:
Let's start out by creating a new file. I used a 500x400 pixels canvas set at 72dpi, and I filled my background with black. Now make a new layer then draw a circle with a #6FB5E3 background color of 118 X 118px dimensions.
Step 2:
Under Layer Style(Layer > Layer Style) add an Inner Glow and Gradient Overlay blending options to the circle layer as shown below.


Step 3:
In a new layer draw a circle with #5F9AC1 background color of 88x88px dimensions.

Step 4:
Under Layer Style(Layer > Layer Style) add an Inner Glow and Gradient Overlay blending options to your smaller circle layer as shown below.

Step 5:
Now merge both your circles together to make the button. Then under Layer Style(Layer > Layer Style) add a Drop Shadow and Inner Shadow blending options as below.

Step 6:
Create a new layer then draw a black circle of 73 X 73px dimensions in the center of the button.

Step 7:
Under Layer Style(Layer > Layer Style) add an Inner Glow and Stroke blending options to your black circle layer. Then set the layer's blending mode to Lighten.

Step 8:
Select the Horizontal Type Tool then set the font family to Webdings, 72pt, strong and white. In a new text layer type '%' which should be a trophy design icon, or choose whatever symbol you want on your button and then position it in the center of the button.

Step 9:
Under Layer Style(Layer > Layer Style) add a Gradient Overlay blending option to your text layer. Then set the layer's blending mode to Darken.

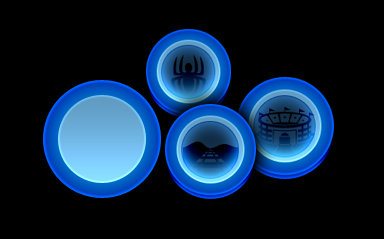
End Result:
My end result looked like this after making a few buttons, your buttons should look similar if not the same if you have followed this tutorial.