Step 1:
Let's start out by creating a new file. I used a 400x400 pixels canvas set at 72dpi, and I filled my background with #DBD7A4 color shade. Now make a new layer set and name it 'Stylish Stewie'.
Make a new layer then draw a dark red ellipse with #B30000 color shade and 75 px 26 px dimensions. Then in a new layer draw a smaller yellow ellipse with #FBF060 color shade on the red ellipse.
Step 2:
In a new layer draw a large ellipse with #F4E2CA color shade 188 x 117 px dimensions. Then rotate the ellipse by a little through Edit > Transform, this will be the head of stewie.

Step 3:
Under Layer Style(Layer > Layer Style) add a Stroke blending option to the head layer.
Step 4:
In a new layer draw a small white circle with 37 x 37 px dimensions for the eye. Then under Layer Style(Layer > Layer Style) add a Stroke blending option.
Step 5:
Duplicate the first small white circle for the other eye. Then in a new layer layer draw two small black circles on the eye set.
Step 6:
Select the Line Tool with a 1px weight, in a new layer draw the eye brows and the nose.
Step 7:
In a new layer draw a small ellipse with #F4E2CA color shade and 12 x 14 px dimensions on the right end of the head, this will be the right ear.
Step 8:
Under Layer Style(Layer > Layer Style) add a Drop Shadow blending option to the small ellipse layer.
Step 9:
Now add the mouth, in a new layer draw a black ellipse and rotate it by a little through Edit > Transform. Then in a new layer draw a smaller ellipse with #FF4545 color shade.

Step 10:
create a new layer, use the Pen Tool to create a curve black line for the hair.

Step 11:
Add more curve lines on the head.

Step 12:
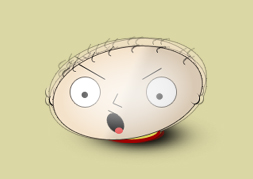
Now merge the 'Stylish Stewie' Layer Set through Layer > Merge Layer Set. Then under Layer Style(Layer > Layer Style) add an Inner Glow and Gradient Overlay blending options to the stylish stewie layer.
Result: