1. In this tutorial there are many different ways of getting the results wanted. Experienced people will know of these. I have decided to use my two favourite tools, the dodge and burn tools :P
Start off with your image that you want to make a crack in. You can use my.
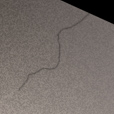
2. Now select your burn tool with 2 px width, range: highlights and exposure 100%. On the layer of your image, make a crack line.
3.
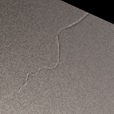
Now, on the
same layer (we are only using one layer in this tutorial),
with your dodge tool at range: highlights, 2 px and 100% exposure
make a line right next to the line you created in step 2.
Now you've added some depth!
4.
Now,
still on the same layer, fasten up the lines. To do this,
use the burn tool at range:
highlights, 1 px and 100%,
and draw above the dark line you created in step 2. Do the
same thing with the highlights, only this time draw above
the dodge light line.
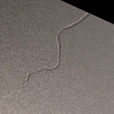
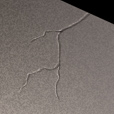
5.
Now
here's what I got. I extended the cracks using 50% exposure
dodge and burn and I added some lines using the same technique
as in step 2 and 3. Looks kinda neat, eh?