1. First start a new image in RGB Mode, and make the contents White.
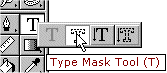
2. Now you need to select the Type Mask Tool. Now type some text then push OK.
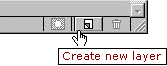
3. Once you see that your Text is type start
a New Layer (Shft Ctrl N) or push the
Create New Layer Button in the Layer Panel.
4. Now make sure you are in your New Layer
and fill your text in with Black.
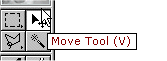
Then select the Move Tool and position your
text in your new layer.
5. Once your text is where you want it
Deselect (Ctrl D) the text.
Now you need to Duplicate your Text Layer.
Layer > Duplicate Layer then OK.
6. Now you need to be in your First
Text Layer. Once in your text layer go to your
Blur Filter.
Blur > Motion Blur
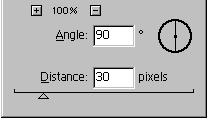
The settings should be:
Angel: 90
Distance: 30.
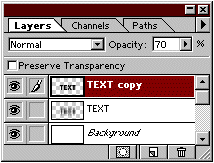
7. Then go to your duplicate layer you made
and change the Opacity to 70%
Once that is done you can Merge the two
layers together (Ctrl E).
8. Now this is your end result when you are
all done with it. Making Motion Blur text is fairly
easy and it looks nice too.

9. Here is a example of the text if you would
have when to Step 6 and changed the Angel
to 0°, and Distance 30.