

This tutorial is designed for people who have little or NO
Experience of using flash. The aim of the tutorial is to:
Show you how to link one Flash 'page' with another 'page'. Page is in inverted commas
because Flash does not really have pages but frames, but the idea is the same.
Note: Don't get Flash 'frames' mixed up with HTML 'frames'. They are completely different. Confused already? Well actually is is not difficult (hopefully)!
Cross Ref: If you wish to learn how to make a hyperlink, a link from a Flash movie to a new web page, go to the beginners tutorial: Hyperlinks
Click on the triangle button.
 New:
See Movie of how to build this Flash file
New:
See Movie of how to build this Flash file
Example of small Flash Movie with buttons linking one 'page' or frame of the flash
movie to the next.
Step One: Setting up the document
We are going to open a new Flash document and customise it.
- Go to: File > New > General Tab > Flash Document > OK
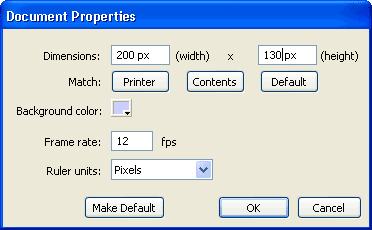
- We are now ready to customise the document. Go to: Modify > Document.
- Type in the dimensions that you want for your movie. The one above is 200 x 130 px (pixels).
- Select a background colour by clicking on the coloured swatch.
- Click: OK.
- Save your file
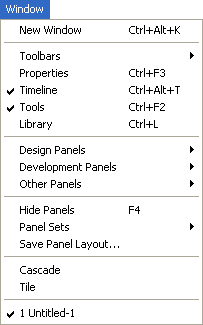
Note: The work space in Flash is often quite cluttered with Panels. Panels are tool boxes and although useful - much of the time time you don't need them and I think for beginners they are confusing. For this reason we are going to close then all except for the Timeline and Tools. You can turn these Panels off and On in the Windows Menu.
Only the Timeline and Tools are open.
Note: You should also close all the Panels that you will find in the sub menus. The sub menus can be accessed via the little triangles:

Your
Document Properties should look like this.
Step Two: Setting up Frame 1
- Using the Text Tool
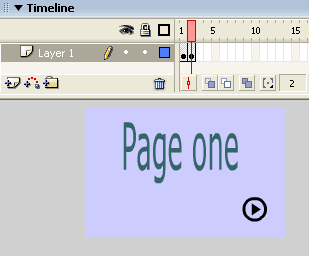
 on the tool bar type: 'Page One' on the stage. The stage is the visible 'page'.
 - When you have finished typing go back to the Selection tool
 .
. - If you want to change the colour, style or size of the font you can do so
in the Property Inspector: Window > Properties
Note: If you want to change the type settings the text must be selected. If you click on your text with the Selection Tool the text will
have a blue rectangle around it: - Go to: Windows > Other Panels > Common Libraries > Buttons.
To look at the buttons you need to double click on the folders .
Choose a button and drag it out on to the stage. I selected: Circle
Buttons > Circle Button - Next. You can move the position of the button
by clicking on it with the Selection Tool and dragging
it.
.
Choose a button and drag it out on to the stage. I selected: Circle
Buttons > Circle Button - Next. You can move the position of the button
by clicking on it with the Selection Tool and dragging
it.
Note: If you take a different button from the Common Button Library avoid Knobs, Faders and Component buttons as they work differently. - Place anything else that you may want on the first frame. You can draw with some of the tools on the tool bar or copy and paste clip art from other programs such as Word. You can also paste from graphics programs like Freehand, Illustrator or CorelDraw.
- Save your file.

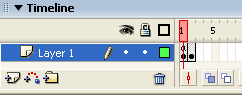
- Go to the Timeline and place your cursor in frame 2. Right click (Ctrl click on a
Mac) and select: Insert Keyframe
You will now have a black dot in both frames 1 and 2. This copies all the contents from frame one and places them onto frame 2. It is the same as copy and paste. Your stage should look the same as before you clicked in frame two but now you are actually in a different place in the movie. The red play head should now be in frame two:
- Use your Text Tool to over write the word 'one'
and type 'two'. It should now say: Page two
- When you have finished typing reselect the Selection Tool:
- Go back to the Common Button Library (Windows > Other Panels > Common Libraries > Buttons) and select a button as the back button and drag it onto the stage.
- Click on the back dot in frame 1 and you will see that the difference between the two frames.
- Click on the black dot (called a keyframe) in frame 2 and add any additional graphic and text elements that you may want.
- Save your file.
Two black
dots in the timeline represent the Keyframe's.
- Right click in frame 3 and select select: Insert Keyframe
- Make any changes to fram e 3 as you did for frame 2.
- Save your file.
- Time to test your movie. Go to: Control > Test Movie
Note: This takes you to a new window. Your movie should be jumping from frame to frame non stop. You should be able to see a clear difference between all three frames. - Close the window. You do this by clicking on the lower of the two crosses in the top right hand corner of your screen. This will not close your file but only the test window.
- Welcome to ActionScript. Your first bit of programming! You need to select frame 1 (the first frame with a black dot in it): Click on key frame 1
- Open the Actions Panel.
On the keyboard press: F9
Important: If you have selected the Frame correctly the Actions panel should say Actions - Frame. Beware it is easy to attach your Actions to the wrong thing! Get in the habit of checking the top of the Actions panel before you use it. - Click on the: Plus Sign
 > Global Functions >
Timeline Control > Stop
> Global Functions >
Timeline Control > Stop
Your Actions Panel should display the following ActionScript:
stop();
- Close the Actions Panel - on the keyboard press: F9
Note: A small a should appear above the black dot in frame one. This indicates that the key frame has some Actionscript attached to it.
 Note the little 'a' in frame 1.
- Test your movie:Control > Test Movie
Your movie should be stopped on frame one. - Close the test Window.
- Save your file.
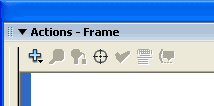
Always check what it says in the top left corner of the Actions
Panel.
- In the timeline, if you are not already on frame 1, drag the red Play Head to: Frame 1
- On the stage select the: Button
- Open the Actions Panel - on the keyboard press: F9
Important: If you have selected the button correctly the Actions panel should say Actions - Button in the top corner: - Type the following code into the Actions Panel:
on (release) {
   gotoAndStop(2);
}
This means that when the mouse button is released you will go to frame 2 and stop.
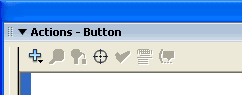
Always
check what it says in the top left corner of the Actions Panel.
- Time to test again. Go to: Control > Test Movie
- Click on your button. You should move to frame 2.
- Close the test Window by clicking on the cross:

Add the actionscript to the remaining buttons and you are home and dry. Well done. To do this go back and repeat Step Seven. Except this time do not go to frame 1 but go to frame 2 and select first one button and then the next.
Your actionscript will look slightly different as you the buttons will be moving you to different frames. The actionscript that moves you from frame 2 to frame 1 will look like this:
on (release) {
  gotoAndStop(1);
}
|
The actionscript that moves you from frame 2 to frame 3 will look this:
on (release) {
  gotoAndStop(3);
}
|
When you have done both of these buttons will also need to go to frame 3 and set the actionscript for that button.
Remember to keep testing your movie: Control > Test Movie