How to Create a Fan Illustration from Scratching Using Photoshop
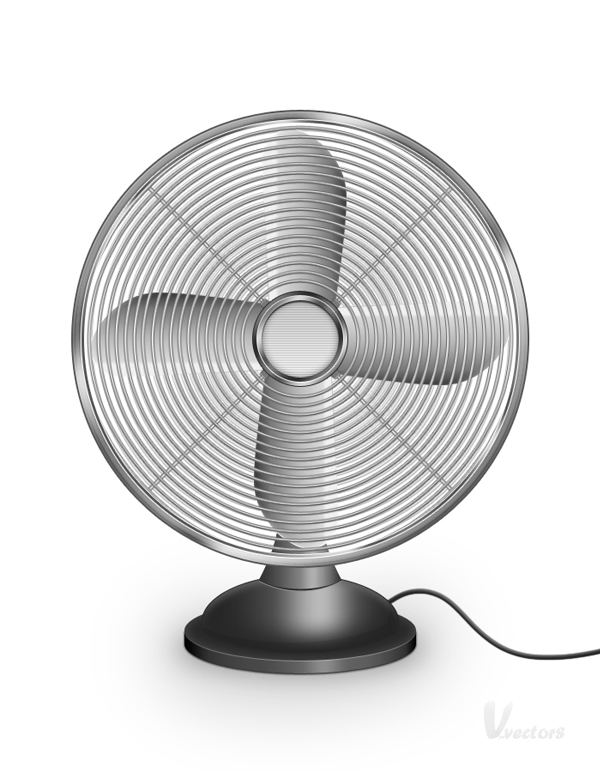
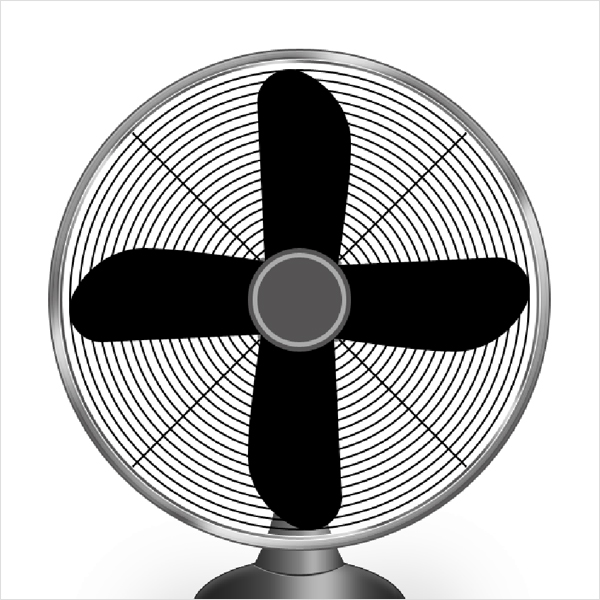
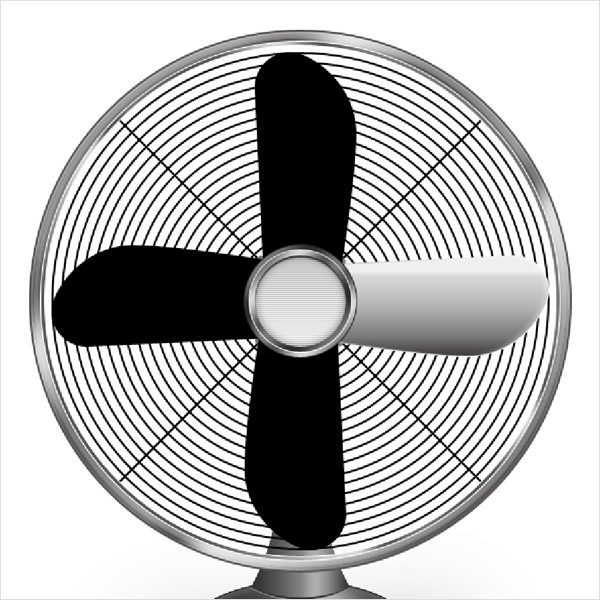
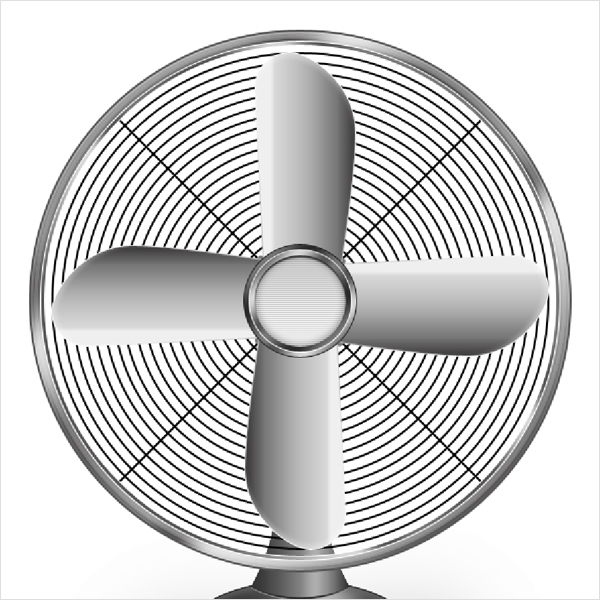
As always, this is the final image that we'll be creating:
Step 1
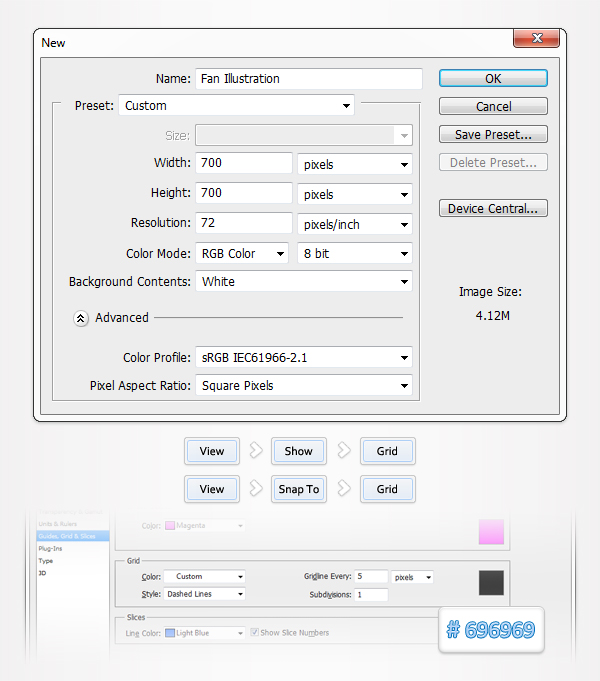
Open Photoshop and hit Control + N to create a new document. Enter all the data shown in the following image and click OK. Next, enable the Grid (View > Show > Grid) and the Snap to Grid (View > Snap To > Grid). For the moment you need a grid every 5px. Go to Edit > Preferences > Guides, Grid & Slices and focus on the Grid section. Enter 5 in the Gridline Every box and 1 in the Subdivision box. Also, set the grid color at #696969. Once you set all these properties click OK. Don't get discouraged by all that grid. It will ease your work. You should also open the Info panel (Window > Info) for a live preview with the size and position of your shapes.
Step 2
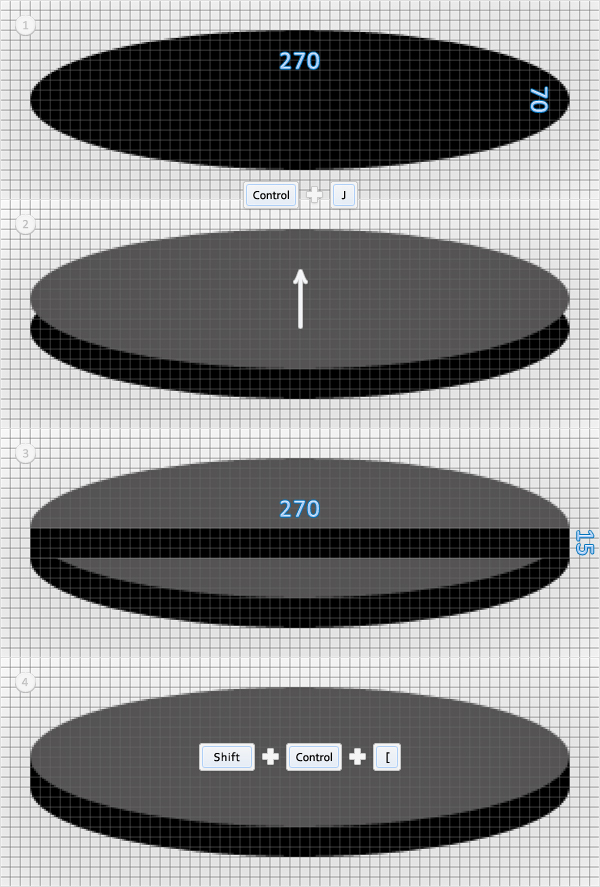
Pick the Ellipse Tool , set the foreground color at black and create a 270 by 70px shape. Select this squeezed circle and duplicate it (Control + J). Select this copy, replace the black with a grey and move it 15px up. The Snap to Grid will ease your work. Set the foreground color at black and switch to the Rectangle Tool. Create a 270 by 15px shape, place it as shown in the third image and send it to back (Shift + Control + [ ).
Step 3
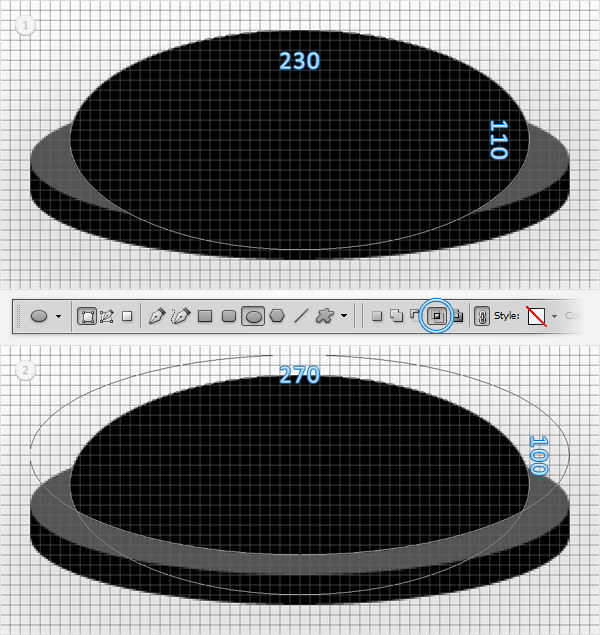
Pick the Ellipse Tool, create a 230 by 110px shape and place it as shown in the first image. Make sure that this shape and the Ellipse Tool remain selected and focus on the top bar. Check the "Intersect shape areas" icon and draw a 270 by 100px shape as shown in the second image.
Step 4
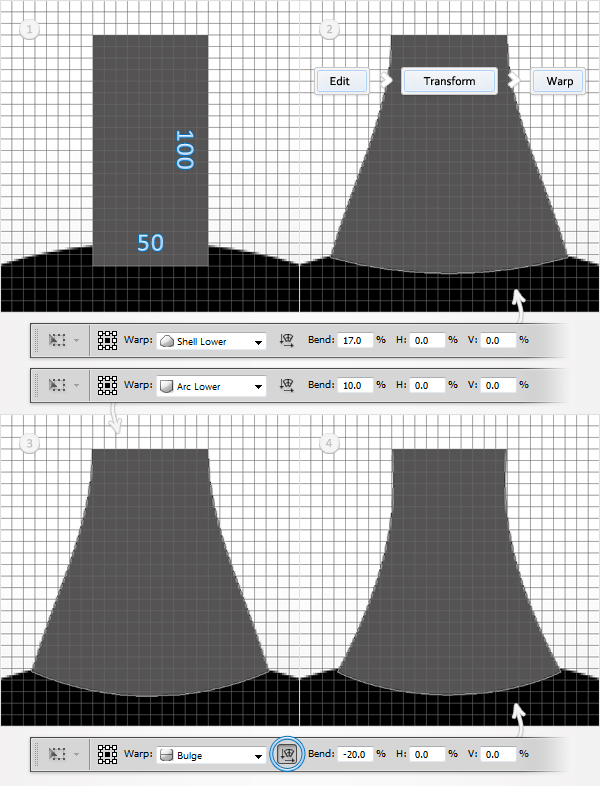
Pick a simple grey for the foreground color and grab the Rectangle Tool. Create a 50 by 100px shape and place it as shown in the first image. Select this new shape and go to Edit > Transform > Warp. Select Shell Lower from the Warp menu, enter 17 in the Bend box and hit enter. Now, your shape should look like in the second image. Make sure that it is still selected and go again to Edit > Transform > Warp. Select Arc Lower from the Warp menu, enter 10 in the Bend box and hit enter. The resulting shape should look like in the third image. Reselect it and go one last time to Edit > Transform > Warp. Select Bulge from the Warp menu, check the orientation icon, enter 10 in the Bend box and hit enter.
Step 5
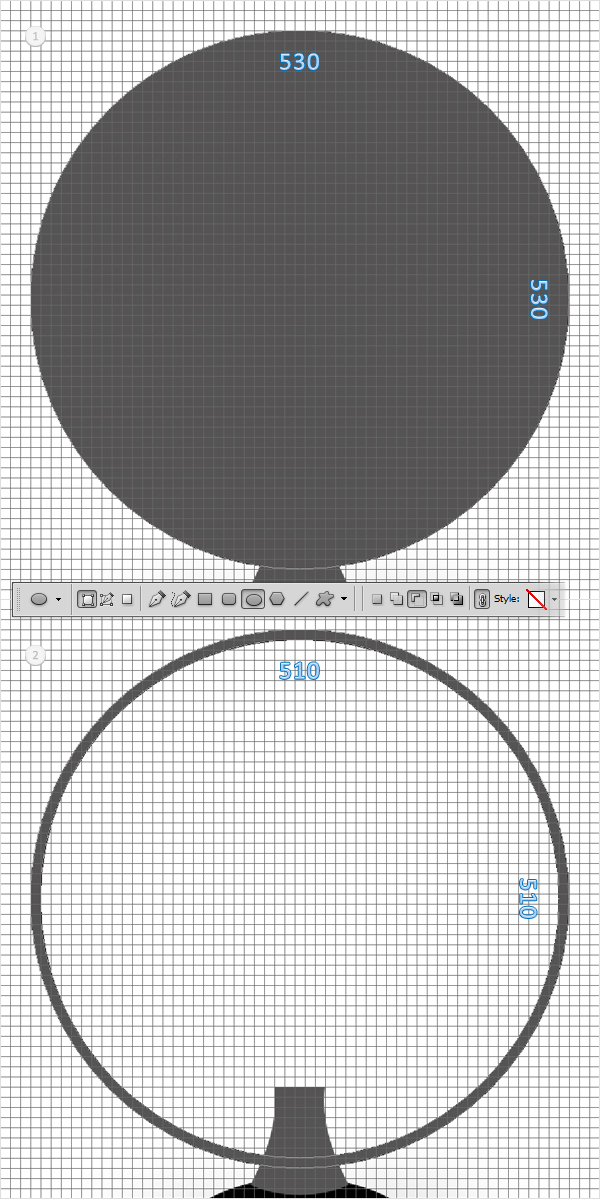
For the next steps you will need a grid every 10px. So, go to Edit > Preferences > Guides, Grid & Slices, focus on the Grid section and enter 10 in the Gridline Every box. Pick the Ellipse Tool, create a 530px circle and place it as shown in the first image. Make sure that this shape and the Ellipse Tool remain selected and focus on the top bar. Check the "Subtract from shape area" icon and draw a 510px circle as shown in the second image. In the end your shape should look like in the second image.
Step 6
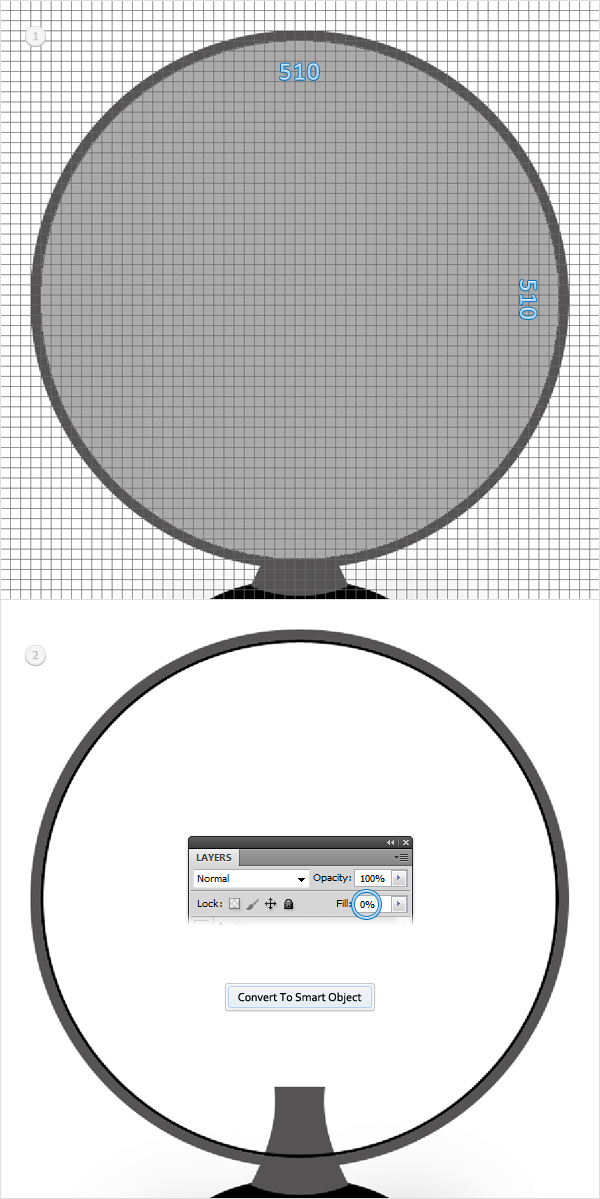
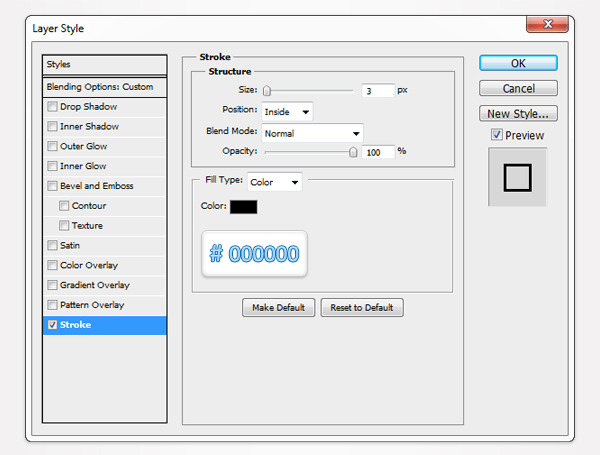
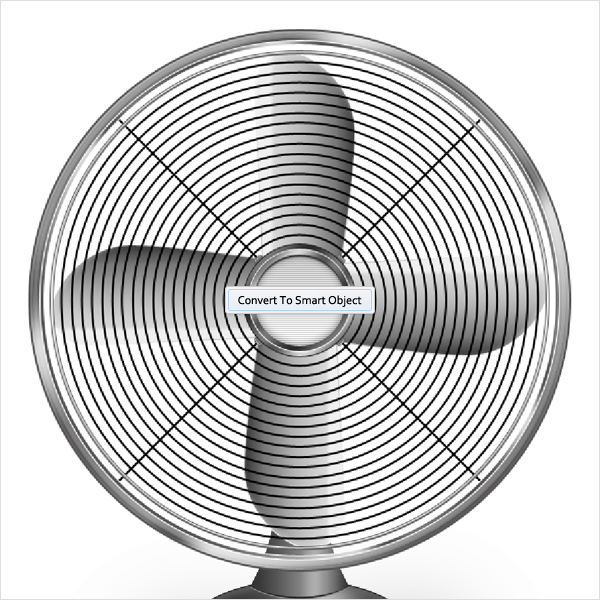
Pick the Ellipse Tool, create a new 510px circle and place it as shown in the first image. Select it and focus on the Layers panel. First, lower its Fill to 0% then double click on it to open the Layers Style window. Activate the Stroke, enter the properties shown below and click OK. Right click on this new shape (in the Layers panel) and click on Convert to Smart Object.
Stroke Blending Options Settings
Size: 3px
Position: Inside
Blend Mode: Normal
Opacity: 100%
Fill Type: Color
Step 7
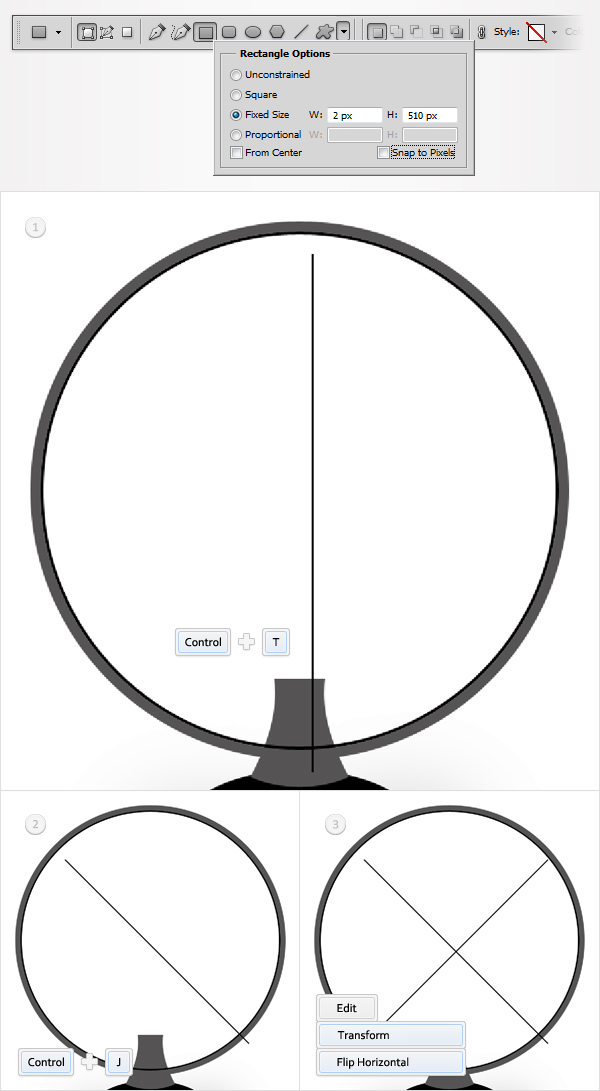
Disable the Grid (View > Show Grid). Pick the Rectangle Tool and click on the little arrow from the top bar. This will open the Rectangle Options window. Check the Fixed Size button and enter 2px in the width box and 510px in the height box. Now, simply click inside your document and Photoshop will automatically create a 2 by 510px shape. Select this thin shape, hit Control + T and rotate it 45 degrees as shown in the second image. Reselect this rotated shape and duplicate it (Control + J). Select this copy and go to Edit > Transform > Flip > Horizontal.
Step 8
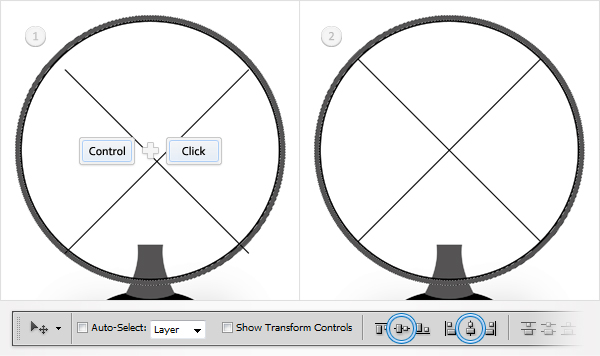
Pick the Selection Tool and focus on the Layers panel. Hold Control and click on the shape created in the fifth step. This will load a nice selection around the shape. Now, select the two shapes created in the previous step, move to the top bar and click on the "Align horizontal centers" and "Align vertical centers" icons. In the end things should look like in the second image. Hit Control + D to get rid of that selection.
Step 9
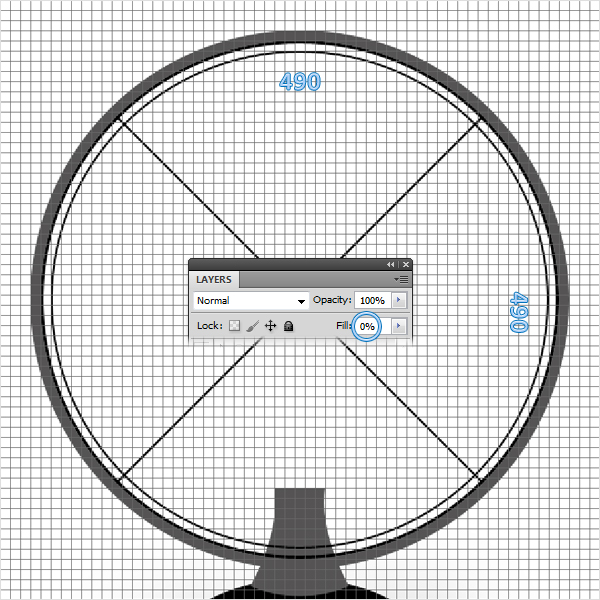
Re-enable the Grid (View > Show Grid). Pick the Ellipse Tool, create a 490px circle and place it as shown in the following image. Lower its Fill to 0% and open the Layers Style window. Activate the Stroke, enter the properties shown below and click OK.
Stroke Blending Options Settings
Size: 2px
Position: Inside
Blend Mode: Normal
Opacity: 100%
Fill Type: Color

Step 10
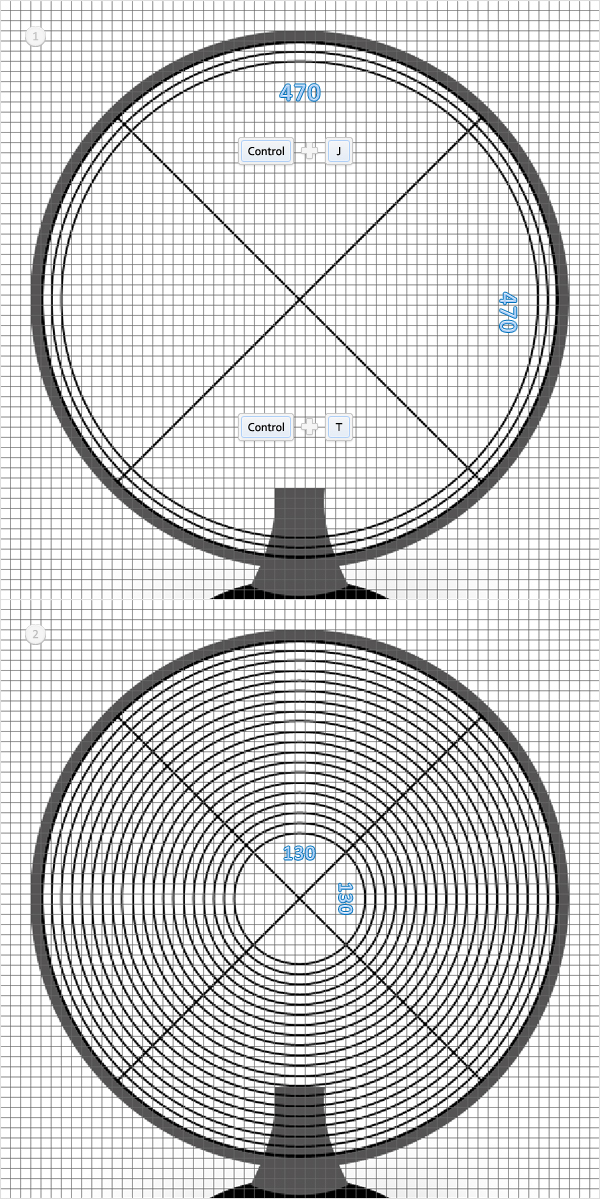
Duplicate the shape created in the previous step (Control + J). Select this copy, hit Control + T, hold Shift and resize it to 470px. Repeat this technique until you get to the 130px circle. In the end you should have nineteen perfect circles.
Step 11
Switch back to 'Gridline every 5px'. So, go to Edit > Preferences > Guides, Grid & Slices, focus on the Grid section and enter 5 in the Gridline Every box. Set the foreground color at #787878 then pick the Rounded Rectangle Tool and set the radius at 3px. Create two, 10px shapes and place them as shown in the following image.
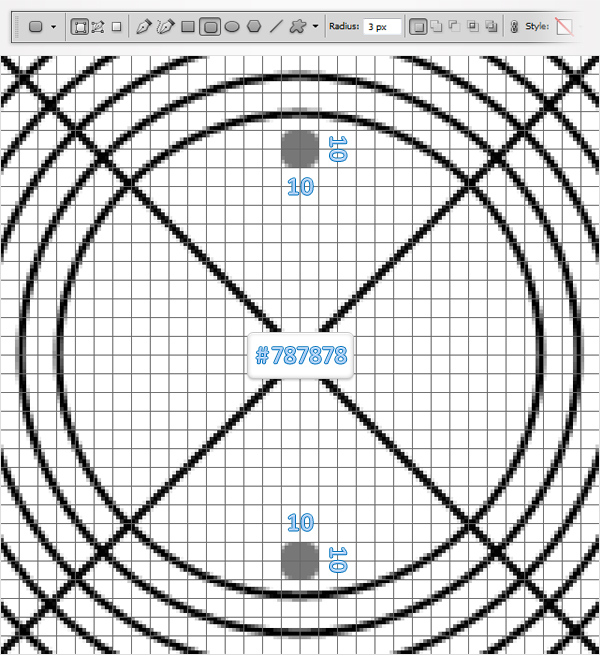
Step 12
Select the shapes created in the previous step, hit Control + T and rotate them 45 degrees as shown in the first image. Reselect these rotated shape and duplicate them. Select the copies and go to Edit > Transform > Flip > Horizontal.
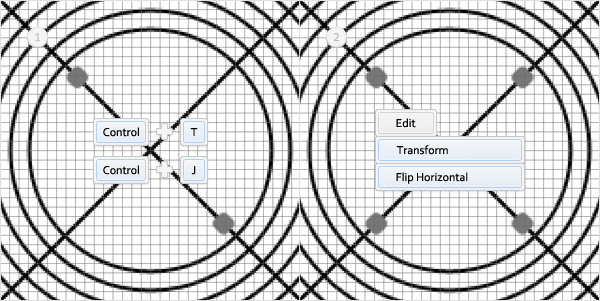
Step 13
Pick the Ellipse Tool, create a 110px shape and place it as shown in the first image. Continue with the Ellipse Tool, create a 100px circle and a 90px circle, and place them as shown below.
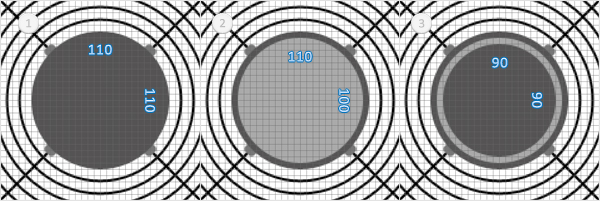
Step 14
Switch to "Gridline every 10px"'. Pick the Rounded Rectangle Tool, set its radius at 35px, create a 270px by 70px shape and place it as shown in the first image. Make sure that this shape is still selected and switch to the Direct Selection Tool. Select the two anchor points highlighted in the first image and move them 10px up and to the right. Now, you shape should look like in the second image. Continue with the Direct Selection Tool, select the anchor point highlighted in the second image and drag it down and to the left as shown in the third image. Keep focusing in this anchor point and grab the Convert Point Tool. Click on it and simply drag to the right to add a nice roundness effect. In the end your shape should look like in the fourth image.
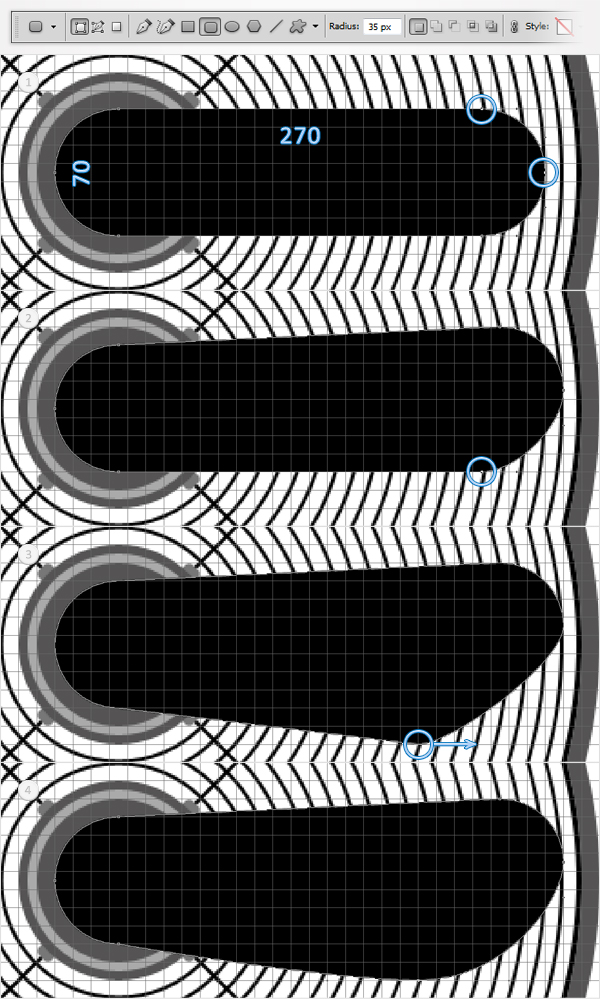
Step 15
Select the shape created in the previous step, duplicate it (Control + J) and move the copy to the left as shown in the first image. Select this copy, go to Edit > Transform > Flip Horizontal then go to Edit > Transform > Flip Vertical. Now, your shape should look like in the second image. Reselect it and move it 10px up.
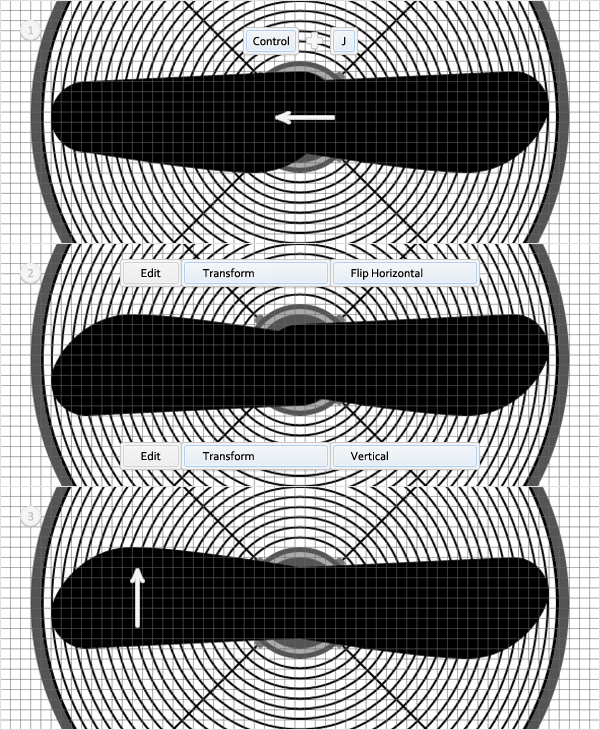
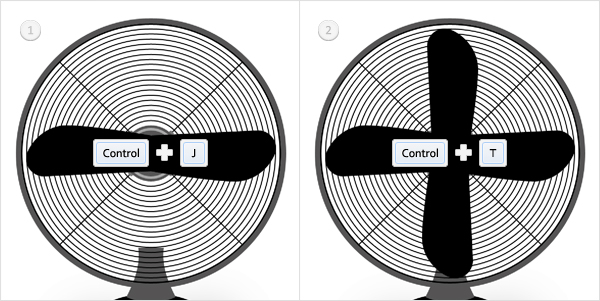
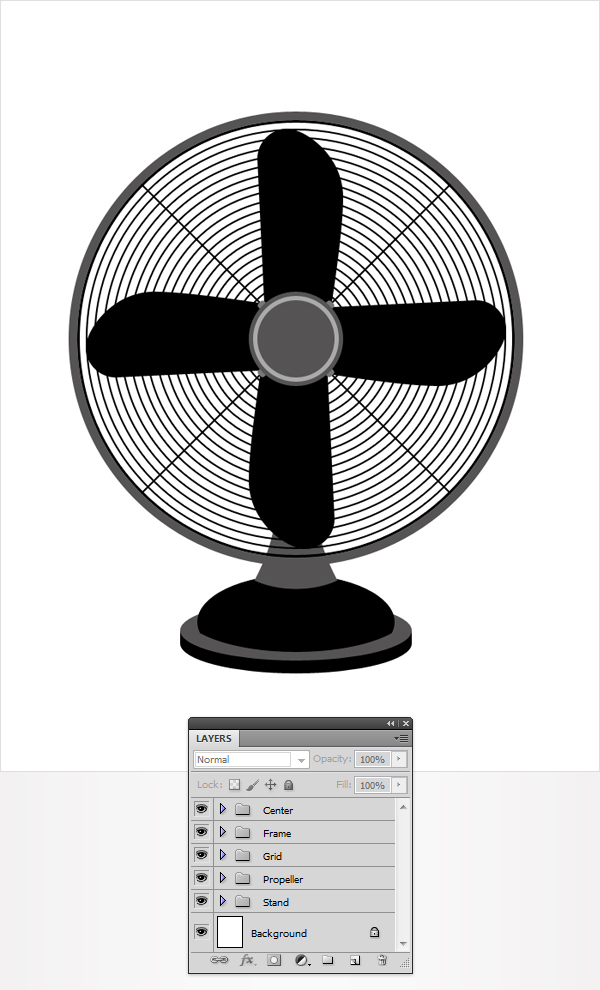
Step 16
Disable the Grid (View > Show Grid) and the Snap to Grid (View > Snap to Grid). Select the two shapes created in the last two steps and duplicate them. Select these copies, hit Control + T and rotate them 90 degrees as shown in the second image. Now, it's time organize all the shapes created so far. Start with the the ones created in steps #2, 3 and 4. Group them (Control + G) and bring the group to front (Shift + Control + ] ). Move to the Layer panel, double click on this group and name it "Stand." Continue with the shapes created in the previous two steps and the ones created in the beginning of this step. Group them (Control + G), name this group "Propeller" and bring it to front (Shift + Control + ] ). Next, select the shapes created from step #7 t step #12. Group them (Control + G), name the group "Grid" and bring it to front (Shift + Control + ] ). Move on and select the two circles created in the fifth and sixth step. Group them, name the group "Frame" and bring it to front (Shift + Control + ] ). Finally, select the three circles created in step #13, group them, name the group "Center" and bring it to front (Shift + Control + ] ). In the end you should have five simple groups ordered as shown in the second photo.
Step 17
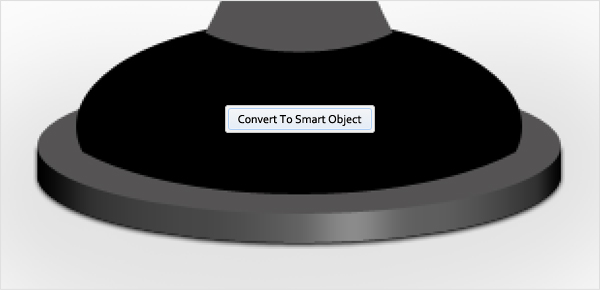
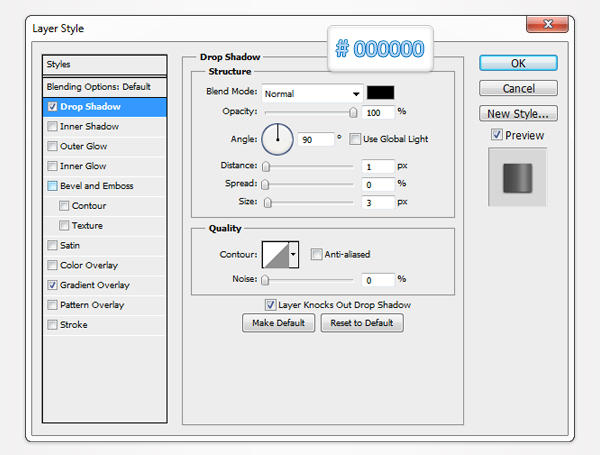
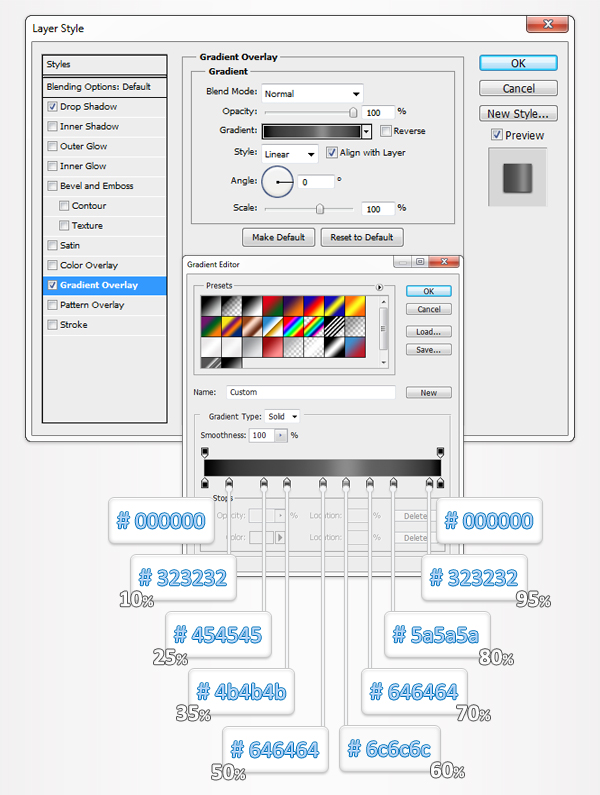
Let's add some colors. Open the "Stand" group and focus on the shapes inside. Select the bottom, black circle along with the thin rectangle (created in the second step) and turn them into a smart object. Double click on this new smart object to open the Layer Style window and enter the properties shown below. The white numbers from the Gradient Overlay image stand for location percentage.
Drop Shadow Blending Options Settings
Blend Mode: Normal
Opacity: 100%
Angle: 90 degrees
Distance: 1px
Spread: 0px
Size: 3px
Gradient Overlay Blending Options Settings
Blend Mode: Normal
Opacity: 100%
Style: Linear
Angle: 0 degrees
Scale: 100%
Step 18
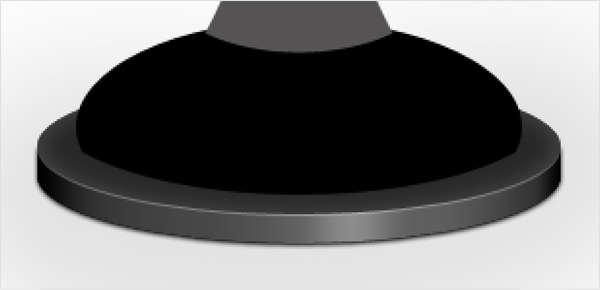
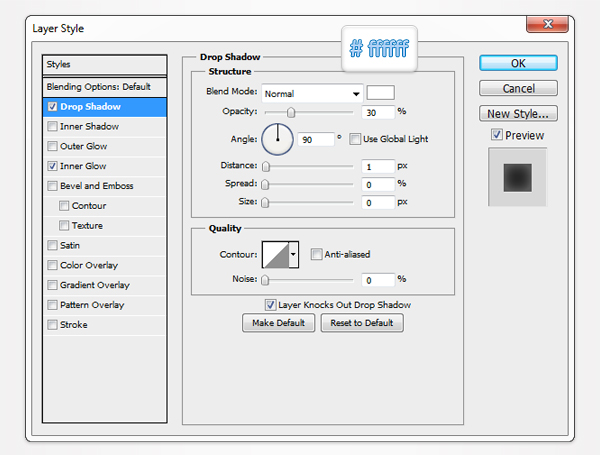
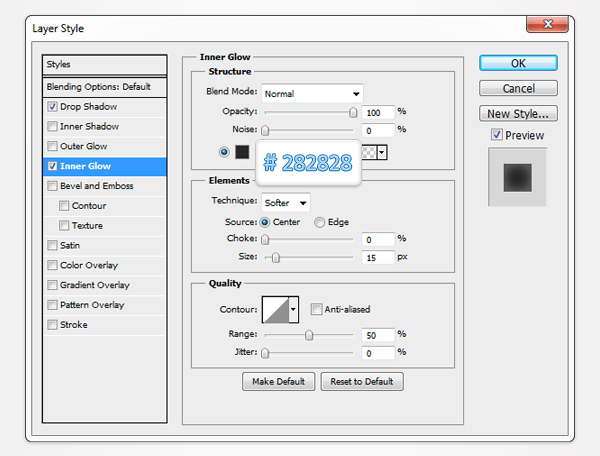
Select the other circle created in the second step, open the Layer Style window and enter the properties shown below.
Drop Shadow Blending Options Settings
Blend Mode: Normal
Opacity: 30%
Angle: 90 degrees
Distance: 1px
Spread: 0px
Size: 0px
Inner Glow Blending Options Settings
Blending Mode: Normal
Opacity: 100%
Size: 15
Step 19
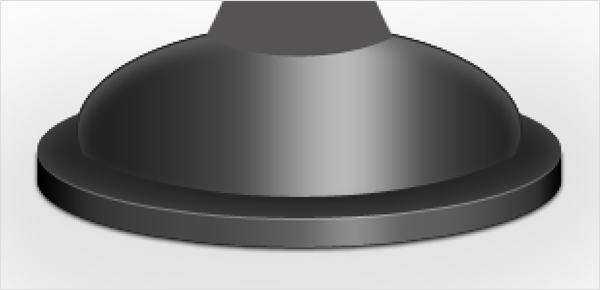
Move to the shape created in the third step. Select it and, open the Layers Style window and enter the properties shown below.
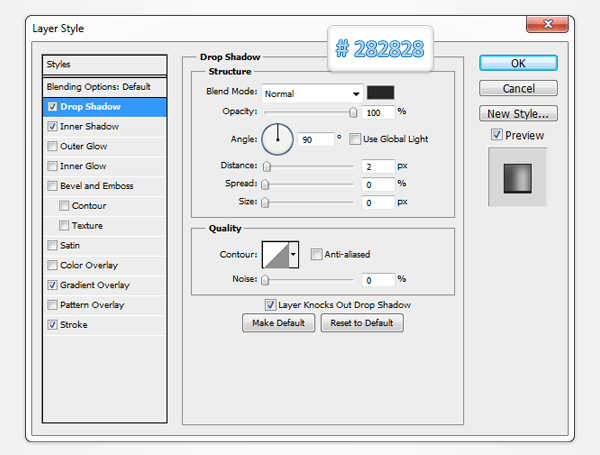
Drop Shadow Blending Options Settings
Blend Mode: Normal
Opacity: 100%
Angle: 90 degrees
Distance: 2px
Spread: 0px
Size: 0px
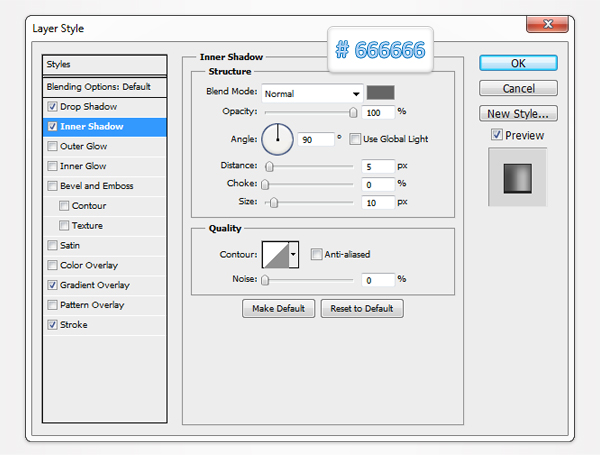
Inner Shadow Blending Options Settings
Blend Mode: Normal
Opacity: 100%
Angle: 90 degrees
Distance: 5px
Choke: 0%
Size: 10px
Gradient Overlay Blending Options Settings
Blend Mode: Normal
Opacity: 100%
Style: Linear
Angle: 0 degrees
Scale: 100%
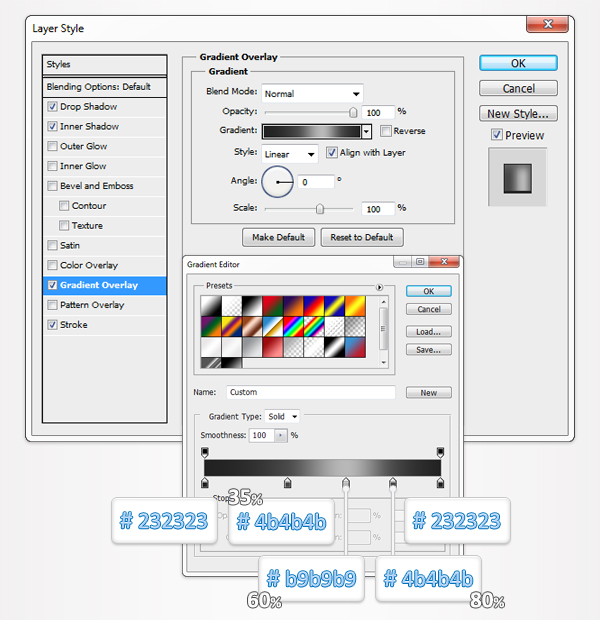
Stroke Blending Options Settings
Size: 1px
Position: Inside
Blend Mode: Normal
Opacity: 100%
Fill Type: Color

Step 20
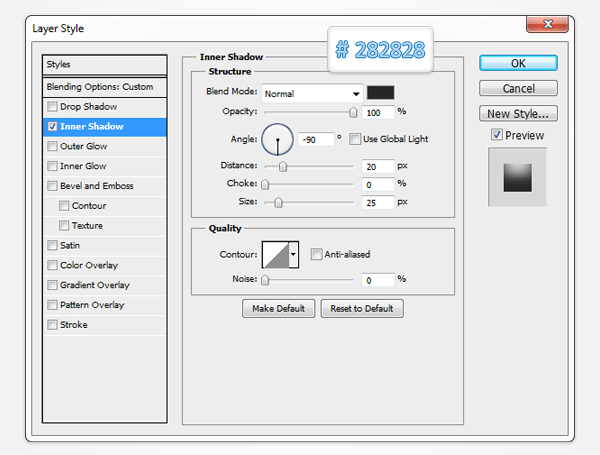
Reselect the shape edited in the previous step and duplicate it (Control + J). Move to the Layers panel, right click on this copy and click on Clear Layer Style to remove the current Layers Style properties. Make sure that this copy is still selected, lower its Fill to 0%, open the Layer Style and enter the Inner Shadow properties shown below.
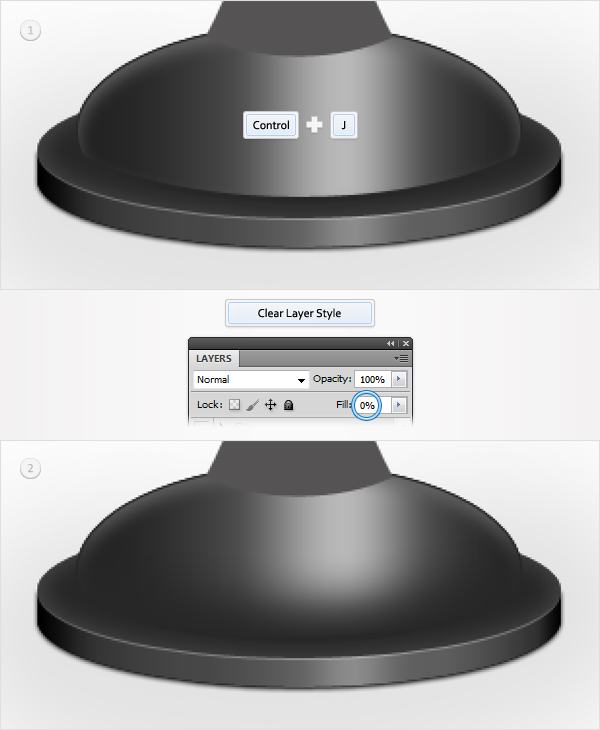
Inner Shadow Blending Options Settings
Blend Mode: Normal
Opacity: 100%
Angle: -90 degrees
Distance: 20px
Choke: 0%
Size: 25px
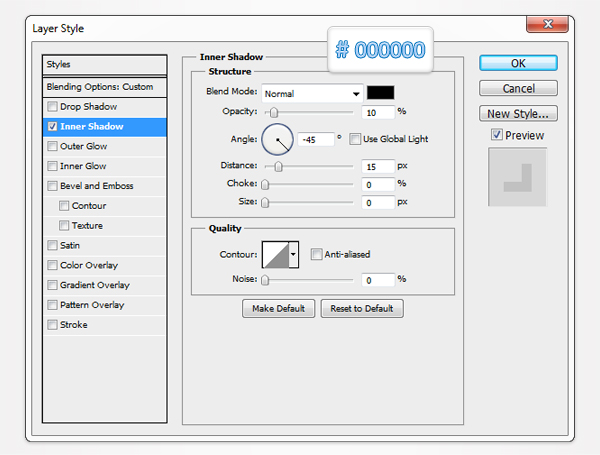
Step 21
Reselect the shape edited in the previous step and duplicate it (Control + J). Open the Layers Style for this copy and edit the Inner Shadow properties as shown below.
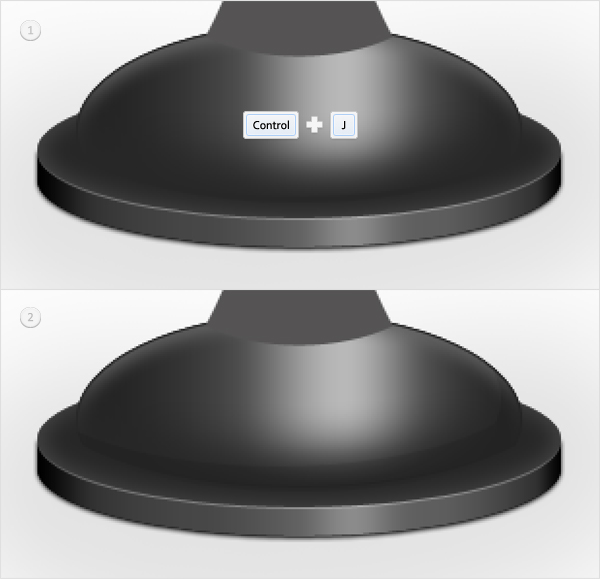
Inner Shadow Blending Options Settings
Blend Mode: Normal
Opacity: 10%
Angle: -45 degrees
Distance: 15px
Choke: 0%
Size: 0px
Step 22
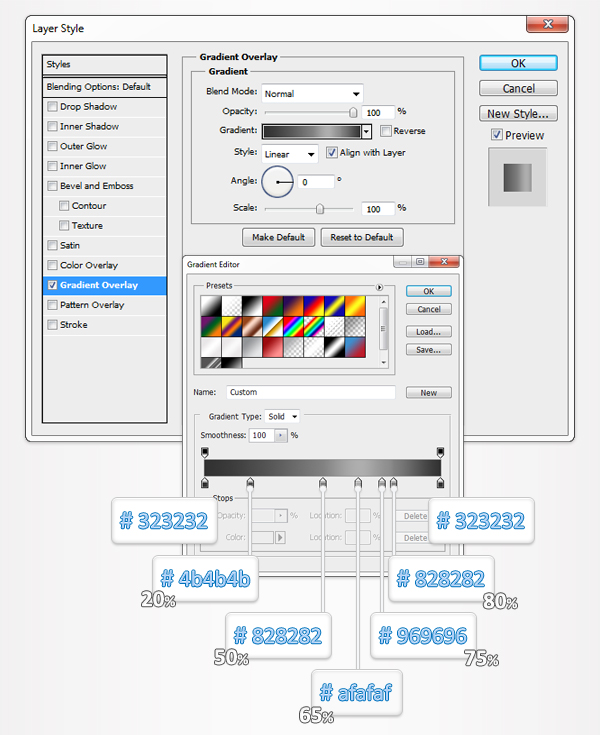
Move to the shapes created in the fourth step. Open the Layers Style window, enter the properties shown below and click OK.
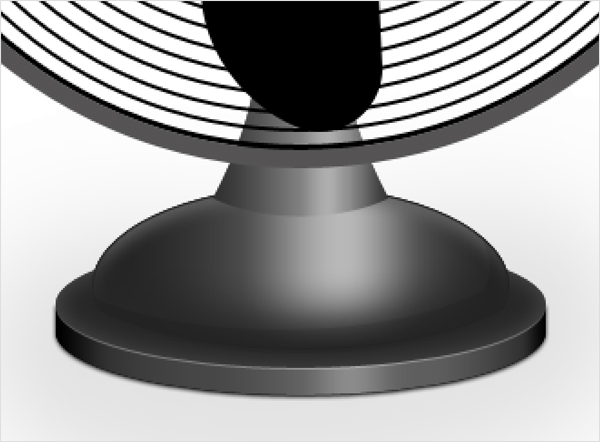
Gradient Overlay Blending Options Settings
Blend Mode: Normal
Opacity: 100%
Style: Linear
Angle: 0 degrees
Scale: 100%
Step 23
Reselect the shape edited in the previous step and duplicate it (Control + J). Select the original shape, clear its Layer Style properties, make sure that its filled with #282828 and go to Edit > Transform > Warp. Select Arc Lower from the Warp menu, enter 5 in the Bend box and hit enter. Open the Layer Style window for this new shape, activate the Drop Shadow and enter the properties shown below.
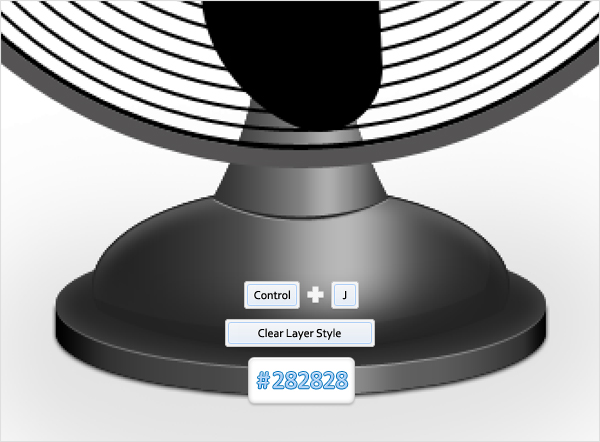
Drop Shadow Blending Options Settings
Blend Mode: Normal
Opacity: 100%
Angle: 90 degrees
Distance: 1px
Spread: 0px
Size: 0px
Step 24
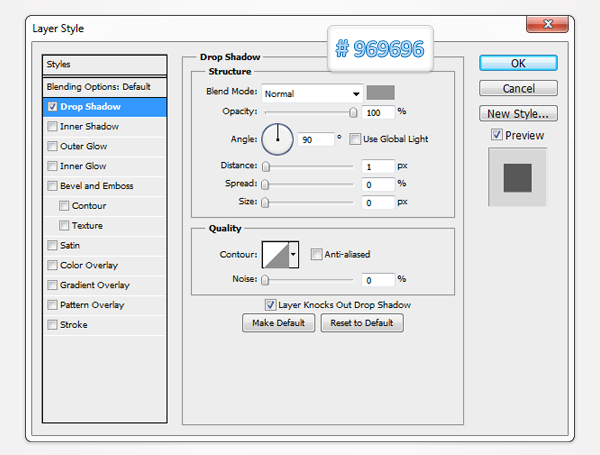
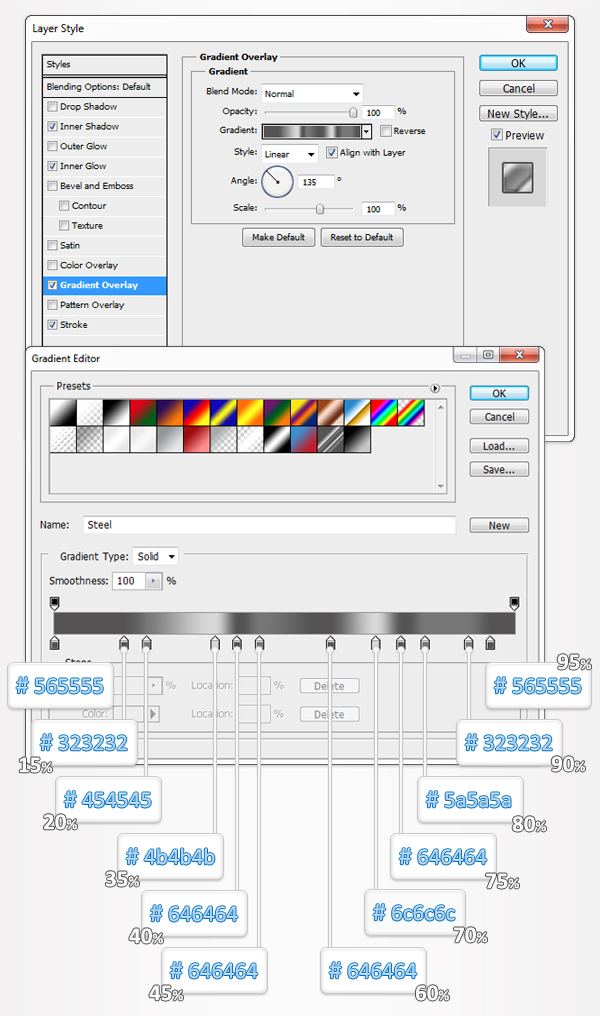
Close the "Stand" group and open the "Frame" group. Select the first shape, open the Layers Style window and enter all the properties shown below. When you get to the Gradient Overlay section make sure that you save the final gradient using the "New" button. It will ease your work in the next step.

Inner Shadow Blending Options Settings
Blend Mode: Normal
Opacity: 60%
Angle: 90 degrees
Distance: 3px
Choke: 0%
Size: 5px

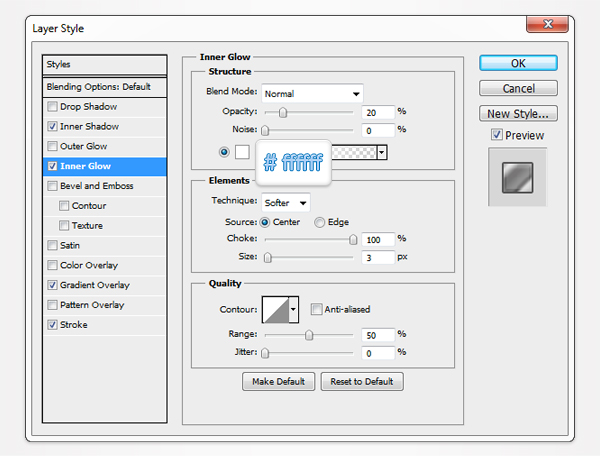
Inner Glow Blending Options Settings
Blending Mode: Normal
Opacity: 20%
Size: 3
Gradient Overlay Blending Options Settings
Blend Mode: Normal
Opacity: 100%
Style: Linear
Angle: 135 degrees
Scale: 100%
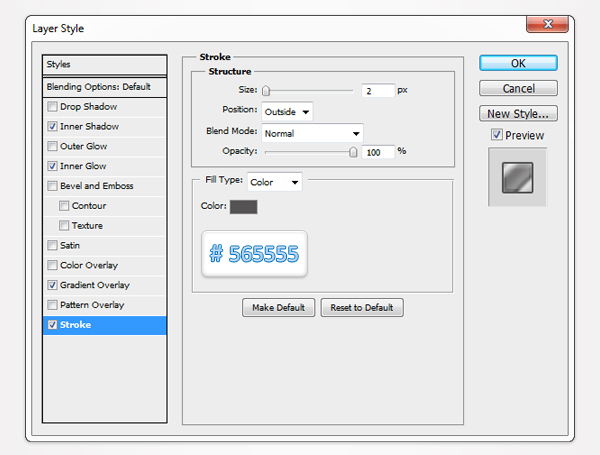
Stroke Blending Options Settings
Size: 2px
Position: Outside
Blend Mode: Normal
Opacity: 100%
Fill Type: Color
Step 25
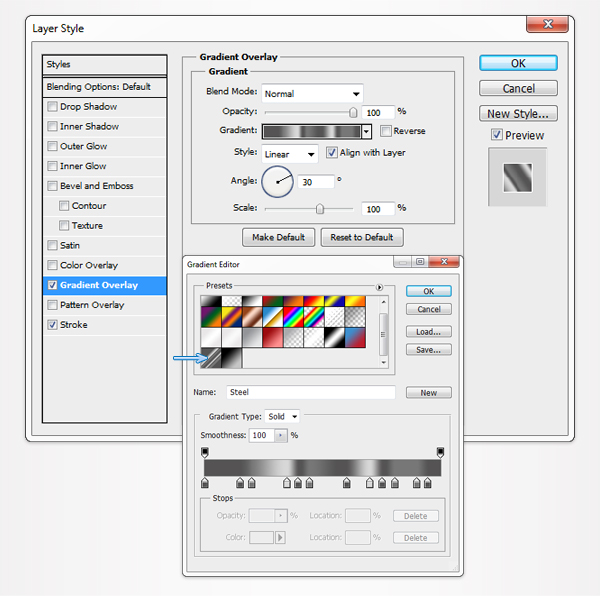
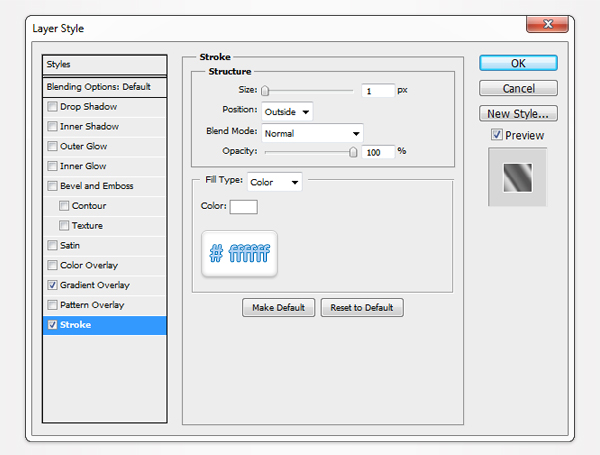
Select the smart object inside the "Frame" group open the Layer Style window and enter the properties shown below. For the Gradient Overlay section use the complex gradient saved in the previous step. You can find it in your Presets window.
Gradient Overlay Blending Options Settings
Blend Mode: Normal
Opacity: 100%
Style: Linear
Angle: 30 degrees
Scale: 100%
Stroke Blending Options Settings
Size: 1px
Position: Outside
Blend Mode: Normal
Opacity: 100%
Fill Type: Color
Step 26
Close the "Frame" group and open the "Center" group. Select the largest circle, open the Layer Style window and enter the properties shown below. Again, make sure that you save that complex gradient when you get to the Gradient Overlay section.
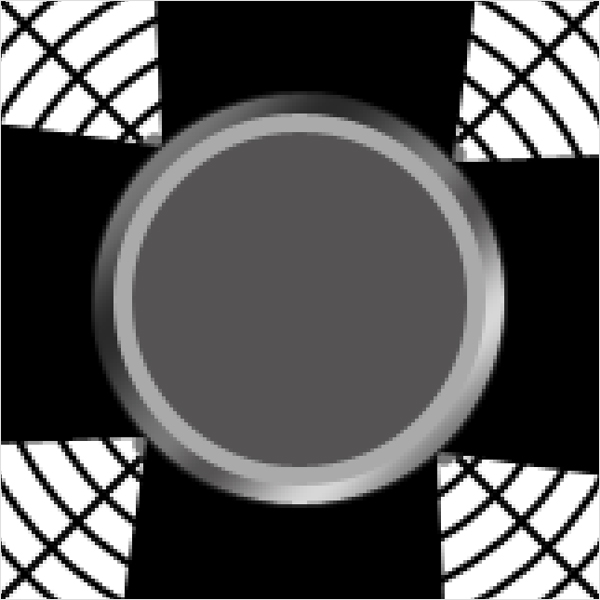
Gradient Overlay Blending Options Settings
Blend Mode: Normal
Opacity: 100%
Style: Linear
Angle: 135 degrees
Scale: 100%
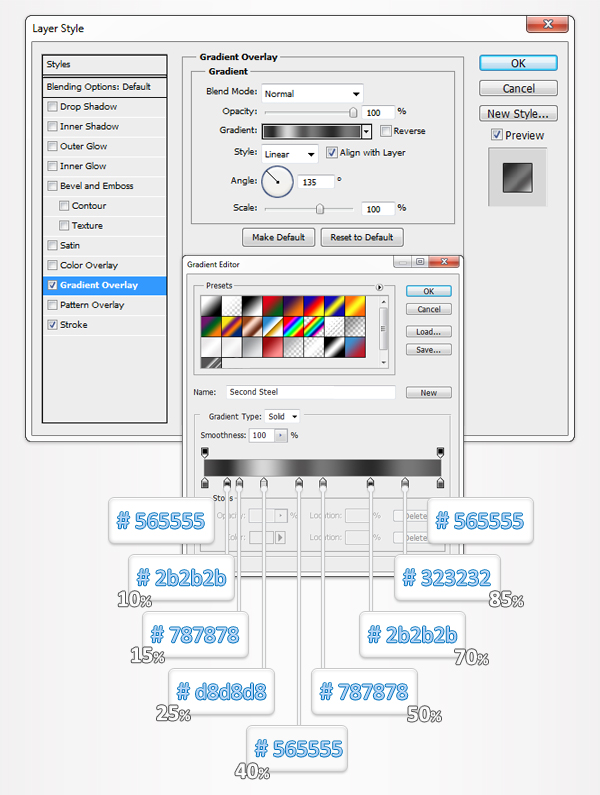
Stroke Blending Options Settings
Size: 1px
Position: Outside
Blend Mode: Normal
Opacity: 100%
Fill Type: Color

Step 27
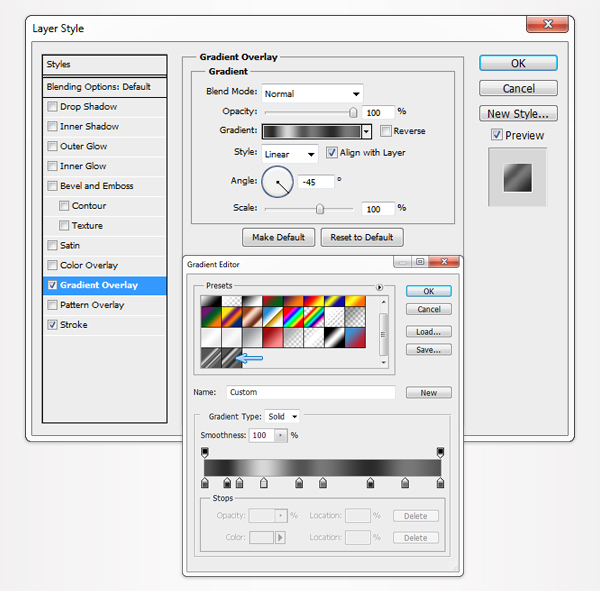
Move to the next circle, open the Layer Style window and enter the properties shown below. Use the gradient saved in the previous step when you get to the Gradient Overlay section.
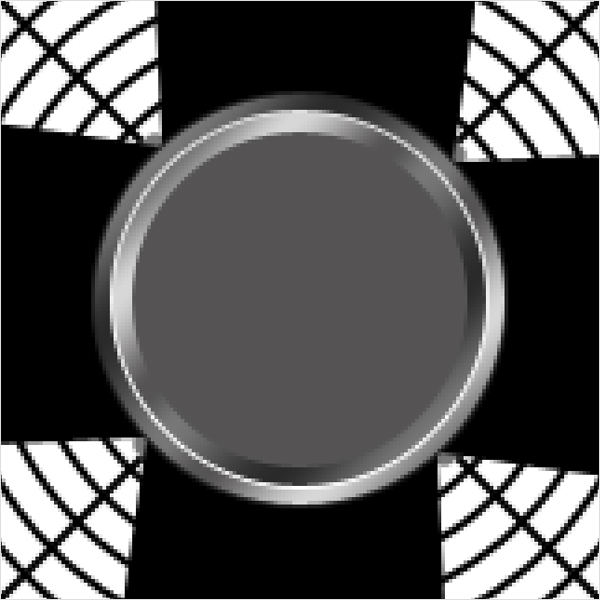
Gradient Overlay Blending Options Settings
Blend Mode: Normal
Opacity: 100%
Style: Linear
Angle: -45 degrees
Scale: 100%
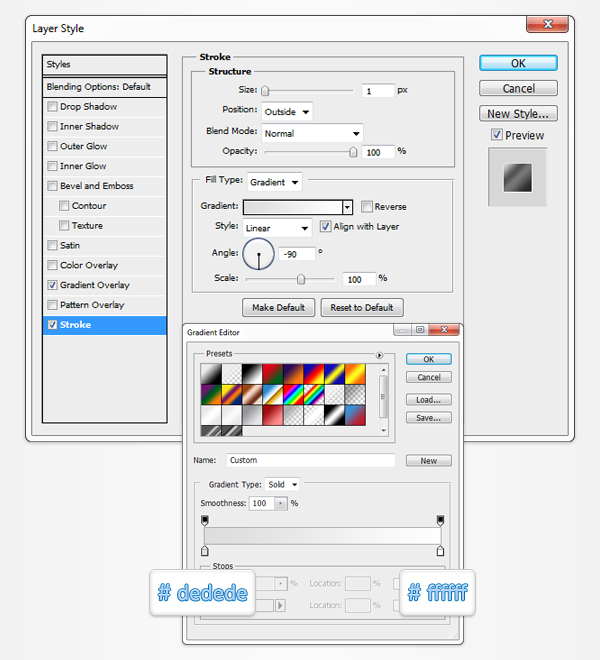
Stroke Blending Options Settings
Size: 1px
Position: Outside
Blend Mode: Normal
Opacity: 100%
Fill Type: Gradient
Style: Linear
Angle: -90 degrees
Scale: 100%
Step 28
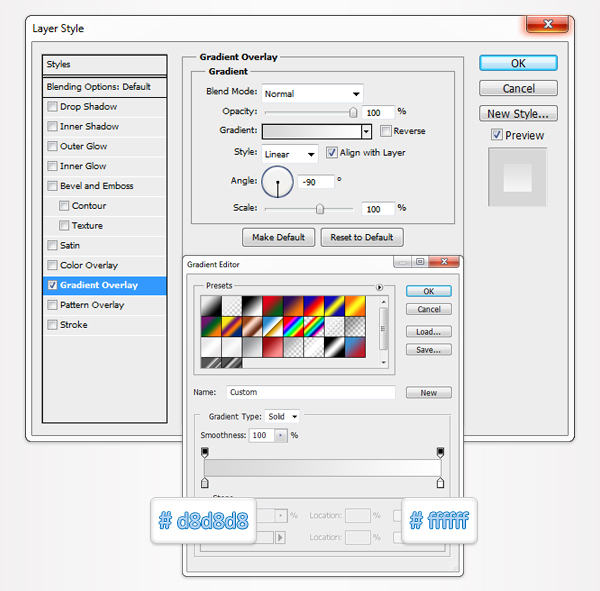
Select the remaining, unedited circle and open the Layer Style window. Enter the properties shown below, click OK then turn the resulting shape into a Smart Object.
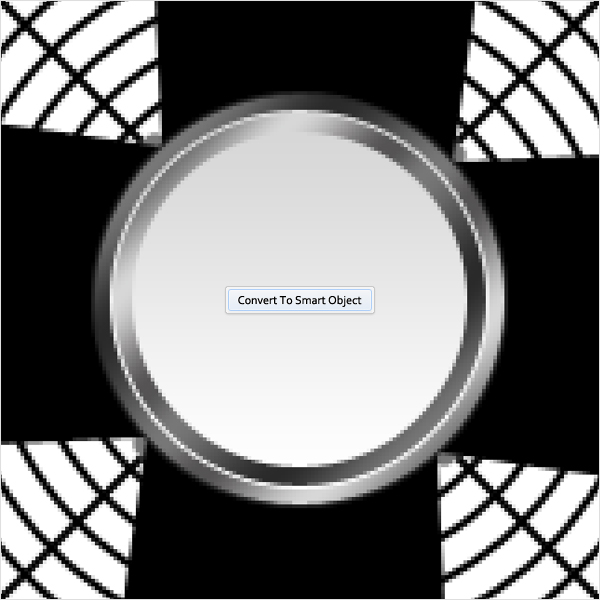
Gradient Overlay Blending Options Settings
Blend Mode: Normal
Opacity: 100%
Style: Linear
Angle: -90 degrees
Scale: 100%
Step 29
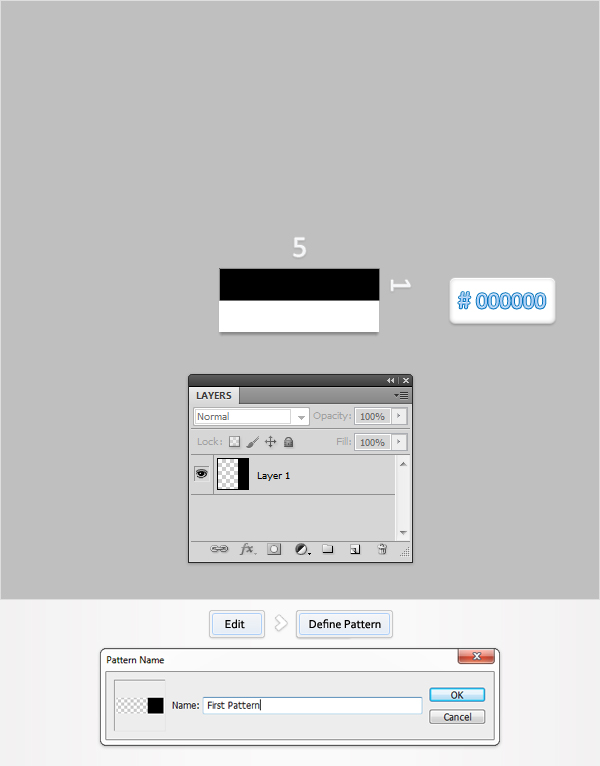
Next, you need to create your own simple pattern. Hit Control + N to open the New Document window. Enter 5 in the width box and 2 in the height box then click OK. Move to the Layers panel, unlock the Background layer and delete it. Select the Rectangle Tool and create a 5 by 1px vector shape. Fill it with black and place it as shown in the following image. Next, go to Edit > Define Pattern. Pick a name for your pattern, click OK and you made your own pattern. Close this small document and return to the main document.
Step 30
Reselect the smart object created in step #28, open the Layer Style window and enter the properties shown below.
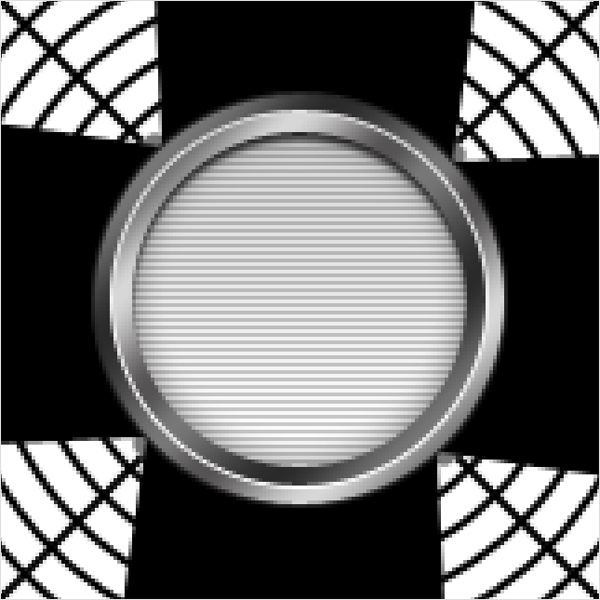
Inner Shadow Blending Options Settings
Blend Mode: Normal
Opacity: 70%
Angle: 90 degrees
Distance: 2px
Choke: 0%
Size: 1px

Inner Glow Blending Options Settings
Blending Mode: Normal
Opacity: 25%
Size: 10

Pattern Overlay Blending Options Settings
Blend Mode: Normal
Opacity: 20%
Scale: 100%

Step 31
Close the "Center" group and open the "Propeller" group. Select the right shape, open the Layer Style window and enter the properties shown below. Once again, make sure that you save that complex gradient when you get to the Gradient Overlay section.
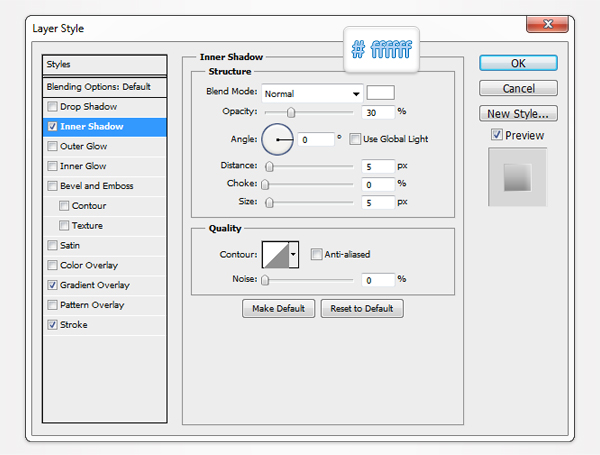
Inner Shadow Blending Options Settings
Blend Mode: Normal
Opacity: 30%
Angle: 0 degrees
Distance: 5px
Choke: 0%
Size: 5px
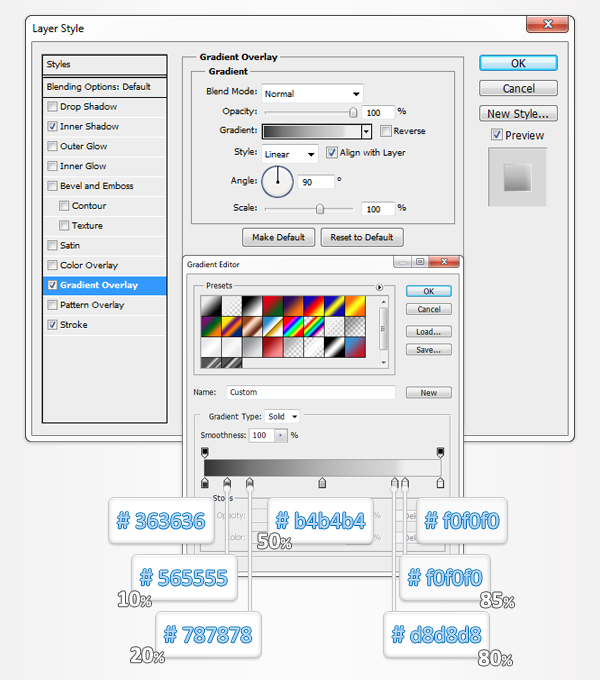
Gradient Overlay Blending Options Settings
Blend Mode: Normal
Opacity: 100%
Style: Linear
Angle: 90 degrees
Scale: 100%
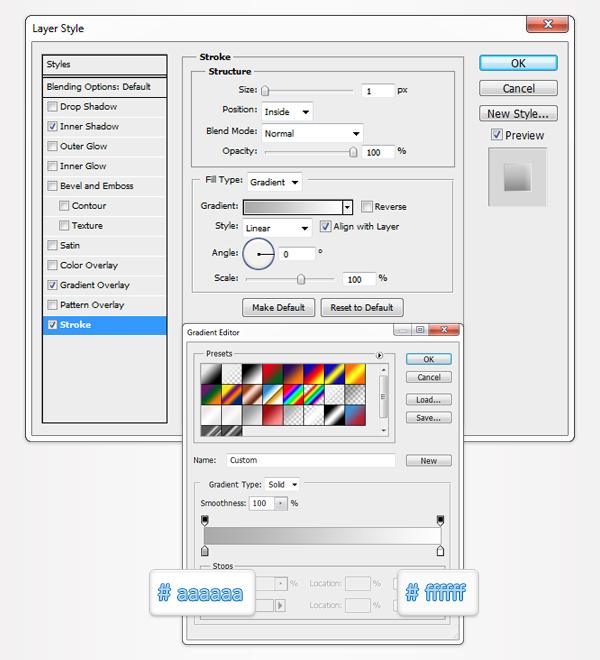
Stroke Blending Options Settings
Size: 1px
Position: Inside
Blend Mode: Normal
Opacity: 100%
Fill Type: Gradient
Style: Linear
Angle: 0 degrees
Scale: 100%
Step 32
Move to the other three shapes inside the "Propeller" group. Add the properties mentioned in the previous step, but change the angle of the effects.
Step 33
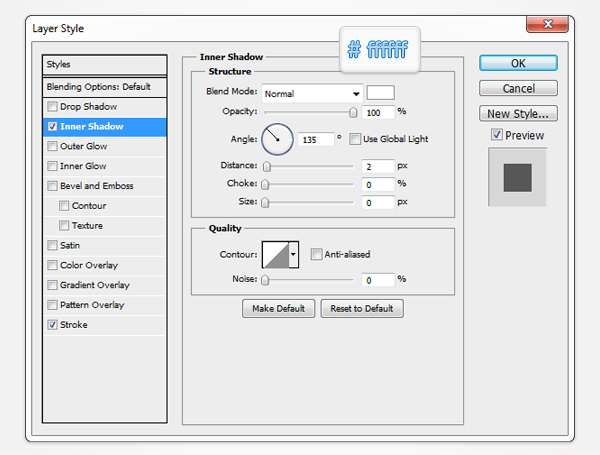
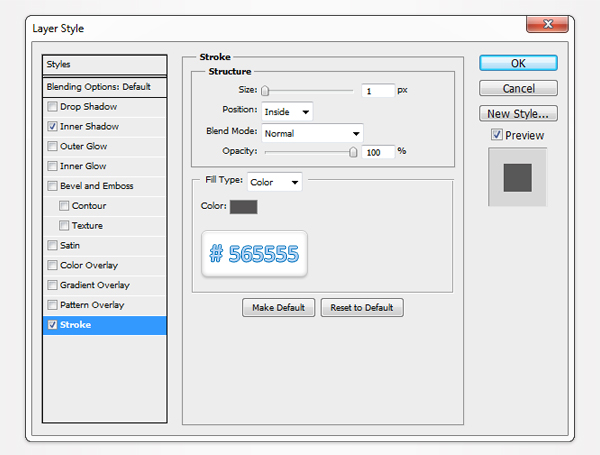
Close the "Propeller" group and open the "Grid" group. First, focus on the four, rounded rectangles. Select the top, left shape, open the Layer Style window and enter the properties shown below. Move to the other three rounded rectangles. Add the same Layers Style properties, but change the angle of the effects.
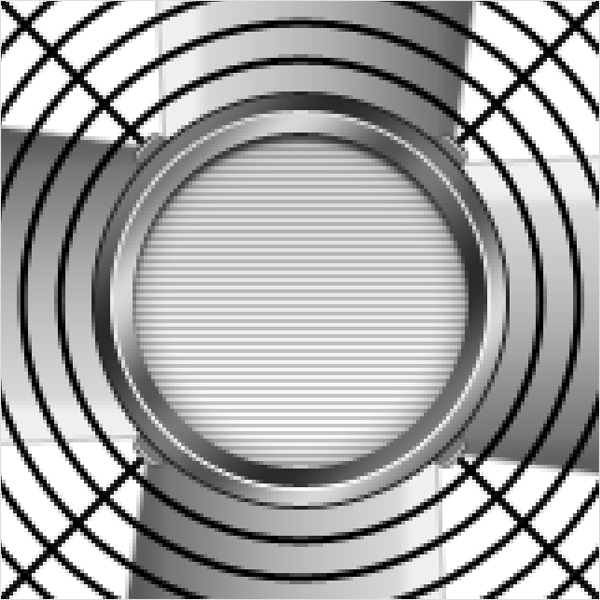
Inner Shadow Blending Options Settings
Blend Mode: Normal
Opacity: 100%
Angle: 135 degrees
Distance: 2px
Choke: 0%
Size: 0px
Stroke Blending Options Settings
Size: 1px
Position: Inside
Blend Mode: Normal
Opacity: 100%
Fill Type: Color
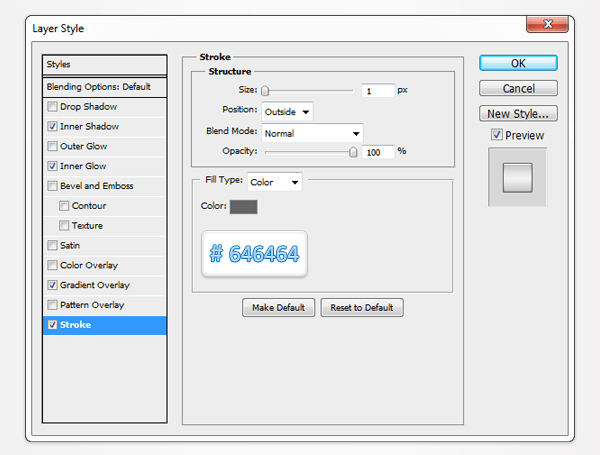
Step 35
Select the largest circle inside the "Grid" group and convert it to a smart object. Open the Layers Style window for this new smart object and enter the properties shown below.
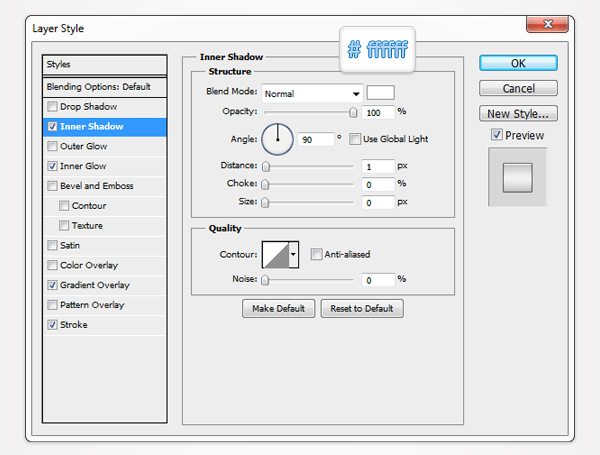
Inner Shadow Blending Options Settings
Blend Mode: Normal
Opacity: 100%
Angle: 90 degrees
Distance: 1px
Choke: 0%
Size: 0px
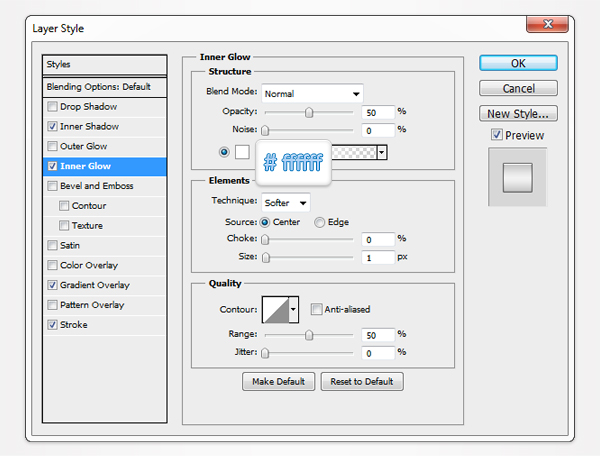
Inner Glow Blending Options Settings
Blending Mode: Normal
Opacity: 50%
Size: 1
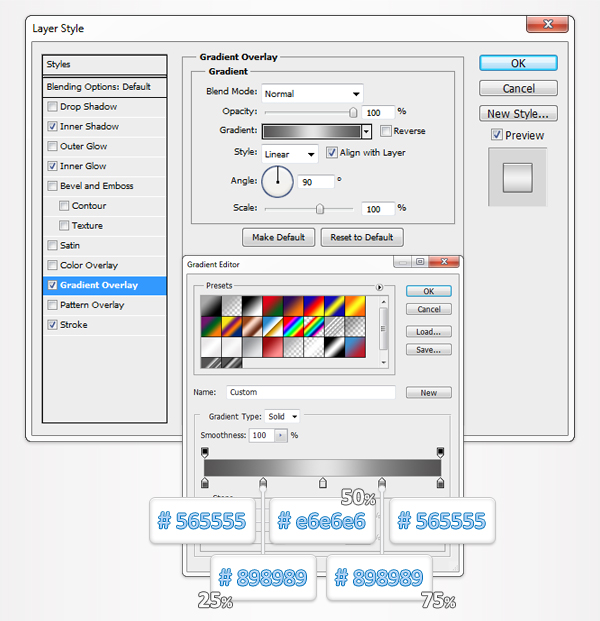
Gradient Overlay Blending Options Settings
Blend Mode: Normal
Opacity: 100%
Style: Linear
Angle: 90 degrees
Scale: 100%
Stroke Blending Options Settings
Size: 1px
Position: Outside
Blend Mode: Normal
Opacity: 100%
Fill Type: Color
Step 35
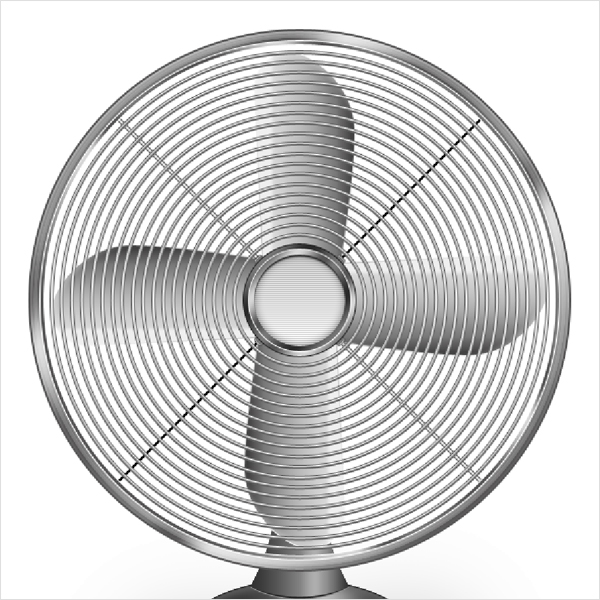
Select the rest of the circles one by one and turn them into smart objects. Now, right click on the smart object created in the previous step and click on Copy Layer Style. Next, reselect all the fresh smart objects created in the beginning of the step, right click on one of them and click on Paste Layer Style. In the end things should look like in the following image.

Step 36
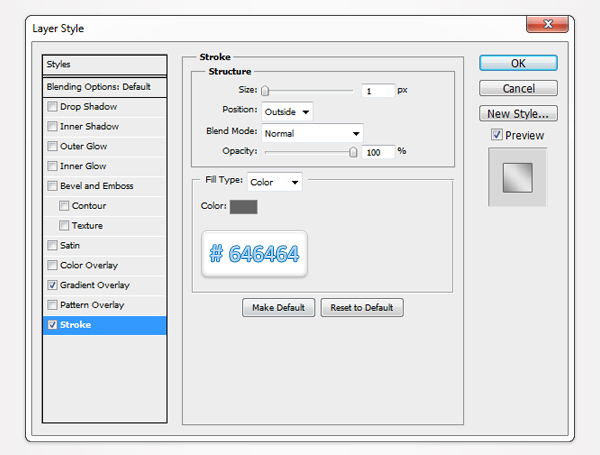
Select the first oblique shape, open the Layer Style window and enter the properties shown below.
Gradient Overlay Blending Options Settings
Blend Mode: Normal
Opacity: 100%
Style: Linear
Angle: 45 degrees
Scale: 100%

Stroke Blending Options Settings
Size: 1px
Position: Outside
Blend Mode: Normal
Opacity: 100%
Fill Type: Color
Step 37
Select the other oblique shape and add the same properties mentioned in the previous step. Just, make a change in the Gradient Overlay section. Replace the 45 degrees angle with a -45 degrees angle.

Step 38
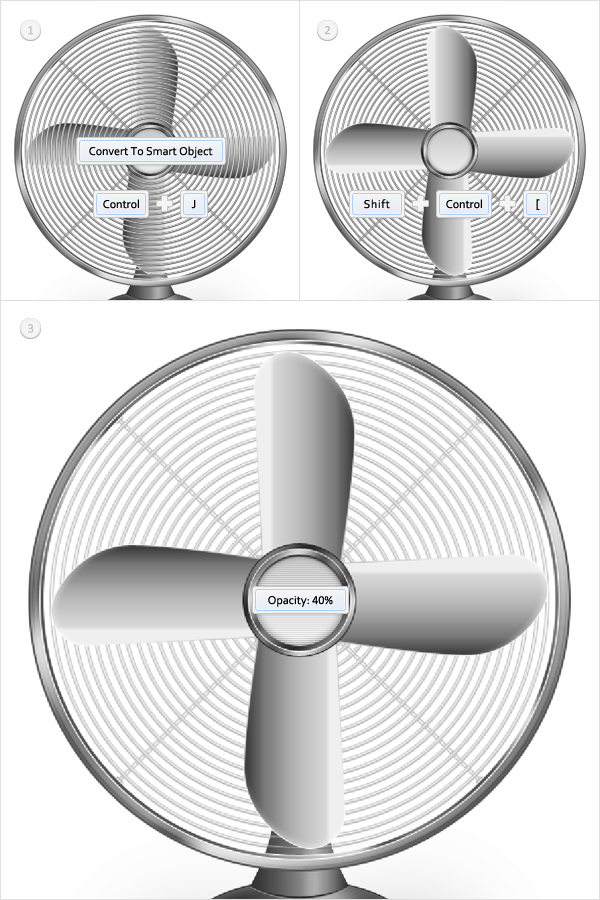
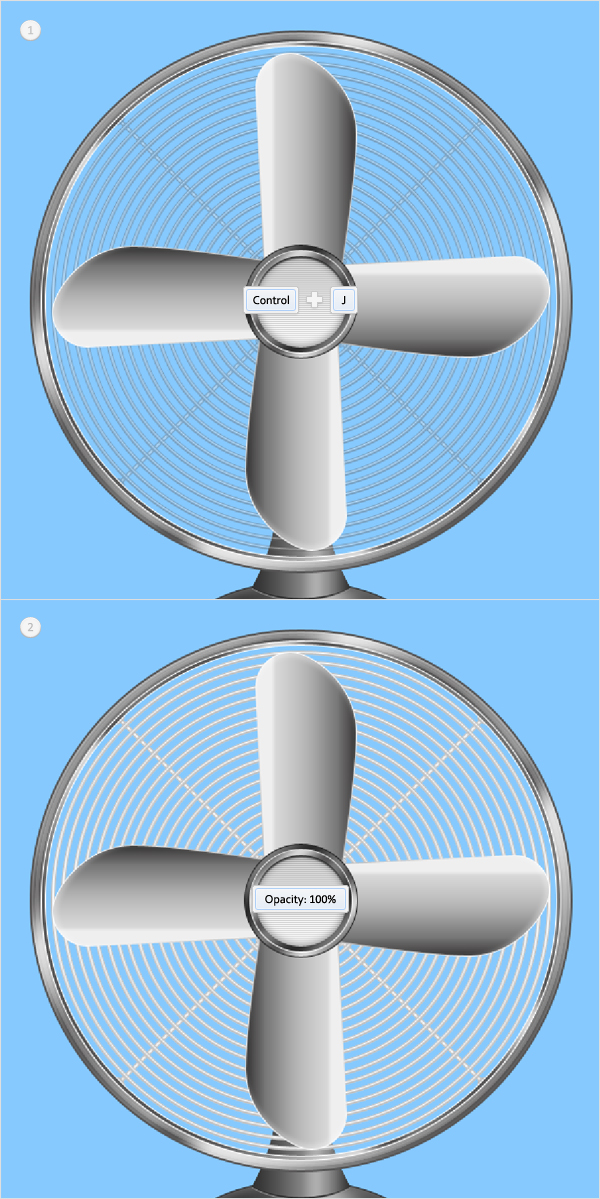
Reselect the entire "Grid" group and turn it into a Smart Object. Select this new smart object and duplicate it (Control + J). Make the copy invisible then select the original smart object, send it to back (Shift + Control + [ ) and lower its opacity to 40%. You'll need that invisible copy a few steps later.
Step 39
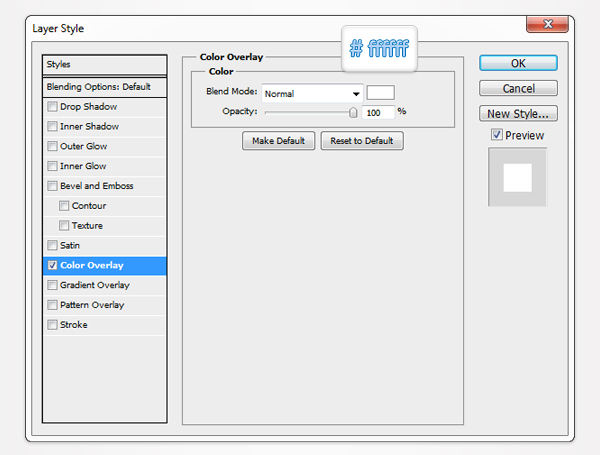
Things look ok if you're using a white background but they might get weird if you pick a different color. Let's get rid of this issue. All you need to do is to make sure that the background behind the smart object with the lowered opacity is always white. Select the smart object with the lowered opacity and duplicate it (Control + J). Select the original shape, raise its opacity to 100% and open the Layers Style window. Activate the Color Overlay, enter the properties shown below and click OK. Now, things should look like in the second image.
Color Overlay Options Settings
Blending Mode: Normal
Opacity: 100%
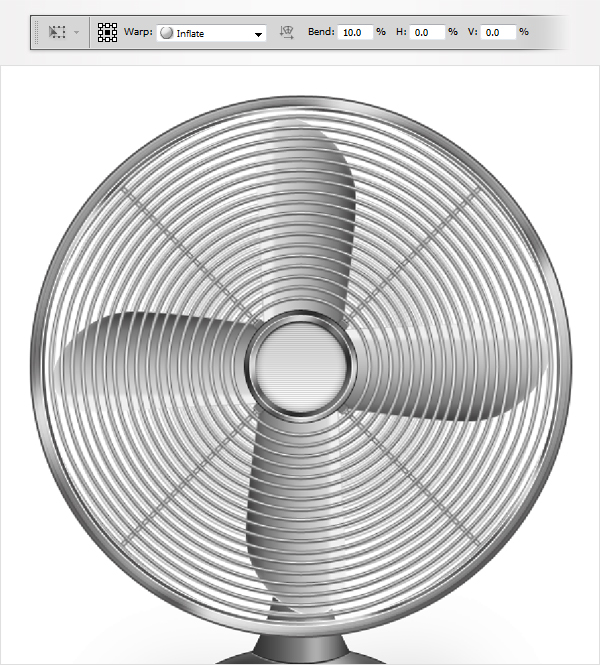
Step 40
Return to the invisible smart object created in step #39. Make it visible and go to Edit > Transform > Warp. Select Inflate from the Warp menu, enter 10 in the Bend box and hit enter.
Step 41
Create a new layer (Shift + Control + Alt + N) and select it from the Layers panel. Pick the Brush Tool, set the size at 5px and the hardness at 100% and draw a simple pat as shown in the first image. Send this new layer to back (Shift + Control + [ ), open the Layer Style window and enter the properties shown below.
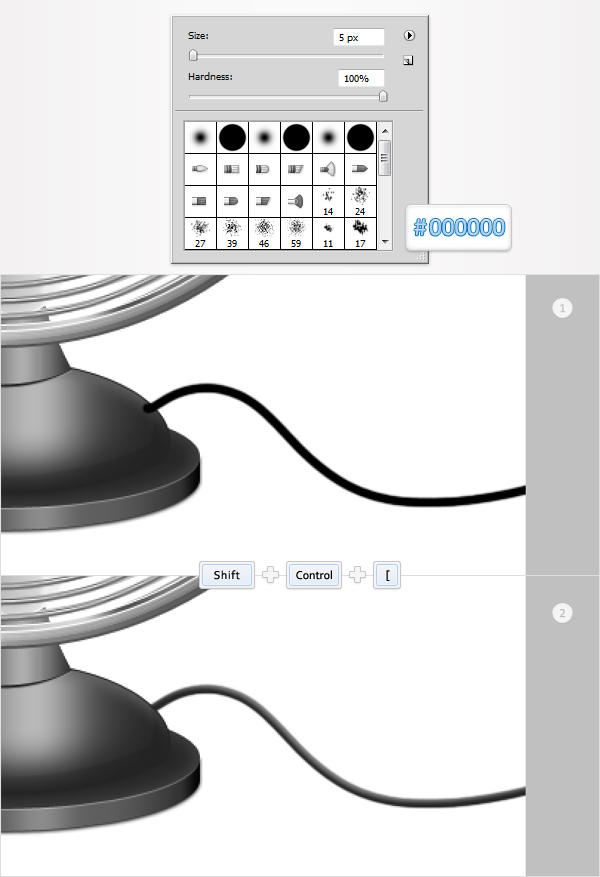
Inner Shadow Blending Options Settings
Blend Mode: Normal
Opacity: 100%
Angle: 45 degrees
Distance: 3px
Choke: 0%
Size: 3px

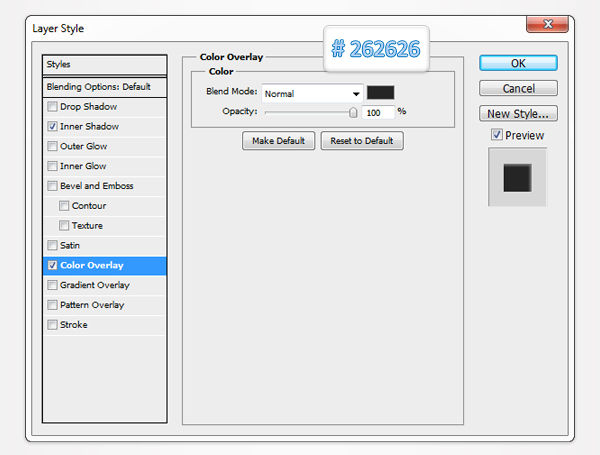
Color Overlay Options Settings
Blending Mode: Normal
Opacity: 100%
Step 42
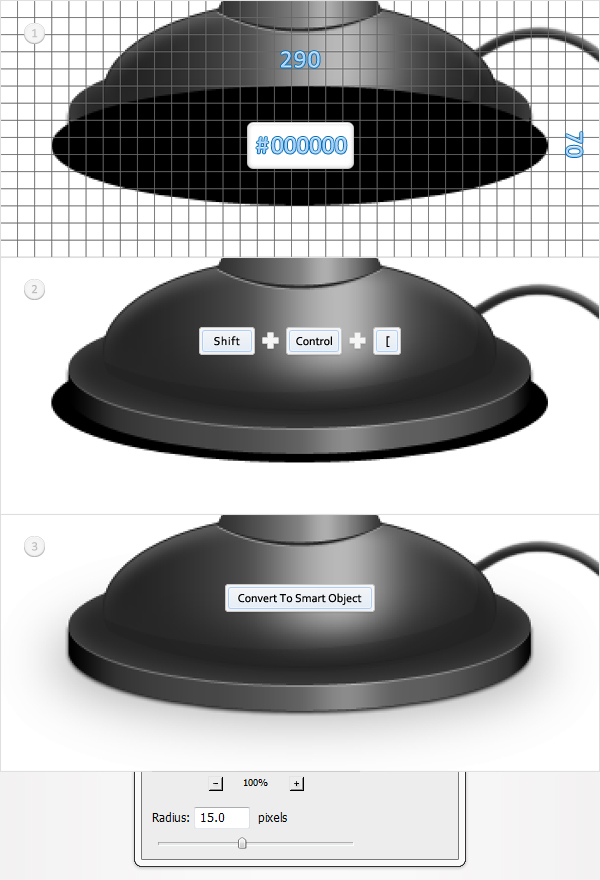
Re-enable the Grid (View > Show Grid) and the Snap to Grid (View > Snap to > Grid). Set the foreground color at black, pick the Ellipse Tool, create a 290 by 70px shape and place it as shown in the fist image. Send it to back, convert it to a smart object and go to Effect > Blur > Gaussian Blur. Enter a15px radius, click OK and you're done.
And We're Done!
Here is how your final result should look.

About the author
Copyright © . All Rights Reserved
