Mustache Editor: Add a Moustache
In this tutorial I will teach you how to use a mustache editor to add a moustache to a picture and make to make it look as real as possible.
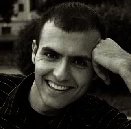
This is my final result:

Before you start we need to find 2 pictures.
The first has to be a fairly big and detailed picture of a face, I'm going to use this picture: (right click and save as to save it to your computer)

The second picture has to have someone with a mustache or beard on it. It is important that the color of the hair matches the color of the mustache, and also pay attention that if in the first picture the person looks right in the camera, on the second picture you also get a good view of the front of the mustache.
For the mustache I'm going to use this picture:(right click and save as to save it to your computer)

Save these 2 pictures(or the ones you are going to use) and open the first picture in photoshop.
Now also open the picture with the mustache on it.
Now copy and paste the second image into a new layer in the same document as where picture 1 is.
On the moustache layer remove everything but the area you will need(the moustache or beard). You can use the Eraser tool for this (press the E to select it).
Now resize it until the moustache has the right size for your face.
You can do this by selecting the layer with the mustache and going to: edit>transform>scale
My image now looks like this:

Now zoom into about 400% and select your Eraser tool again (press E to select it) and with a small round brush (I used 8px), delete all the unwanted skin that is still attached to the mustache

If done correct your picture will now look like this:

As you can see we need to rotate the moustache a bit to make it align better with the face.
You can do this by going to: edit>transform>rotate. Here is what I did:

After this step I took out my eraser tool again and with a very small round brush(4px) I deleted some parts of the mustache, to make it look more natural. My result after this step:

Now its starting to look good, the only thing we need to do is add adjustment layers to make it look even more realistic.
I started with adding a Level layer on top of our mustache layer.

With the Level layer selected press: CTRL+ALT+G, this will make the layer a clipping mask layer. This means that only the layer under the mask is affected by the the Level Layer. So in this example it means that you can edit the color of the moustache, but not of the whole picture
play a bit with the 3 triangles until you think it looks natural. With this layer you can alter how many grey/black and white is used in your mustache. I made my mustache slightly lighter.
This is my final result, I hope you learned something from this tutorial
About the author
Copyright © . All Rights Reserved