How to Create Favicon.ico File in Photoshop CS5
Favicon is a little custom icon that appears in various places in the web browsers like the address bar, the favorites list, in the RSS feeds, the browser's tabs, as a desktop shortcut to a site and more. The name favicon comes originally from favorites icon. It is also known as a shortcut icon, Web site icon, URL icon, or bookmark icon. It appeared first in March 1999, when Microsoft released Internet Explorer 5 which supported website favicons for a first time.
To add a favicon to your site or blog, all you have to do is to put the favicon.ico file in the site's root directory. The most of the browsers nowadays instead of the .ico file can use GIF or PNG images, which allows to use the animations and the transparency functions of these file formats. But because the .ico files are understand by all browsers, now we'll learn how to create them in Photoshop.
Subscribe to our newsletter and get useful tutorials and huge bundles with design freebies once in two weeks:
Necessary Plugin
Before we start creating our favicon in Photoshop, we have to download one free plugin from Telegraphic. With this plugin we can open and save Windows .ico files. Be sure to install this plugin before we start creating our favicon file.
The Design
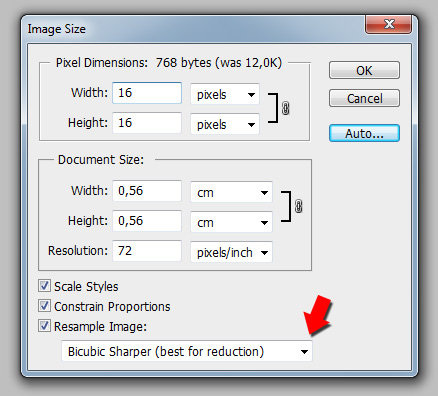
The actual size of the favicon files is 16x16 pixels. This is one really small canvas to put your design on, so lets start our icon design with a little larger canvas, lets say 64x64 pixels. We will scale down our design later but be sure to start your project with canvas with odd and equal pixels for hight and width. The most important thing for the favicon design is to be recognizable and it must reflect your site. This is the most tiny bit of your online brand so you have to do it right. Probably you already have a site logo so the first thing to do is to open it in Photoshop and try to scale it down to 16x16 pixels. It looks like s**t? Try with the first letter of your domain. Too many like yours? Just use your design skills and come to a design that can represent your site, use your sites color palette and create a small icon that can't be mistaken with some other favicon designs.
Tip#1
Sharpen. Sharpen, sharpen and sharpen... Try to make it before the resize to 16x16 and try to make it afterwards.
Tip#2
When you scale down your image, be sure to select Bicubic Sharper in the drop down menu.

Saving the favicon

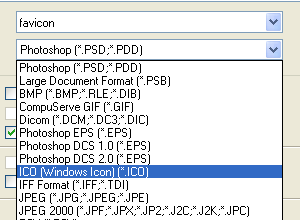
In the main program menu go to File>SaveAs and enter for the file name "favicon", andchoose ICO (Windows Icon) from the drop down menu. This option will be available only after you have installed the plugin from the first step of our Photoshop tutorial.
Uploading the favicon
Just connect to your website's server and upload the Favicon.ico file to your root directory where your index page is. When the favicon.ico file is in your root folder the most browsers will detect and display it automatically.
Some browsers will look for HTML code in your index page to display the favicon.
Add the following code to the HEAD of your page <link rel="icon"
href="/favicon.ico" type="image/x-icon"> and the favicon will display
in your browser's address bar. If it don't appear at first, try to
refresh the page few times and clear your browser's cache.
Copyright © . All Rights Reserved