Bright Rope Light Text Effect

Step 1
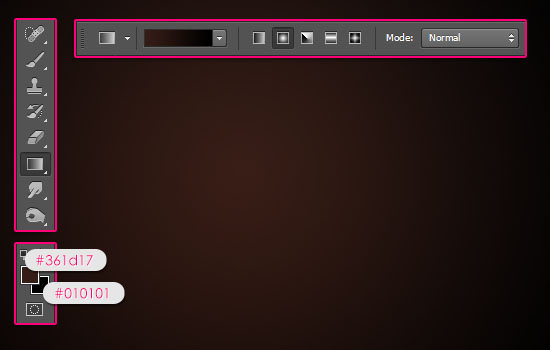
- Create a 1280 x 1024 px document, set the Foreground color to #361d17 and the Background color to #010101. Pick the Gradient Tool, click the Radial Gradient icon in the Options bar, then click and drag from the center of the document to one of the corners.
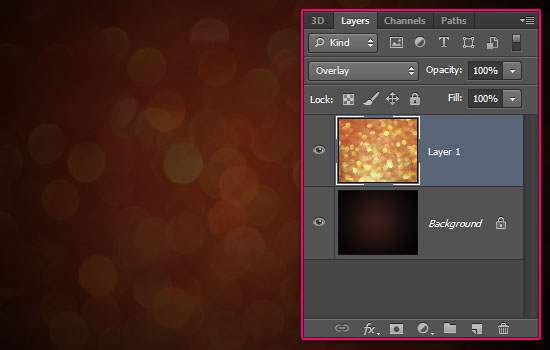
- Place the Loving the sparkle paper image on top of the Background layer, resize it so that it fits inside the document, then change its layer's Blend Mode to Overlay.
Step 2
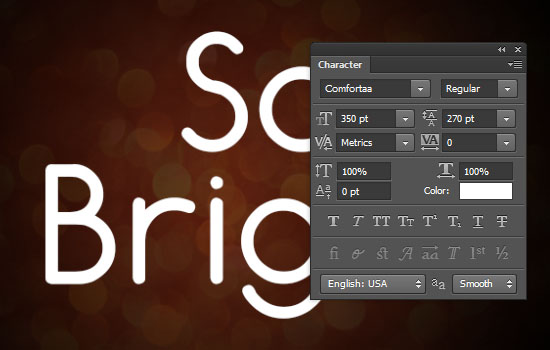
- Create the text in white using the font Comfortaa-Regular. The font size is 350 pt, and if you are creating more than one line of text, change the Leading value to something between 270 and 300 pt.
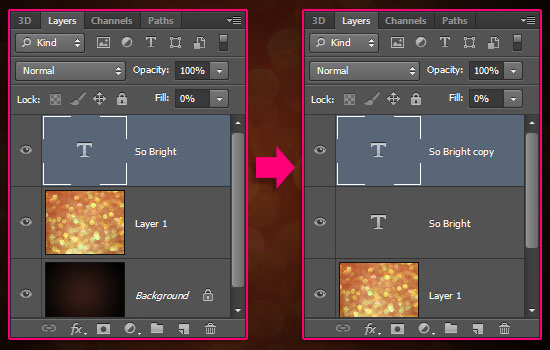
- Change the text layer's Fill value to 0, then duplicate it.
Step 3
Double click the original text layer to apply the following Layer Style:
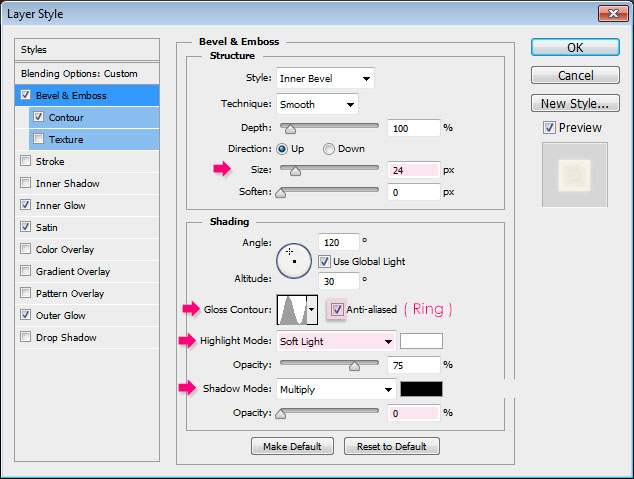
- Bevel and Emboss: Change the Size to 24, the Gloss Contour to Ring, and check the Anti-aliased box. Then, change the Highlight Mode to Soft Light, and the Shadow Mode Opacity to 0.
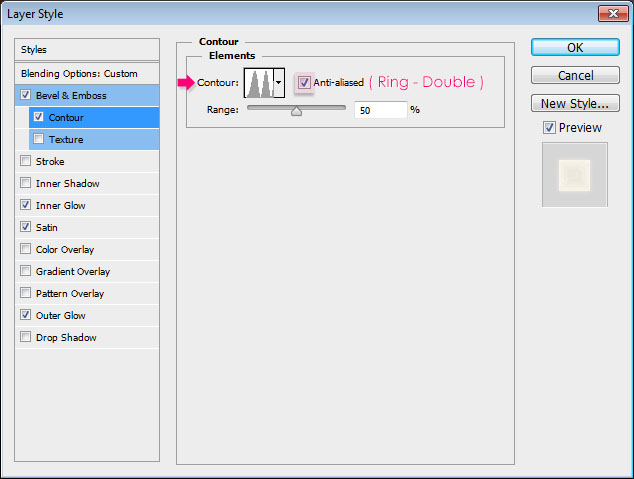
- Contour: Choose Ring - Double, and check the Anti-aliased box.
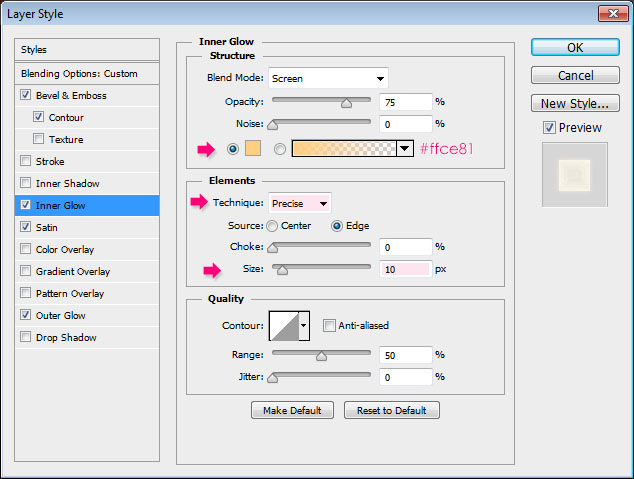
- Inner Glow: Change the color to #ffce81, the Technique to Precise, and the Size to 10.
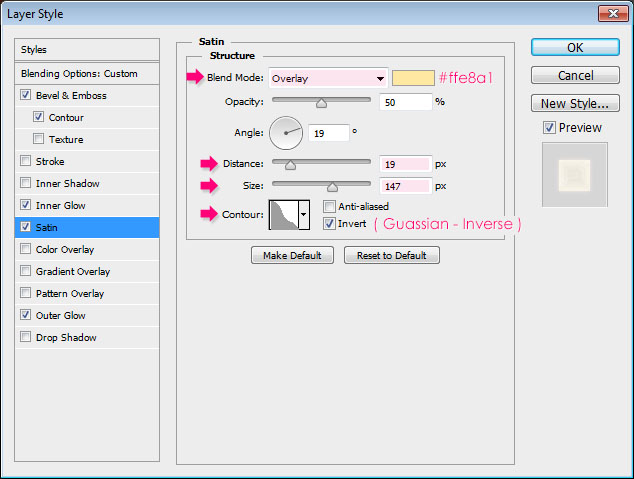
- Satin: Change the Blend Mode to Overlay, the color to #ffe8a1, the Distance to 19, the Size to 147, and the Contour to Guassian-Inverse.
- Outer Glow: Change the color to #ffbc81, and the Range to 100.
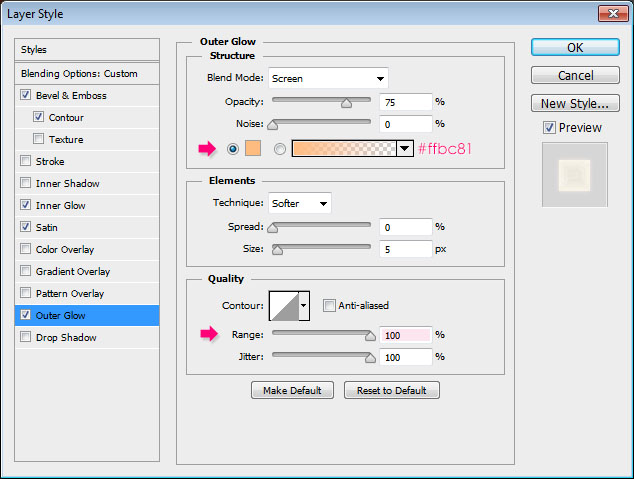
This will create the first part of the semi-transparent rope.

Step 4
Double click the copy text layer to apply the following Layer Style:
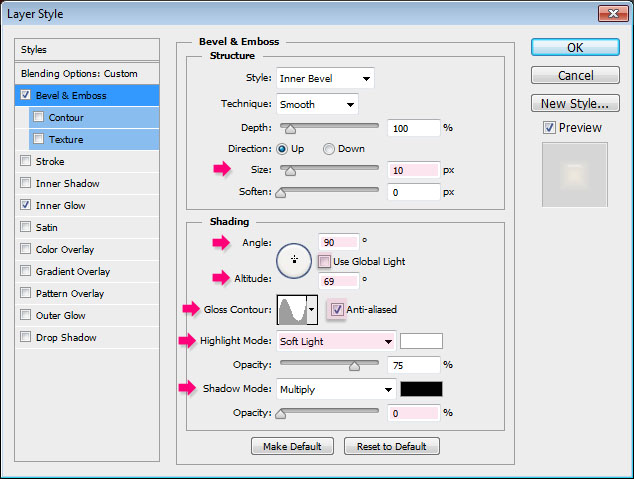
- Bevel and Emboss: Change the Size to 10, un-check the Use Global Light box, then change the Angle to 90 and the Altitude to 69. Load the 25 Contours pack and change the Gloss Contour to the one shown below. Also, change the Highlight Mode to Soft Light, and the Shadow Mode Opacity to 0.
- Inner Glow: Change the color to #e2b452, the Technique to Precise, the Source to Center, and the Size to 54.
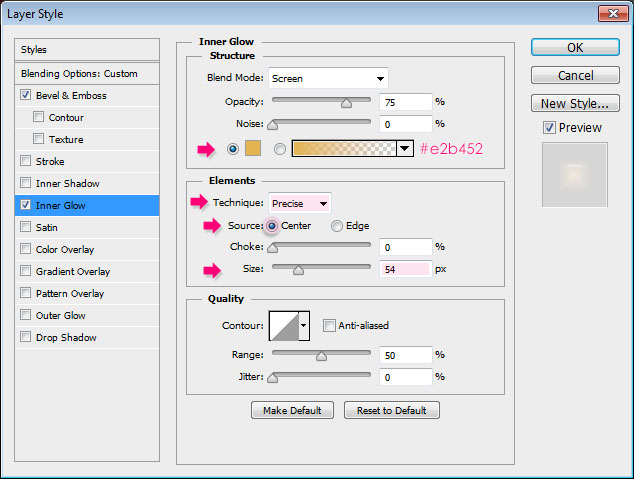
This will create the second part of the rope, adding more gloss and shine details.

Step 5
This is the 'kinda' difficult part, where we are going to use the Pen Tool to create a work path inside each one of the letters. So here are a couple of notes and tips for using the Pen Tool.
- First off, select the Pen Tool, then choose Path in the Options bar at the top, and make sure that the Auto Add/Delete box is checked.
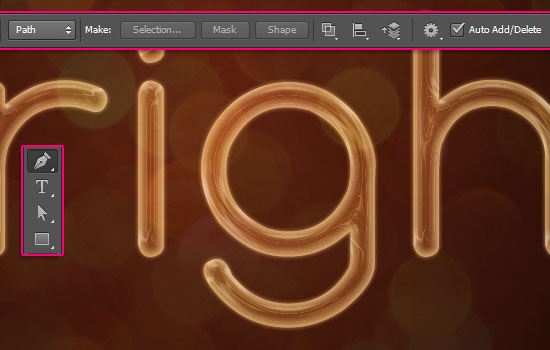
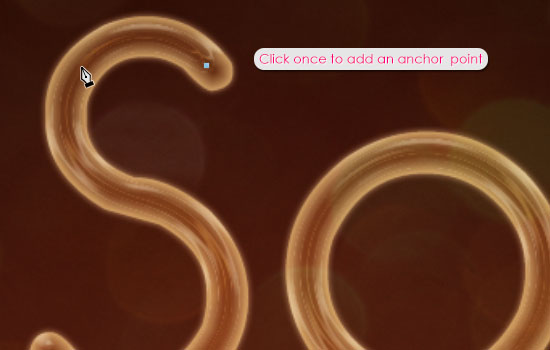
- To add anchor points, you need to click once. No path will be created until the mouse button is clicked again.
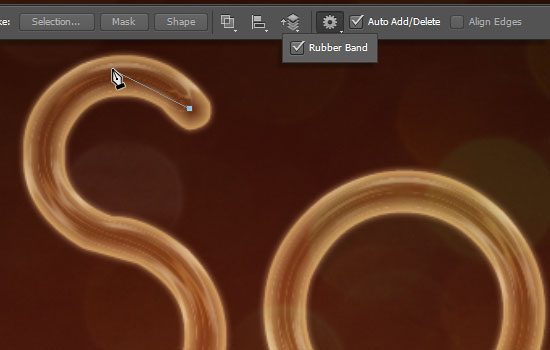
- If you check the Rubber Band box in the Options bar, you can see how the path will look like before you click to add an anchor point. So if you find this helpful, go ahead and check that option, cause we're going to be adding many paths!
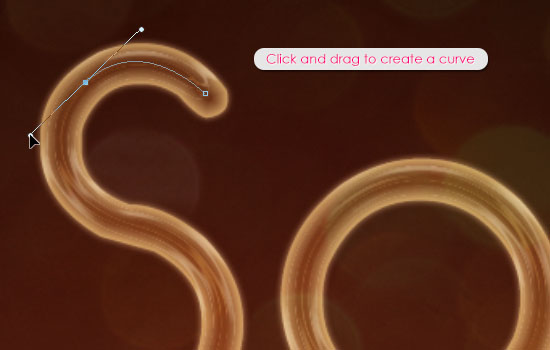
- Clicking right away to add anchor points creates a straight line path. To create curves instead, you need to click and drag when you add the anchor point.
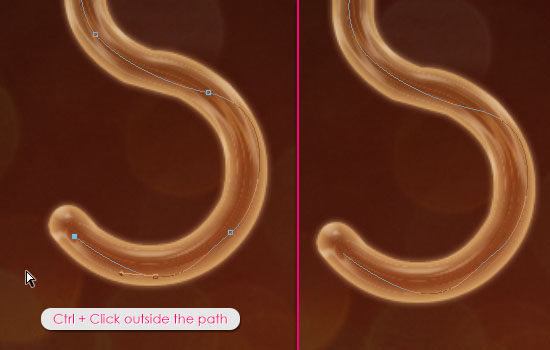
- When you create the path, and you are ready to create a new separate one, press and hold the Ctrl/Cmd key, then click anywhere outside the path, then release the Ctrl/Cmd key. This will keep whatever path(s) you have, and enable you to add new ones separately.
Use this whenever you're done with a letter's path and ready to create another's.
- Don't waste so much time in perfecting the path, because once the basic shape is created, you can use the Direct Selection Tool to modify your anchor points.
Click the path first to show the anchor points, then, whenever you click any of those points, you can move it around.
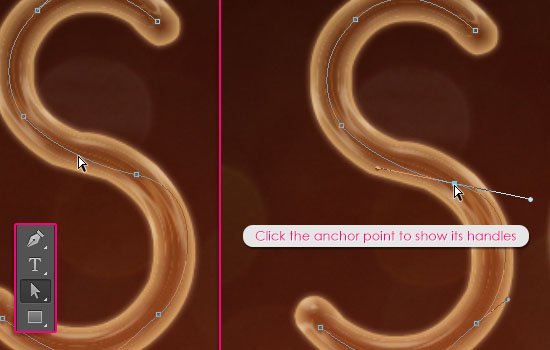
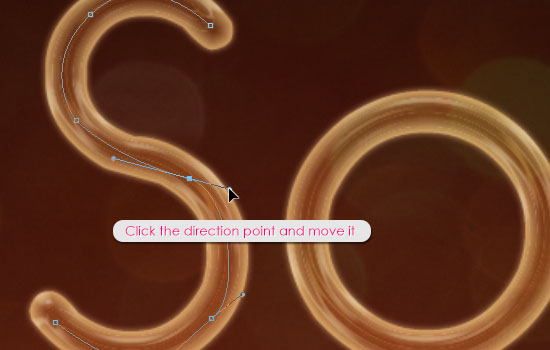
- Once the anchor point is selected, you can see the two little handles (direction lines) that control it. Click the point at the end of the handle and move it slightly to the sides if you want to change the direction (or the orientation) of the path, and move it out and in to make the curve wider or narrower.
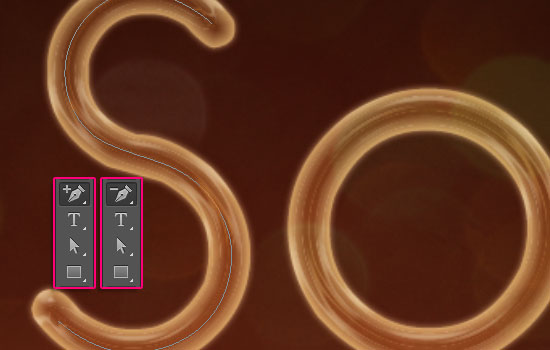
- You can also use the Add Anchor Point Tool and the Delete Anchor Point Tool to add or remove anchor points along the path(s). Take your time with creating the paths, this is an important step to get a good result.
Step 6
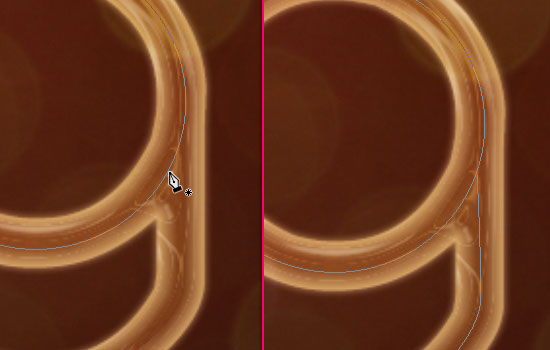
- You can as well use the Ellipse Tool, choosing Path in the Options bar, to create the round parts, as it's easier, faster, and more accurate. To get a perfect circle, press and hold the Shift key while creating the circle.
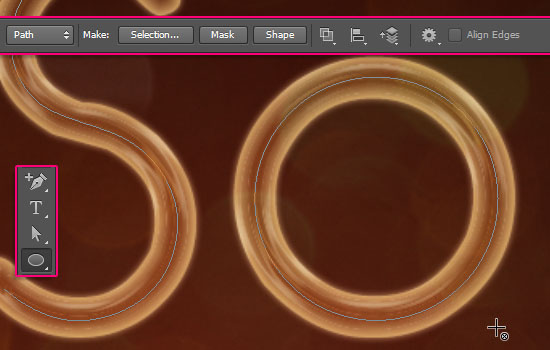
- You can create the round part of the letter then use the Pen Tool again to continue the rest.
Step 7
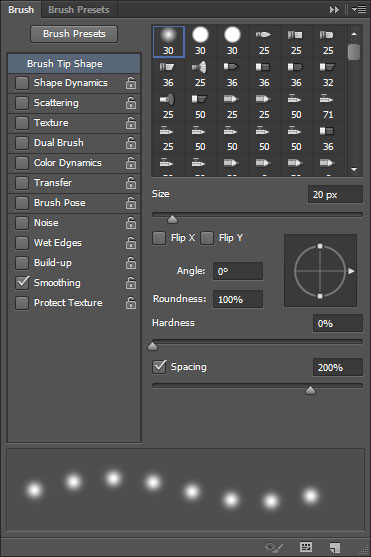
- Once the paths are all ready, pick a 20 px soft round brush.
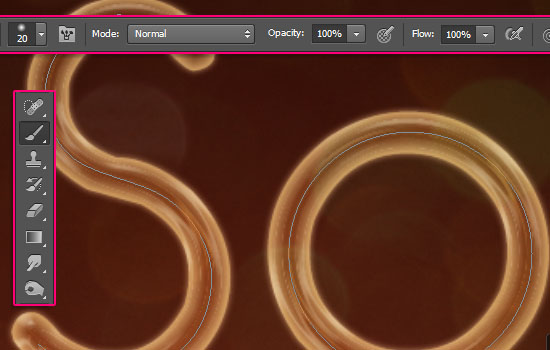
- In the Brush panel (Window -> Brush), set the spacing to 200%. Smaller values create closer dots.
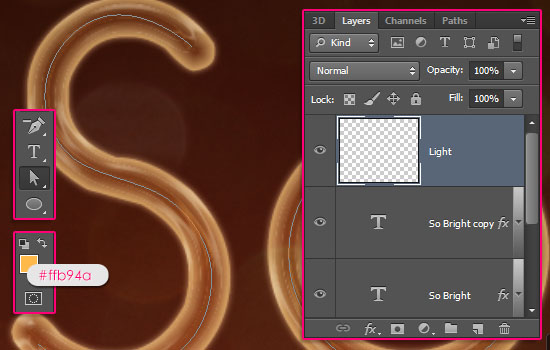
- Set the Foreground color to #ffb94a, create a new layer on top of all of layers, call it "Light", and pick the Direct Selection Tool. Make sure no path or anchor points are selected by clicking anywhere outside all the paths.
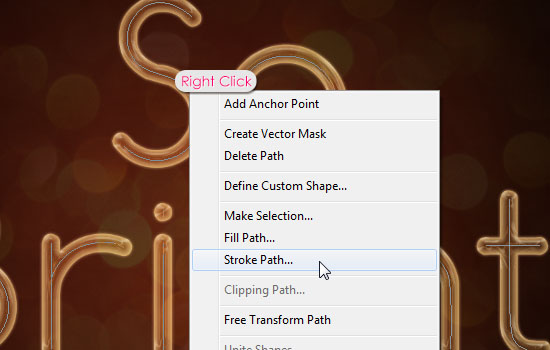
- Right click any work path then choose Stroke Path.
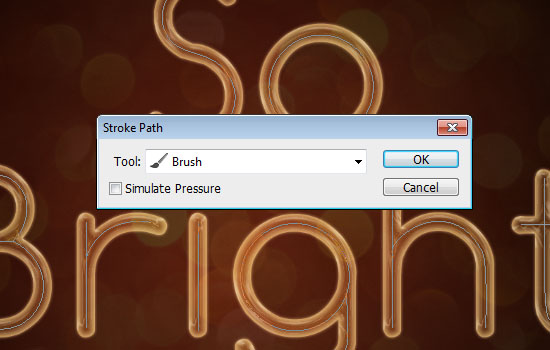
- Choose Brush from the Tool drop down menu and make sure that the Simulate Pressure box is un-checked.
- This will stroke the path with the dots brush. Hit Enter to get rid of the path.

Step 8
- Pick the Eraser Tool. Choose a soft round brush with a size of 30 or 40 px. Erase any overlapping or unwanted dots.
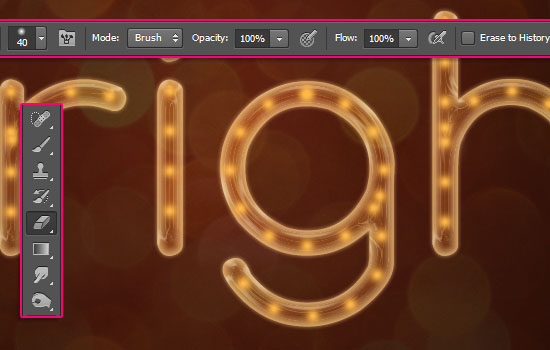
- You can then use the Brush Tool to fill in the empty spaces with more dots.
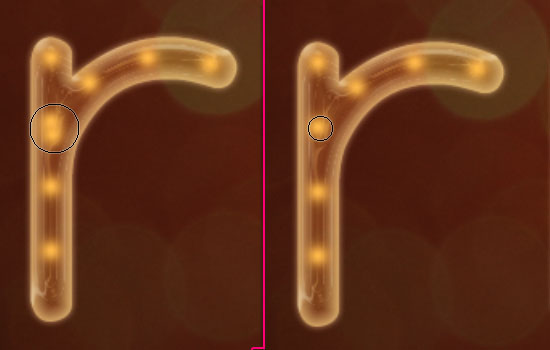
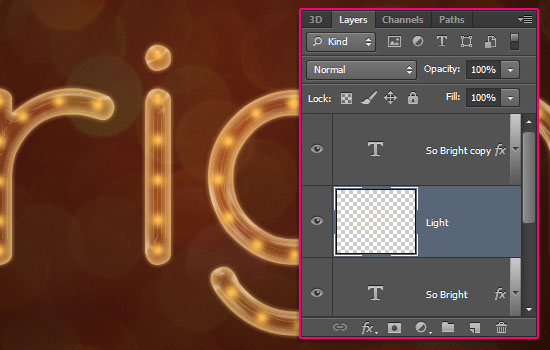
- When done, place the "Light" layer between the two text layers.
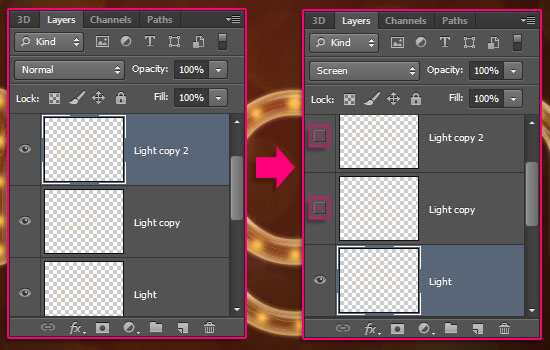
- Duplicate the "Light" layer twice to create two copies, then make those copies invisible by clicking the eye icon next to each one of them.
Step 9
Double click the original "Light" layer to apply the following Layer Style:
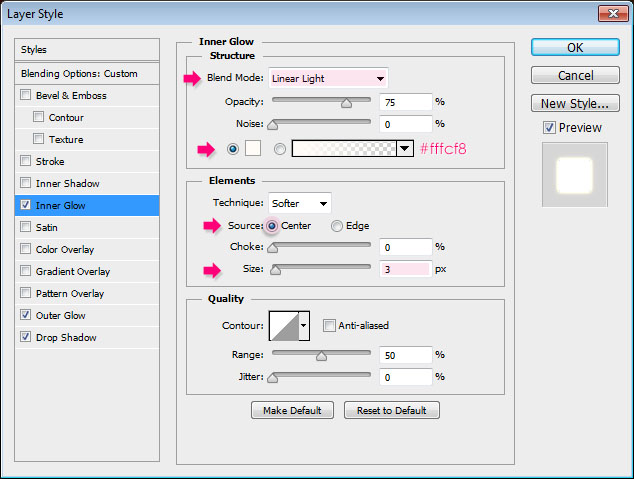
- Inner Glow: Change the Blend Mode to Linear Light, the color #fffcf8, the Source to Center, and the Size to 3.
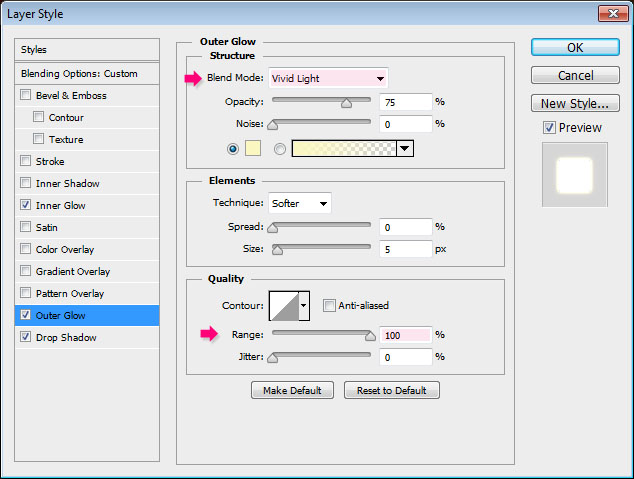
- Outer Glow: Change the Blend Mode to Vivid Light, and the Range to 100.
- Drop Shadow: Change the Blend Mode to Overlay, this way we can use the Drop Shadow to intensify the glow effect, then change the color to #ffe8a3, the Distance to 0, and the Size to 10.
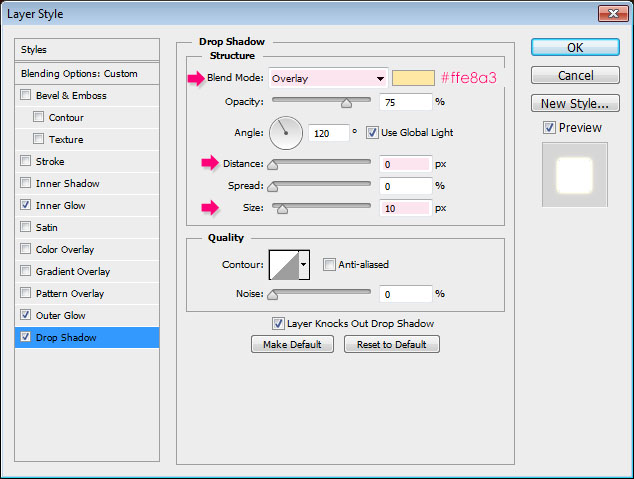
- This will add beautiful glow to the light dots.

Step 10
- Select the first "Light" copy layer, and make it visible by clicking the empty square next to it.
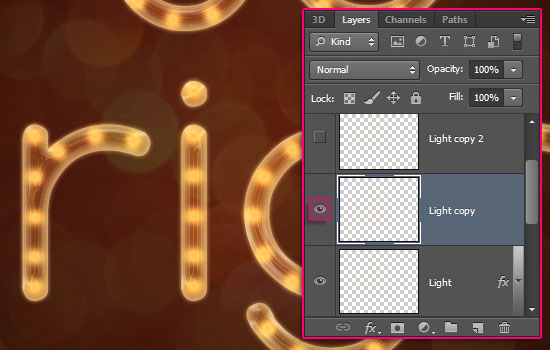
- Go to Filter -> Blur -> Motion Blur, set the Angle to 45, and the Distance to 30.
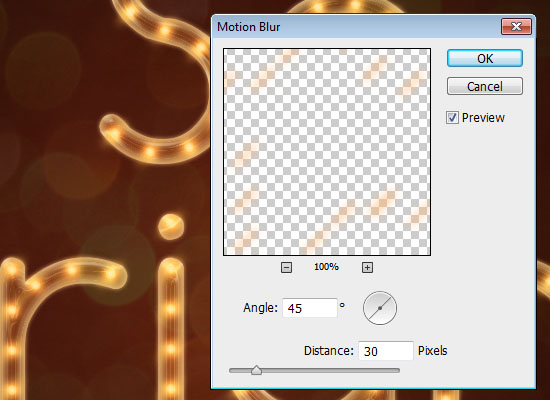
- Select the second "Light" copy layer, and make it visible as well.
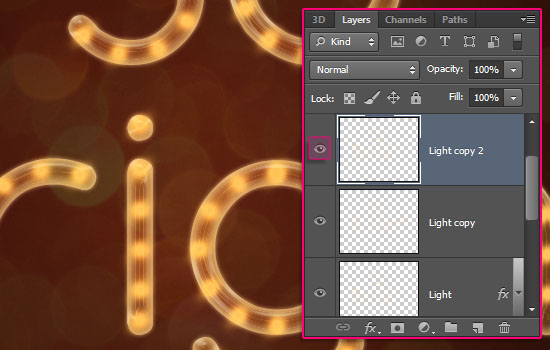
- Go to Filter -> Blur -> Motion Blur, set the Angle to -45, and the Distance to 30.

- Select both copy "Light" layers (select one, then Ctrl + Click the other), and go to Layer -> Merge Layers (or press Ctrl + E) to merge them in one layer.
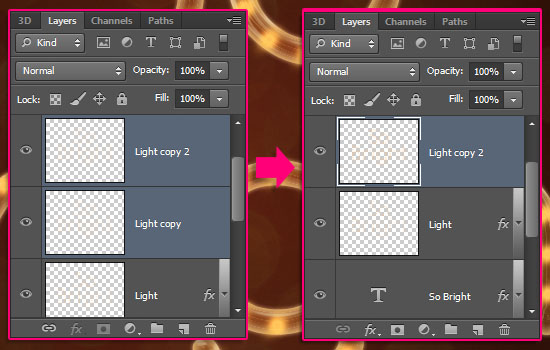
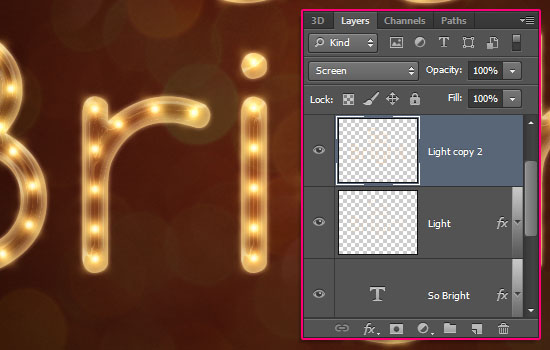
- Change the merged layer's Blend Mode to Screen.
Step 11
- No glowing effect is complete without sparkles! So create a new layer on top of all layers and call it "Sparkles", then change its Blend Mode to Overlay, and set the Foreground color to #fffdef.
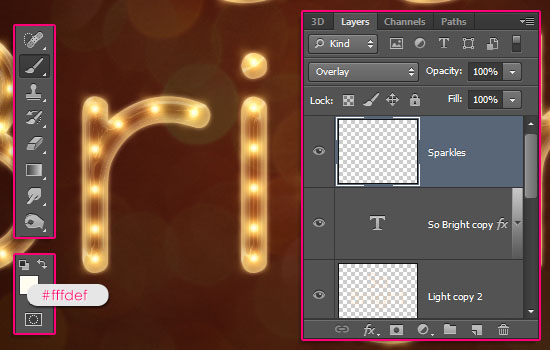
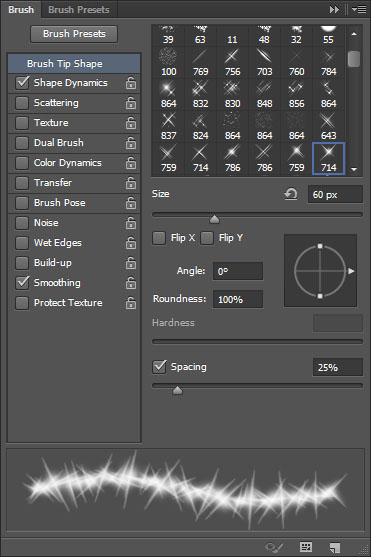
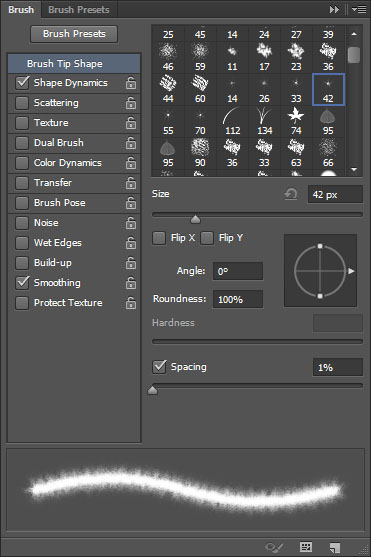
- Choose one of the Sparklies Photoshop Brushes then open the Brush panel to modify its settings.
- Brush Tip Shape:
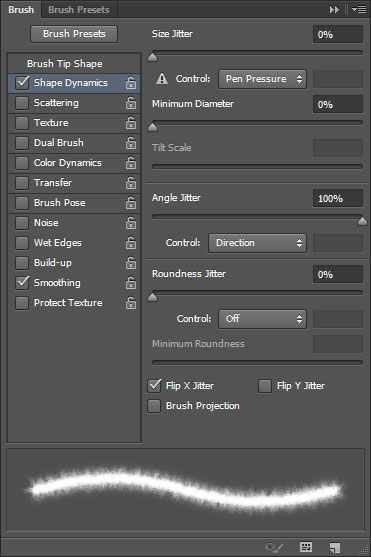
- Shape Dynamics:
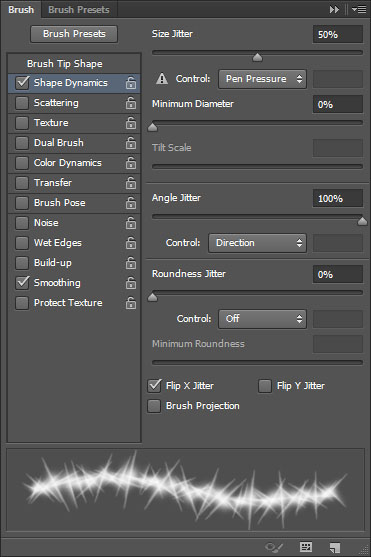
These settings will help create sparkles with different sizes and angles with every click (add variation).
- Add some sparkles over a couple of the light dots. Just a couple.

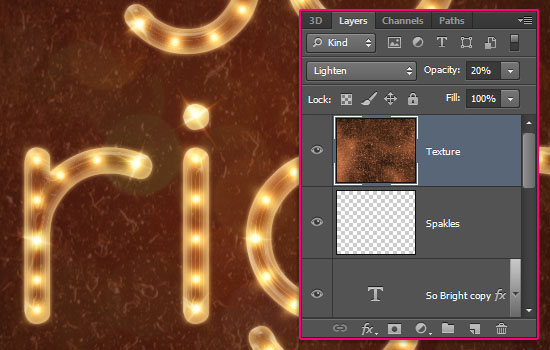
- Place the Orange Galaxy Texture image on top of all layers, resize it, then change its layer's Blend Mode to Lighten and its Opacity to 20%.
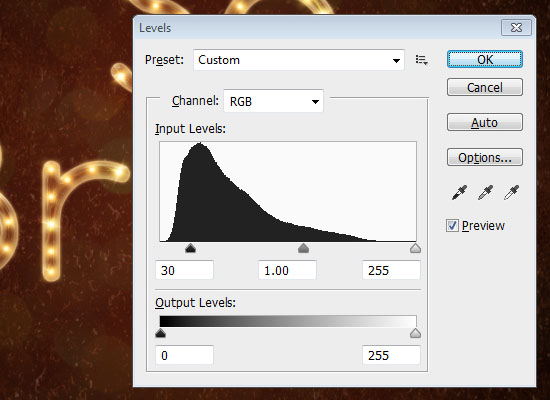
- Go to Image -> Adjustments -> Levels, and change the Shadows value to 30 to darken the image a bit.
Step 12
- This step is optional, but it makes the final effect more fancy and fun. Create a new layer right on top of the "Sparkles" layer and call it "Sparkle Lines".
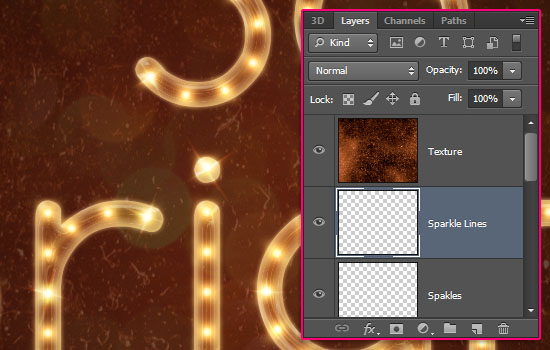
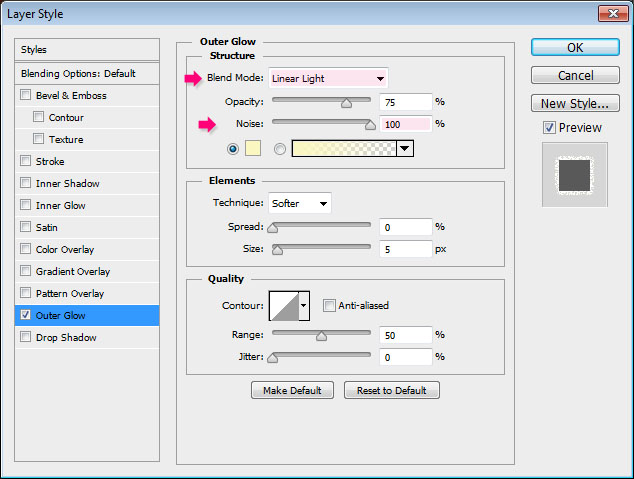
- Double click the "Sparkle Lines" layer to apply an Outer Glow effect, by changing the Blend Mode to Linear Light, and the Noise value to 100. The noise will make the glow all frizzy looking.
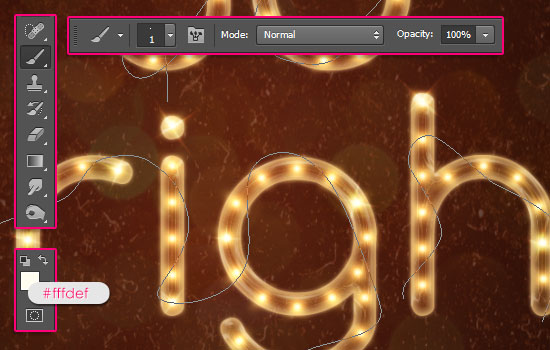
- Set the Foreground color to #fffdef, and pick a soft round 1px brush.
Then, use the Pen Tool to draw some random paths over the letters. Keep those paths close to the letters so they are not all over the place.
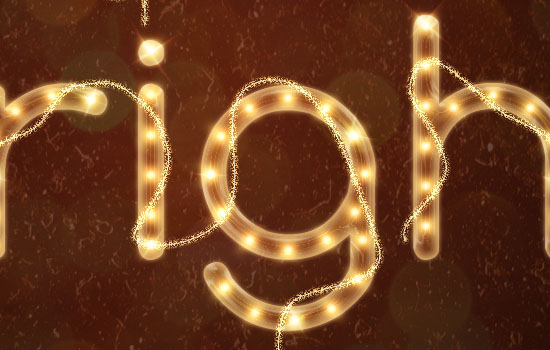
- Stroke the paths just like you did before. Hit Enter to get rid of the paths afterwards.
Step 13
- Ctrl + Click a text layer's thumbnail to create a slection.
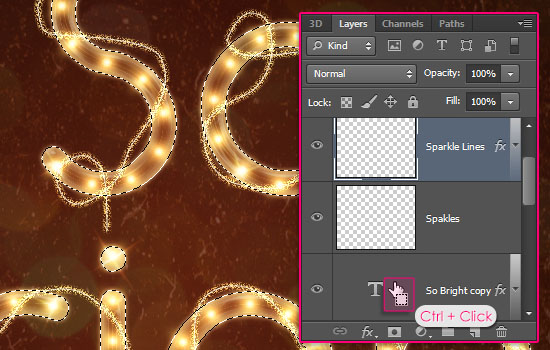
- Pick the Eraser Tool, and set the Opacity value in the Options bar to 85%. Then, start erasing the parts that are supposed to be behind the light rope.
Oh, and don't forget to set the Eraser Tool Opacity back to 100% when you're done 
The 85% opacity will not erase the line completely, as the light rope is not supposed to be opaque. So it's important to not go over the same line twice. You can undo and re-erase, but don't erase the same area more than once.
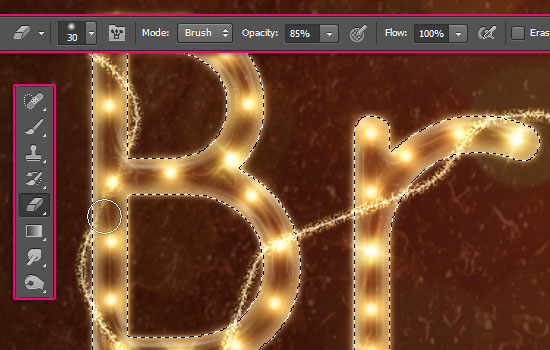
- You can use the brush to add any missing parts again.
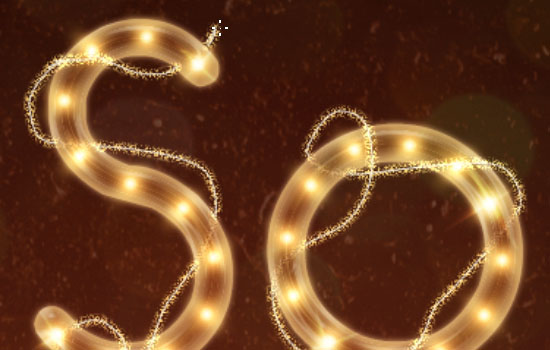
Pick the "Star 42 pixels" brush and modify its settings in the Brush panel as below:
- Brush Tip Shape:
- Shape Dynamics:
- Click once to add the brush to the sparkling lines tips (ends).
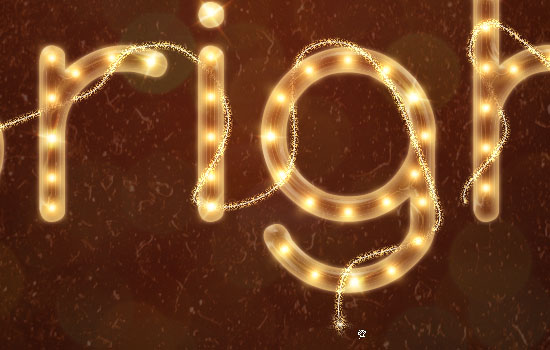
And that's it!
Hope you enjoyed the tutorial and found it useful.

Copyright © . All Rights Reserved