Create a light Effect in Photoshop
Step 1
Create a new document in Photoshop and fill the background with black using the Paint Bucket Tool (G). Then go to Layer - New - Group to create a new group and name it "bg". Create a new layer inside this group and fill it with the color #1f0959. Name this layer "bg" and set its opacity to 50%.

Step 2
Create a new layer inside the "bg" group. Then select a soft brush with the size 50px, set the foreground color to #b52a66 and draw some random lines on your image.

Step 3
Right-click on the layer you created at the previous step and select Convert to Smart Object. Then go to Filter - Blur - Motion Blur and use the settings from the following image. Name this layer "color" and set its opacity to 30%.

Step 4
Duplicate the "color" layer by dragging it over the 'Create a new layer' button from the bottom of the Layers panel (or right-click on it and select Duplicate Layer). Then go to Edit - Free Transform (Ctrl/Cmd + T), hold down the Shift key and make this layer smaller.
Double-click on the new "color" layer to open the Layer Style window and add a Color Overlay using the color #ffd200. Set the opacity of this layer to 20%.

Step 5
Download this galaxy image and open it in Photoshop. Then use the Move Tool (V) to move it into your first document. Go to Edit - Free Transform (Ctrl/Cmd + T) and change the size of this image. Add a Motion Blur filter to this layer using the settings from the following image. Name this layer "texture" and set its blend mode to Screen 25%.

Step 6
Create a new group and name it "stars". Create a new layer inside this group and fill it with black. Right-click on it and select Convert to Smart Object. Go to Filter - Noise - Add Noise and use the settings from the following image. Then go to Filter - Blur - Gaussian Blur and set the radius to 0.2px.
Go to Layer - New Adjustment Layer - Levels, tick the "Use Previous Layer to Create Clipping Mask" option and use the settings from the following image. Then set the blend mode of the "stars" group to Screen.
Note: to reduce the number of stars even more you can add a mask to the "stars" layer and paint with a black soft brush (B) over some areas of the image.

Step 7
Download the image and open it in Photoshop. Use the Move Tool (V) to move it into your document inside the "stars" group. Then use Free Transform (Ctrl/Cmd + T) to change the size of the image. Name this layer "stars 2? and set its opacity to 20%.

Step 8
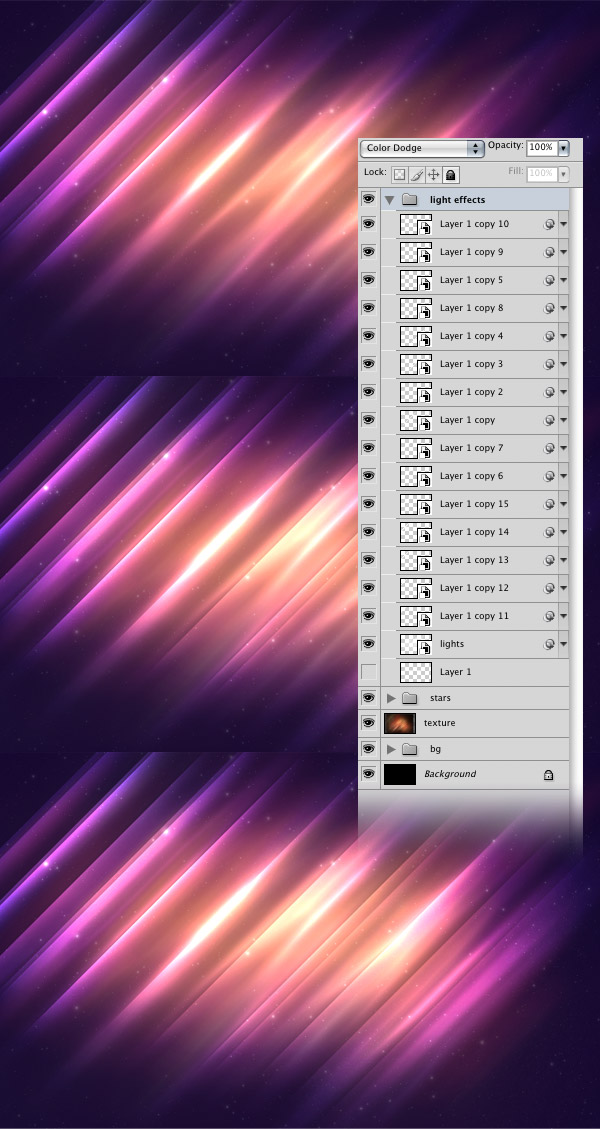
Now that we have the background we can start creating some light effects. Create a new group and name it "light effects". Create a new layer inside this group and use the Rectangular Marquee Tool (M) to make a selection like the one from the following image. Then drag a white to transparent gradient (G) from the top of the selection to the bottom. Hit Ctrl/Cmd + D to deselect.
Use the Eraser Tool (E) with a big soft brush to erase the left and right side of the white gradient layer. Then set the blend mode of the "light effects" group to Color Dodge.

Step 9
Hide the layer that you created at the previous step for the moment. Then create a new layer inside the "light effects" group. Select a white soft brush with the size 50px and draw with it some random lines. Right-click on this layer and select Convert to Smart Object. Go to Filter - Blur - Motion Blur and use the settings from the following image. Then go to Filter - Other - Maximum and set the radius to 3px to get a really nice effect. Name this layer "lights".

Step 10
Duplicate the layer that you created at step 8. Make this layer visible and put it above the "lights" layer. Then go to Filter - Noise - Add Noise and use the settings from the following image. Go to Edit - Free Transform (Ctrl/Cmd + T), hold down the Shift key and rotate this layer with -45.

Step 11
Duplicate the layer you created at the previous step. To do this, select the Move Tool (V), hold down the Alt/Option key, click on the image and drag the cursor. Set the opacity of this layer to around 30%.
Continue to click and drag to duplicate the layer as many times as you want. Then set the opacity of each layer between 20-60%. Take a look at the following image for reference.

Step 12
Select the Brush Tool (B) and select a hard brush with the diameter 35px. Then go to the Brushes panel (Window - Brushes) and use the settings from the following image to create a new brush. To save it, click on the 'Create new brush' button from the bottom of this panel.
Create a new layer inside the "light effects" group and set the foreground color to white. Then use the brush you created to draw some white circles from the upper left corner of the image to the lower right corner.
Right-click on this layer and select Convert to Smart Object. Then go to Filter - Blur - Motion Blur and use the settings from the following image. You can also add a mask to this layer and paint with black over the corners of the image to erase the light effect from there.

Step 13
Select the Type Tool (T) and write any word you want using a bold font (such as Myriad Pro Black Semi Extended).

Step 14
Double-click on the text layer to open the Layer Style window and use the settings from the following image.

Step 15
Go to Edit - Free Transform (Ctrl/Cmd + T) and rotate the text layer with -45. Then use the Move Tool (V) to move it in the middle of your image.

Step 16
Create a new group and name it "small text". Then select the Type Tool (T) and add more words to your image. Set the Fill to each of these text layers to 0% and use the same layer style settings that you used at step 14 (you can just copy the layer style from the previous text and paste it to these layers). Then use Free Transform (Ctrl/Cmd + T) to rotate each text layer with -45.

Step 17
Download some star vectors and open the .AI files in Adobe Illustrator. Select some stars and change their color to white.Then copy the stars (Ctrl/Cmd + C), go back to Photoshop and paste them (Ctrl/Cmd + V).
Use Free Transform (Ctrl/Cmd + T) to make these layers very small and move them around your image. Put these layers inside a group (Ctrl/Cmd + G), name the group "vector stars" and change its blend mode to Color Dodge. Set the opacity of each star layer to 60-100%.

Step 18
Create a new group, name it "big stars" and set its blend mode to Color Dodge 70%. Then select a vector star from Illustrator and change its color to white. Copy the vector shape and paste it into your Photoshop document. Go to Edit - Free Transform (Ctrl/Cmd + T) and change the size of the star. Duplicate this layer a few times and use the Move Tool (V) to arrange the stars. Set the opacity of these layers to 50-70%. As you can see in the following image I putted the stars in the upper left corner of the image between two lines of light.

Step 19
Create a new group, name it "small stars" and set its blend mode to Color Dodge 50%. Then repeat the previous step, but this time make the stars smaller and put them beneath the first ones. You can also add a mask to this group and use a black to transparent gradient (G) to erase the left and right side of the group.

Step 20
Download the bokeh texture and open the image in Photoshop. Then go to Layer - New Adjustment Layer - Black and White. Use the settings from the following image to convert this image into black and white. Create a new layer, go to Image - Apply Image and click OK.

Step 21
Move the image from the previous step into your first document. Go to Edit - Free Transform (Ctrl/Cmd + T) and change the size of the image. Then put this layer right above the "texture" layer, right-click on it and select Create Clipping Mask. Set the blend mode of this layer to Overlay and name it "bokeh".

Step 22
Go to Layer - New Adjustment Layer - Black and White. Use the settings from the following image. Then put this layer above all the other ones and set its blend mode to Soft Light 10%.

Step 23
Go to Layer - New Adjustment Layer - Gradient Map and use the settings from the following image. Set the blend mode of this layer to Soft Light 20%.

Step 24
Now we will make the image sharper. Create a new layer above all the other ones, go to Image - Apply Image and click OK. Convert this layer into a smart object. Then go to Filter - Other - High Pass and set the radius to 1.2px. Set the blend mode of this layer to Hard Light 35% and name it "high pass".

Final Result
Here is the final result of this tutorial. I hope you enjoyed it and you learned some new things. As you can see, it's very easy to create a beautiful image in Photoshop using stock vectors and textures. Stay tuned for the next Photoshop tutorial here on Grafpedia.

Copyright © . All Rights Reserved