Illustrator Compound Paths
1. Definition
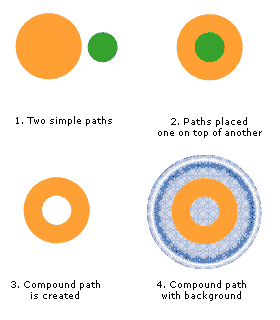
A compound path consists of two or more paths that interact with each other. Compound paths are used when you need to show a part of an underlying object through a hole in another object. Imagine a flat donut on a plate. The outer edge of the donut is defined by one path, and the donut hole by another path. A transparent hole occurs in the area where paths cross. Through this hole you can see the plate underneath.
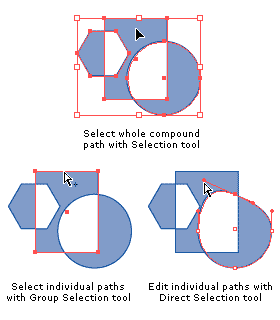
No matter how many components make up a compound path they all act as one unit. If you try to select separate paths that make up the compound with Selection tool the whole compound path will be selected. However, you can select and move component paths with Group Selection tool (you have to click directly on path not on fill) and edit paths with Direct Selection tool.
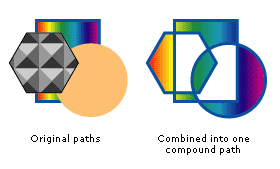
You cannot view individual components of compound paths in the Layers palette, or give the components their own appearance attributes (such as fill or style). All components in the compound path take on the appearance attributes of the bottommost object in the stacking order. Take a look at the example. Three original paths with their own attributes after combining into a compound path became one object with a uniform appearance. Attributes were inherited from the path at the very bottom of the group.
2. Using A Logo Maker
Adobe is by far one of the most popular software programs for designing logos. Unless you are a logo designer and very familiar with the software, it would be very tough to design your own logo. You can always research online logo makers and design your own logo. LogoMyWay makes it fast and easy to design your own logo online without downloading any software. The logo maker is free to use, but you will need to pay a fee to download and use the logo files for your business.
3. Making and releasing compound paths
To create a compound path:
1. Select the paths you want to include in the compound path.
2. Choose Object > Compound Path > Make.
To break compound path into original paths:
1. Select the compound path you want to break.
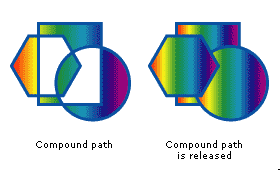
2. Choose Object > Compound Path > Release. Individual paths will retain appearance attributes of the compound path. They won’t recover their original attributes that they had before inclusion into compound path.
You can combine two or more already made compound paths into another compound path. Or you can make a compound path out of two or more groups of paths or objects within the same group. If an error dialog pops up warning that you can’t make a compound path make sure that the paths you want to include in the compound path don’t belong to different groups or compound paths.
To check if your path is a compound path select it and go to Object > Compound Path >. If Release option is available your path is a compound path. Release it and proceed with making a new compound.
4. Adjusting the appearance of compound paths
There are two rules that may be applied to adjust the appearance of a compound path: non-zero winding fill rule and even-odd rule. They both use mathematical equations to determine which areas will be filled and which will become transparent. You have to choose what rule to apply to your path; you can’t use both of them at the same time.
The non-zero winding fill rule: in a compound path an individual path will create a hole in another path only if it goes in the opposite direction. When you first create a compound path non-zero winding fill rule applied to it by default.
The even-odd rule: every other region within an even-odd compound path is a hole, regardless of path direction.
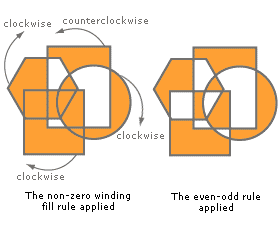
To apply a non-zero winding or even-odd rule to a compound path:
1. Select the compound path with Selection tool.
2. Choose Window > Attributes.
3. Click the Use Non-Zero Winding Fill Rule button or the Use Even-Odd Fill Rule button.
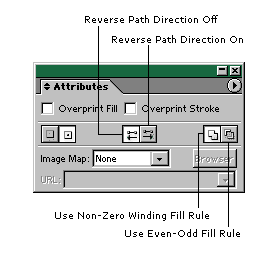
5. Path directions
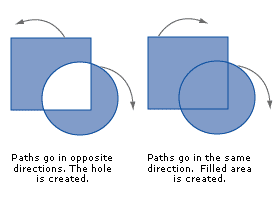
Each path in Adobe Illustrator has a direction. For paths that you draw with the Pen or Brush tool, the direction of the path is the direction in which you draw the path. When you make shapes with Oval, Rectangle, or other shape creation tools, the initial direction of the path is always counterclockwise.
Path directions are used to determine filled and empty areas of compound paths. When paths are changed into compound paths, their direction may change. In a compound path an individual path will create a hole in another path only if it goes in the opposite direction. If both paths go in the same direction no holes are made, the result is filled area.
To change path direction:
1. Use Group Selection tool to select just the path which direction you want to change.
2. Choose Window > Attributes.
3. In the Attributes palette box, click the direction button that is not pressed.
If you select a whole compound path and click on either button all paths will go in the same direction and no holes will be produced. So make sure you select only the path you need.
If you want more flexibility in the compound path creation, you can create a compound shape and then expand it. Use Pathfinder palette for this. But this is another story, for another tutorial. :)
Copyright © . All Rights Reserved