Pure an Energetic Photomanipulation
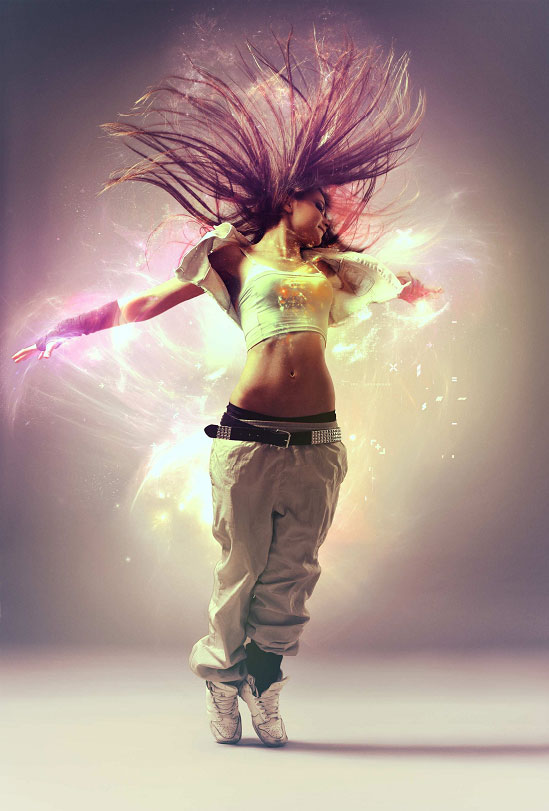
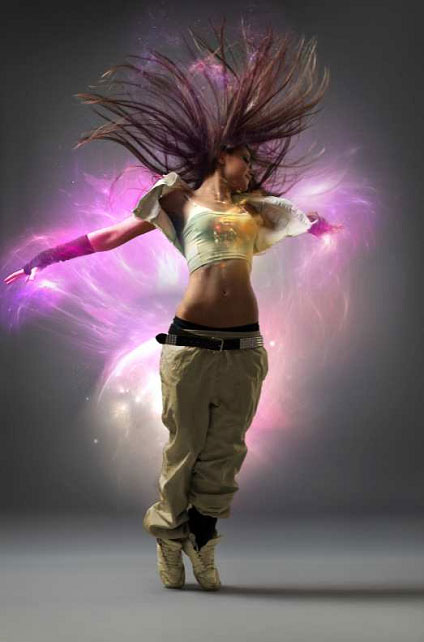
Final result:
- The Best Photoshop Actions Ever
- Photoshop tutorials
- Freebies: Round-up of 100 Free Textures
- 100 Free Patterns to Boost Your Creativity
- Adobe Photoshop CS6 Classroom in a Book
1) Introduction
Hi everyone! My name is Kevin Nitschmann and today I'm going to show you how to achieve the
manipulation effect shown above. We will be working with many blending modes and adjustment
layers. In addition to that I am going to use some handy tricks every now and then. I personally am
using Photoshop CS4 but the following steps can be achieved by any version as far as I am concerned.
Please keep in mind: This is a tutorial for advanced/experienced users. The effects are complex and
therefor I can't go into detail on every single keystroke you have to make. Very well, let's get started
then!
2) Used stock
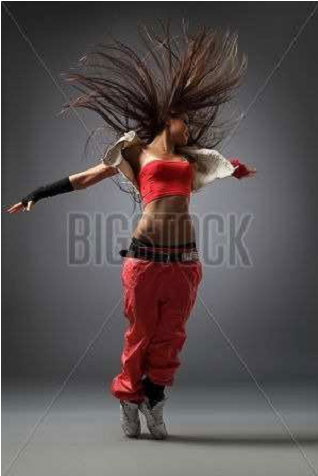
Besides the stock image of the model we will be needing several nebula stock images. But first things
first:
Copyright by Alexander Yakovlev, available via bigstock.com and also at the profile pages of this photographer at shutterstock
and istockphoto.
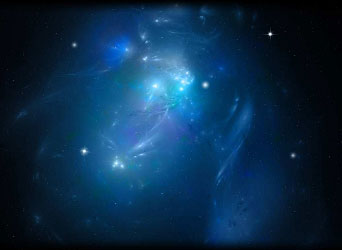
credit goes to: http://bull53y3.deviantart.com
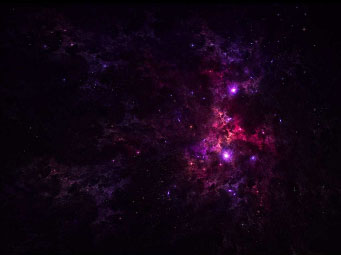
from now on I will refer to this image as "nebula 1"
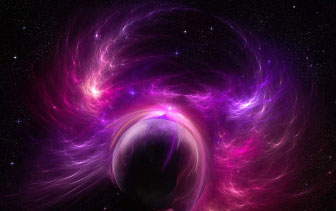
credit goes to: http://moonchilde-stock.deviantart.com/
from now on I will refer to this image as "nebula 2"
credit goes to: http://moonchilde-stock.deviantart.com/
from now on I will refer to this image as "nebula 3"
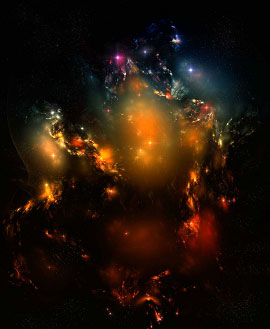
credit goes to: http://moonchilde-stock.deviantart.com/
from now on I will refer to this image as "nebula 4"
credit goes to: http://boyingopaw.deviantart.com/
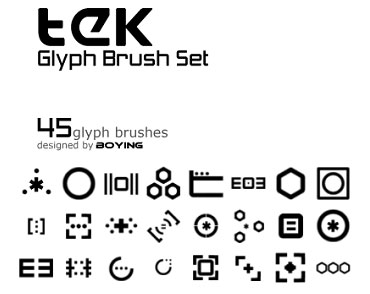
for details we will use a Photoshop tech brush pack
credit goes to: http://fuelfiredesire.deviantart.com/
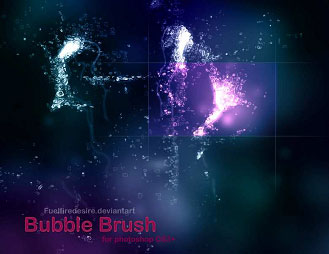
sparkling brushes for even more details
3) Organisation
We will divide our image into several parts. When you have a look at the image you will notice
nebula behind the model, nebula that is covering the model and there are also many tiny brushes
added right within all the fany colors. In the end we will play a little with the contrast and other
adjustment layers to give our piece of art a finishing touch. So our main setup is defined by this and
every single aspect will get a layer folder:
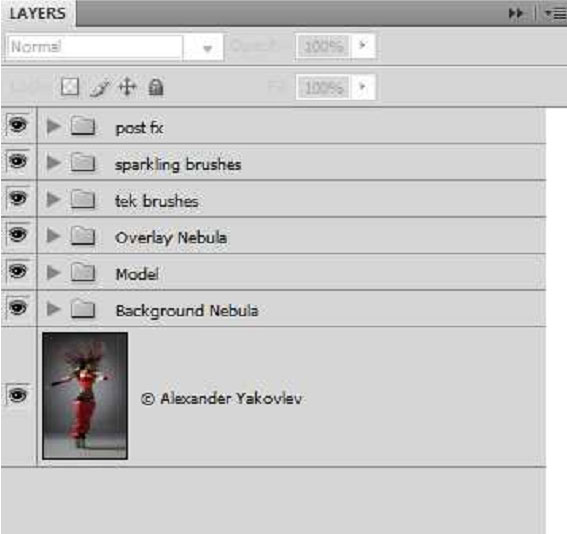
From botton to top:
1) The original stock photo of the model photographed by Alexander Yakovlev
2) Nebula image 1-3 building the background of the image
3) A cutout of the model to emphasize special areas. We will also change the color of the clothing
there, some of you might have noticed that in the original image the dancer is wearing red.
4 ) Alle nebulas put together in a more gentle way to overlap some parts of the model to make it look
as if the girl is dancing inbetween all the effects
5) Two folders of Photoshop brushes, one per artist and detail
6) A folder where all the post-effects / adjustment layers are stored
4) Step-by Step
Step 1: Openening the file and setting up the workspace
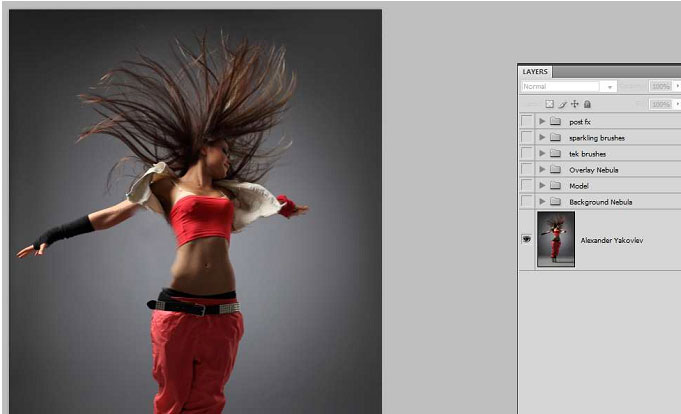
Open Photoshop and load the image of the stock model. Double click the background layer where
Photoshop will place the photo and name it as you wish, I simply named it Alexander Yakovlev(If you
like you can start creating and naming empty folders right away)
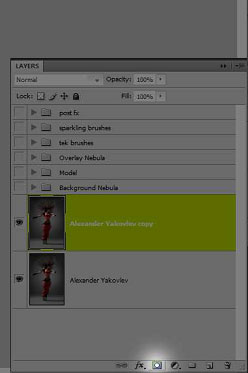
Duplicate the model layer and create a layer mask by clicking the icon highlighted in the image below.
This step is all about cutting out the model. It doesn't really matter how you do it, the idea behind all this is to get rid of the background. You will find many tutorials for that on the web. Another thing to mention here is that you don't have to pay much time on cutting out the hair, we will use a trick for that afterwards. I personally just started painting with a black brush on the layer mask (and of course while doing so I am hiding the bottom layer to see what I am actually doing). This step is boring and frustrating because you want to finish the effect and don't spend time on simple and obvious things. But it has to be done. You might wanna try Photoshop's "quick selection tool", maybe you are doing much faster with this than I do with my "zoom in and paint the layer mask"- technique.
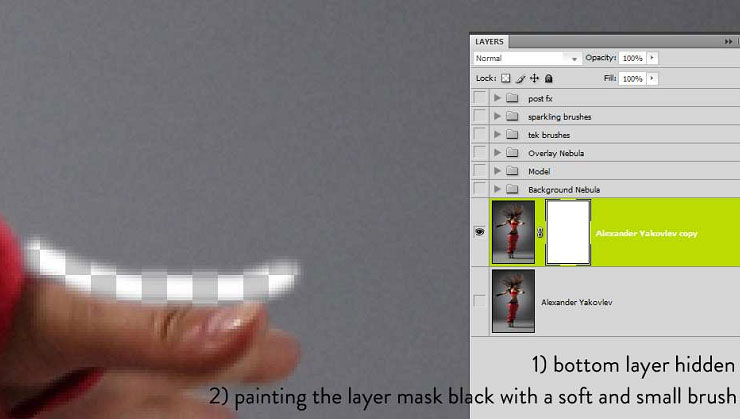
Another word concerning the hair: As I said before, don't worry that much about it. Here is my cutout of this particular area:
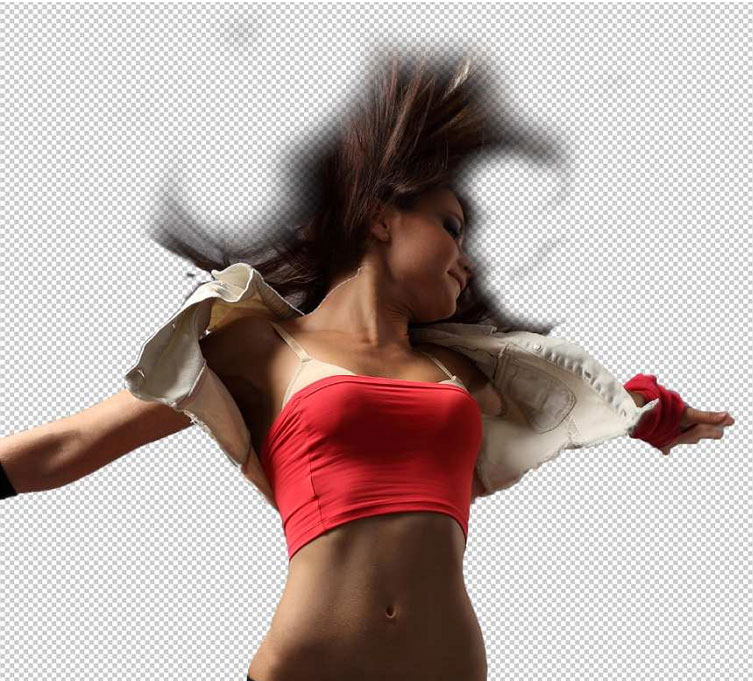
When you are finished, place the layer with the layer mask inside the "Model" folder or if you haven't already created a folder create one now, name it and put the layer there. You can now turn on the bottom layer again. This will act as the background from now on. From this point on I will refer to this particular layer with the layer mask as "model layer" while the original photo at the bottom will be our "background".
Step 4: Changing the color of the clothes
In this step we are getting rid of the loud red colors of her outfit. We do this by adding a new "Hue and Saturation" - adjustment layer right above the model layer.
Layer - New Adjustment Layer - Hue and Saturation
Apply the following settings:
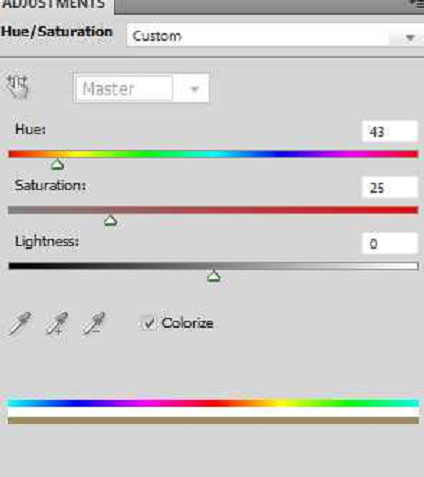
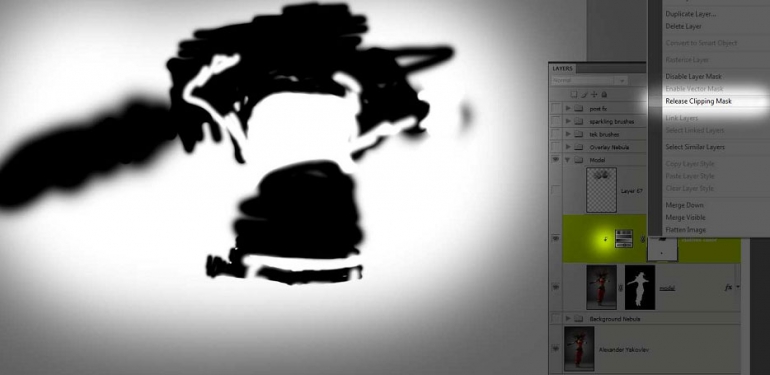
You will notice that our new adjustment layer is affecting all of our layers below it, our background also changed. We simply don't want that. So first of all we right-click the adjustment layer somewhere on the text and apply a "clipping mask". This will limit the layer's effects to the layer below it - our model layer.
But we also don't want anything else but the clothes to be manipulated, her face mustn't be affected as well. So we highlight the given layer mask of the Hue and Saturation adjustment layer, choose a soft black brush and paint on the layer mask of the layer all the areas black where there are no clothes to manipulate. The following image shows you my layer mask on the left and also the little arrow from the hue and saturation layer pointing towards the model layer being an indicator that the layer has been clipped to the layer below. My layer is already clipped, so in my right-click menu it says "release clipping mask" which would reverse the effect (ignore my layer being on top of the adjustment layer for now please):
Step 5: Masking the hair
In order to have a proper selection of the hair (still not perfect but it does the job on this particular image) select your background layer again and go to the channels palette.
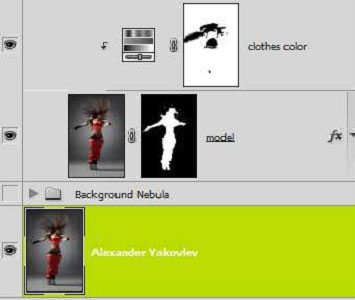
You need to find the channel with the biggest contrast between hair and background, I suggest you go with the blue one. So click on it so that only the blue channel is visible and copy it.
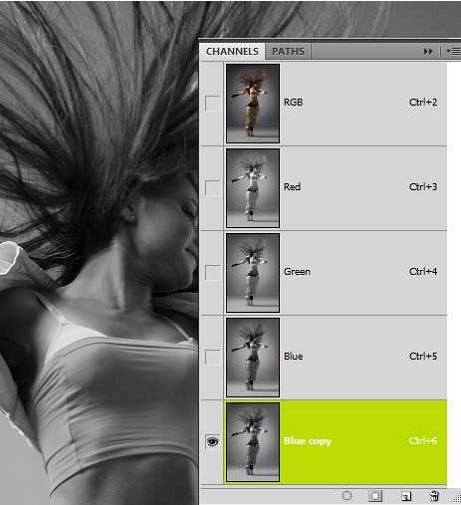
You need to find the channel with the biggest contrast between hair and background, I suggest you go with the blue one. So click on it so that only the blue channel is visible and copy it.
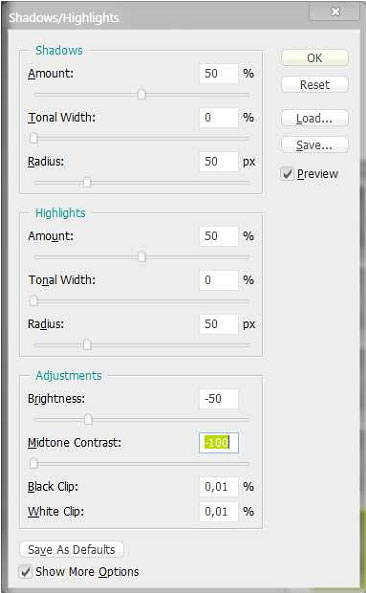
by doing so we crank up the contrast even more. Now hold the ctrl - Key of your keyboard and left- click the "blue" copy channel. This will make a selection. Invert the selection by choosing
Select - Inverse
Switch back to your layers palette away from the channels and with your background layer still selected press ctrl + c and ctrl +v to copy the selected area from the background layer on it's own layer.
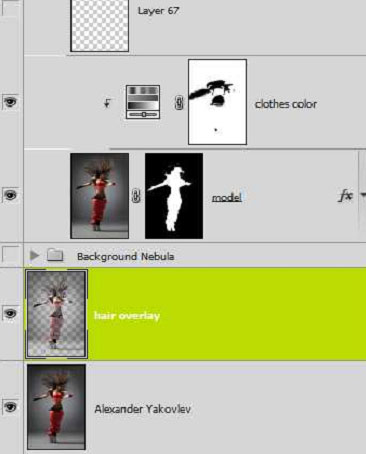
Finally, name the layer "hair overlay" to match the progress-picture above. You will quickly notice that the created layer contains more information than just the hair part. So we create another layer mask for this layer, paint it totally black (e.g. with the paint bucket tool) and then only paint the area around the head white, there is no precision needed, I will prove that to you in a second. But first drag the layer into the "model" folder above all the other layers this folder contains (just two, our model cutout and a Hue and Saturation adjustment layer).
Final picture of that step:
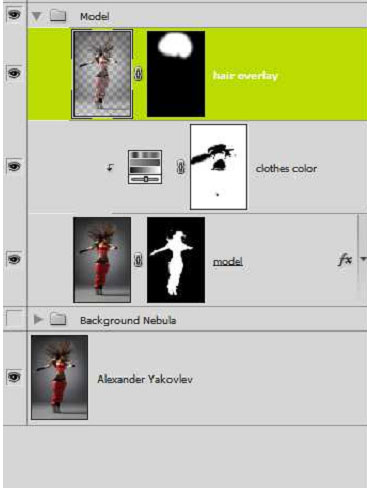
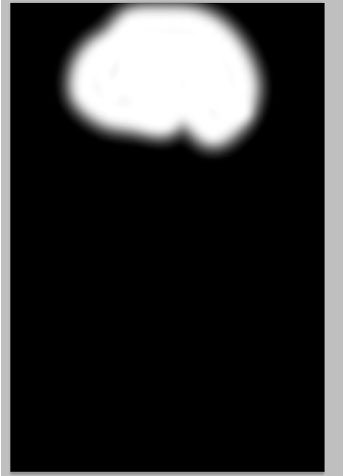
And just for the record, this is how my layer mask for the hair layer looks like fullscreen:
Step 6: Adding background nebulas
If you haven't already created an empty folder under the model folder named "Background Nebula" please do so now. Also, load nebula1 and nebula2 into Photoshop and drag these two stock photos in your current document to have them available within our photomanipulation project on it's own layer.
Next up is the arrangement of our new layers inside the image. I advise you to take a close look at the following screenshot of mine, the layer order isn't as important as where you put them. I will highlight every layer on it's own to give you an idea. Also notice that I used the nebula2 image twice and rotated all the images a little.
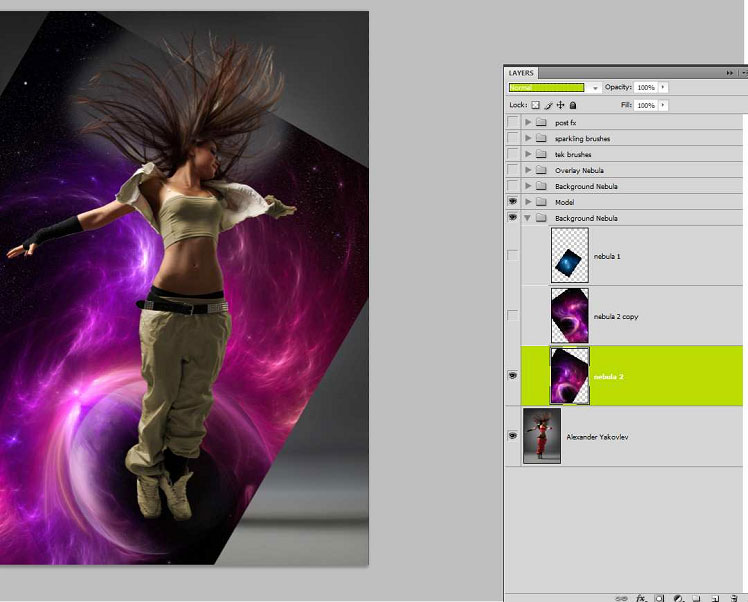
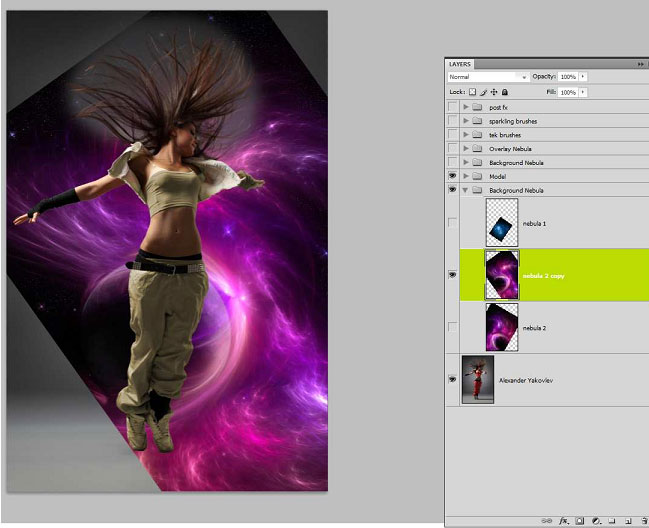
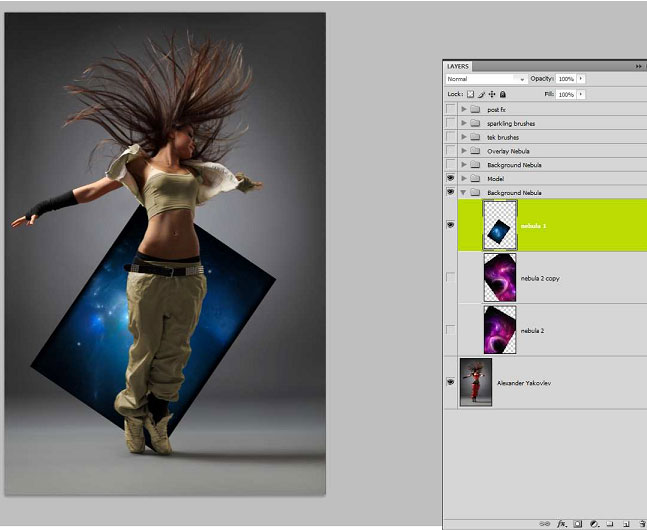
Set the blending mode of the two "nebula2" layers to Linear Dodge, the nebula1 layer to Color Dodge.
Now create a layer mask for each of the three nebula layers. I prefer to fill the masks with black and begin painting back what was on the layer with white, doesn't matter really how you do it, the key thing here is to get rid of the edges of each nebula. You don't want that look of having an image on top of an image, therefor the shape of the nebula can't be a square, it needs to be distorded.
I again provided you a screenshot for every single layer, now with my finished layer mask:
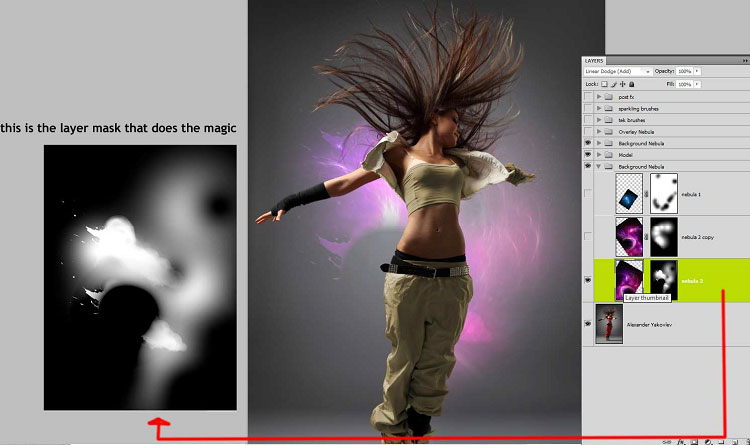
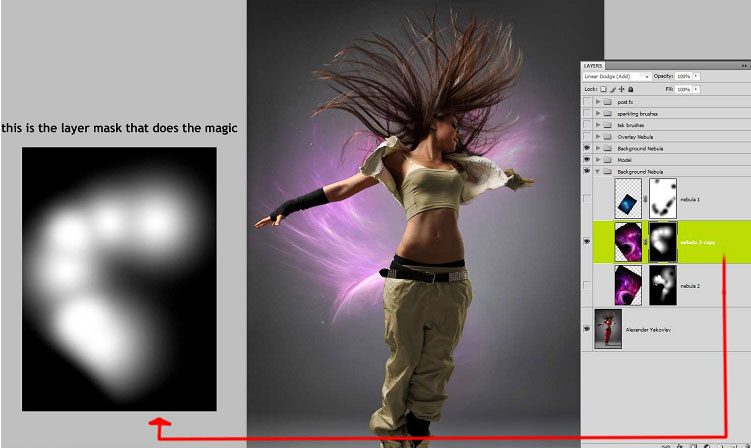
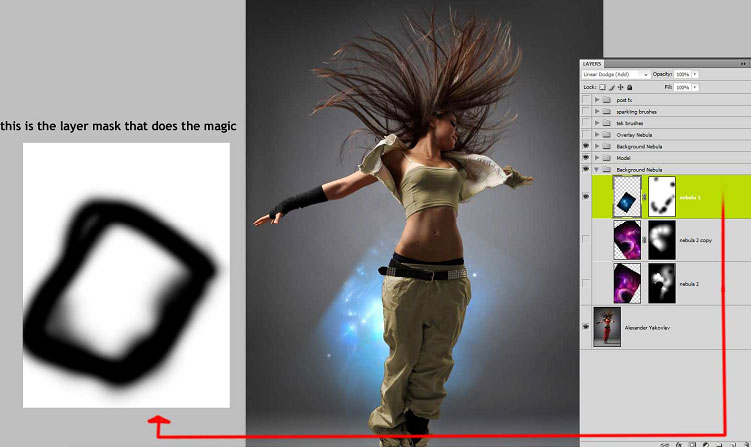
For the end, create and clip a Hue and Saturation layer to the nebula1 layer and one to the nebula2 layers as shown here:
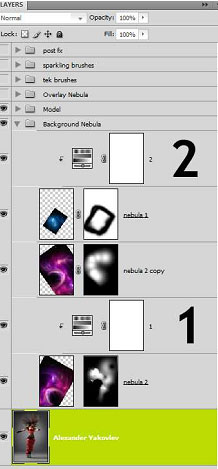
For Hue and Saturation layer "1" apply these settings:
Hue: +28
Saturation: -23
Lightness: 0
For Hue and Saturation layer "2" apply these settings:
Hue: -180
Saturation: -79
Lightness: 0
Were done with another project folder.
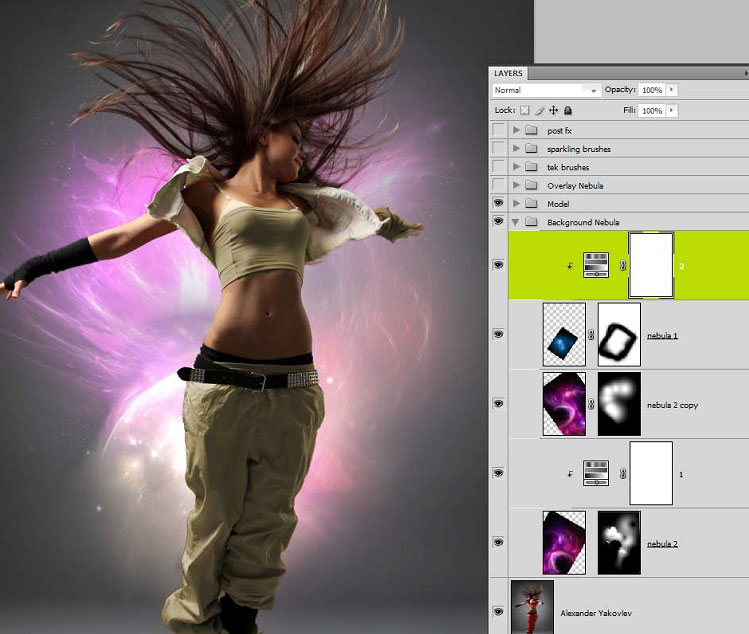
By the way: When you have completed this step you are able to see whether you did a good job on cutting out the hair or not. In the above image the "background nebulas" are really in the background, the model is in the front. Just turn off the hair layer for a moment and look at the picture without our little fix applied...
Step 7: Adding Overlay Nebulas
It's time to blend in the model and discontinue letting her standing out of the picture. Above the Background and the model folder, please create another folder and name it "Overlay Nebula" if you haven't done so already.
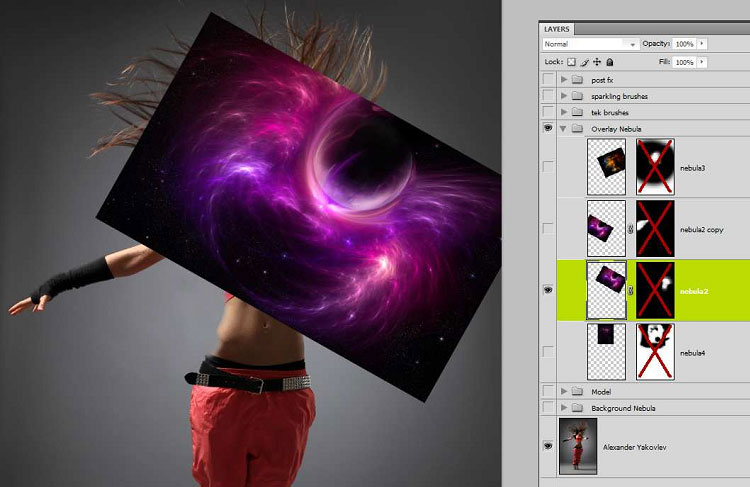
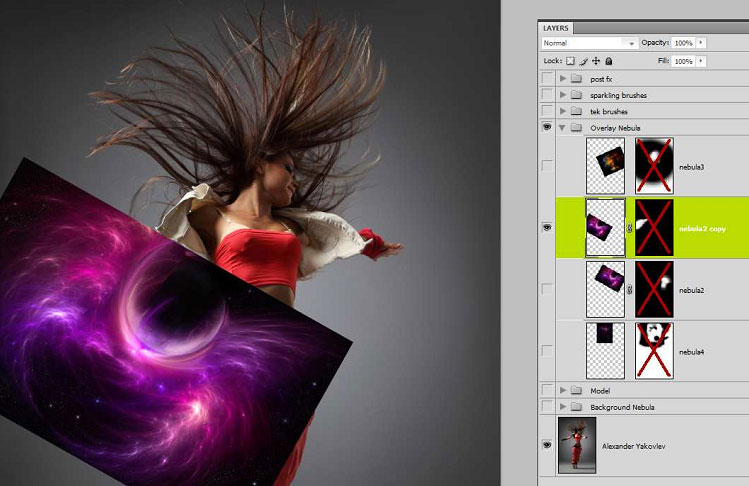
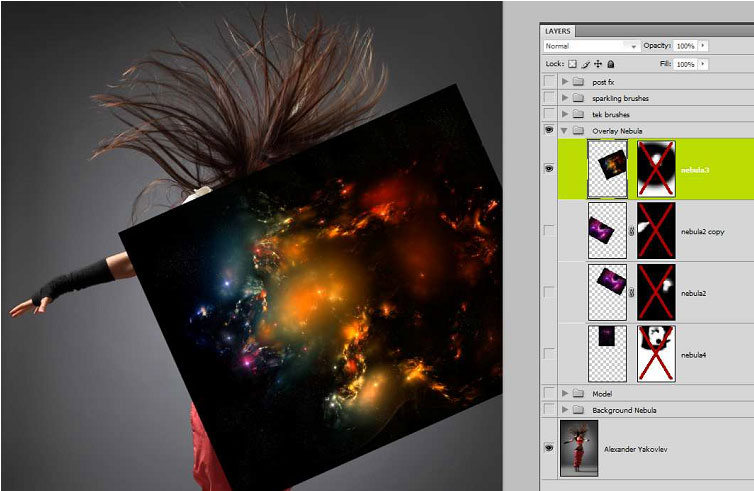
Load nebula2,3,4 into Photoshop and place them as a layer inside the folder. The order is not really important since every layer will just deal with a small area of the image itself, there hardly will be any overlapping. But maybe it's wise to just follow my order:
bottom to top : 4-2-2-3
To show you the right placement of the images I attached another screenshot of mine. Notice that I already created layer masks like I did with the nebula layers for the background( I think you saw that step coming), I just disabled them to let you see how the whole image layer itself was arranged by me. What you are supposed to see: I used nebula4 in the head/hair area to make it sparkle (will get back to that shortly) and in case to make it fit even better on the model I rotated it by 90 degrees ccw. But see for yourself ( I switched off any other layer than the background layer, that's why my model is wearing "red" again, just so you can see what's going on with the layers we're working on right now):
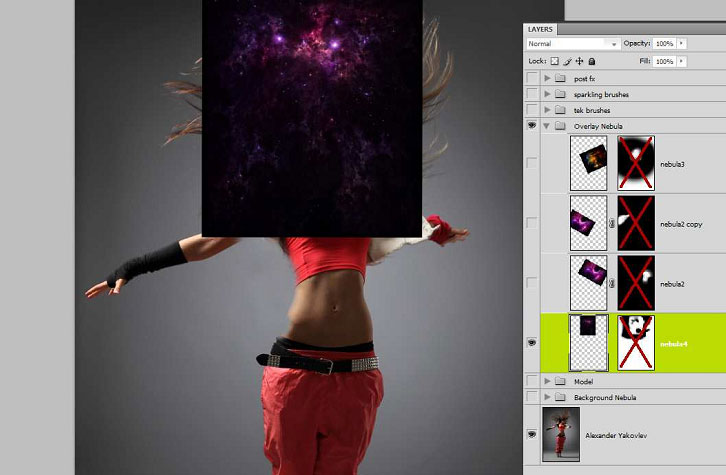
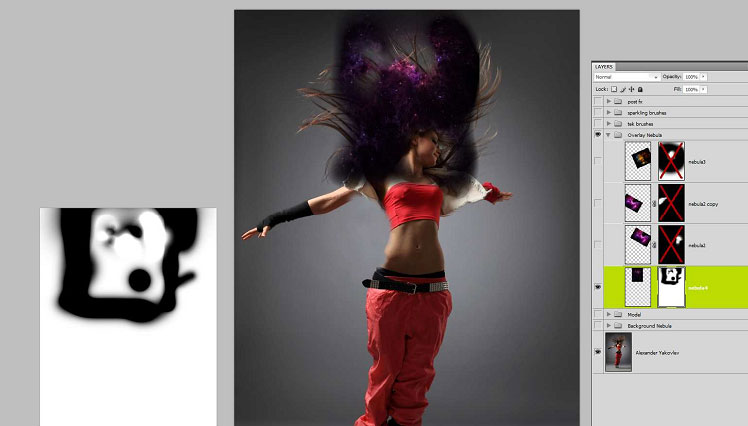
Now once again it's about layer masking. I already mentioned the purpose of the nebula4 layer. We actually only want it visible around the head, so create a layer mask for that layer and paint everything besides that area black. It isn't that hard, the whole nebula itself is mostly black, just a few sparkles which are already in place.
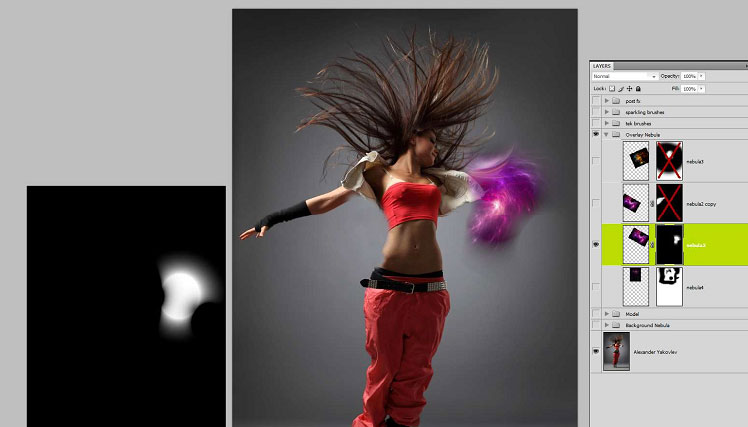
The idea of the layer above that is to have the "wing" of the nebula be visible around the arm o model. So the first nebula2 layer should be visible somewhere between her belly and the arm o right side of the image.
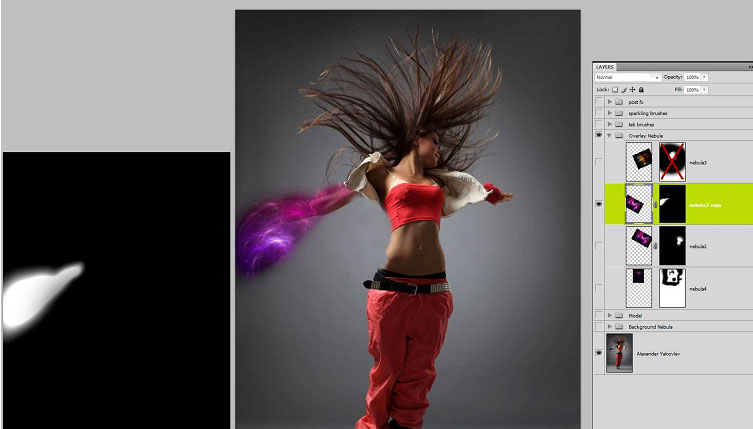
The other nebula2 copy goes with the right arm and maybe a little below it. So try to only paint that area of the corresponding layer mask in white.
What's left now is the layer mask of nebula3. My idea behind this layer was simple: Make the model blend in. That's why the layer itself is really centered. But in the end it's only just a small amount of effects coming from this layer. Be gentle with that one, don't reveal too much or in other words: Don't cover too much of our beautiful model!
And of course, all the things I've just told you in pictures:

Personally, I think there is no need of color-editing. So we can continue with setting the blending modes of each layer:
Set nebula4 to Linear Dodge ebula4 and nebula2 to Screen
Set nebula2copy (the layer for the left arm [model's right arm]) and nebula3 to Linear Doge
We're done with this step, here's what we have so far:
Step 8 : Details and Brushes
The next step is all about adding depth and details to the image. It's about letting the viewer's eye explore what is going on in the picture. When someone only needs a second to get all the information there possibly is of your photo it's simply boring to look at. You need to add tiny decals some may not even recognize. People will only see them when they are gone because they work so well with all the other elements of this manipulation.
So next up: Load the the two brush sets into Photoshop.
Some people might wanna do this step after all the other ones because they maybe don't know yet which main color to choose for the whole image. But since I have given this a thought while I actually created the image I now just have to pick the right color for the brushes and continue.
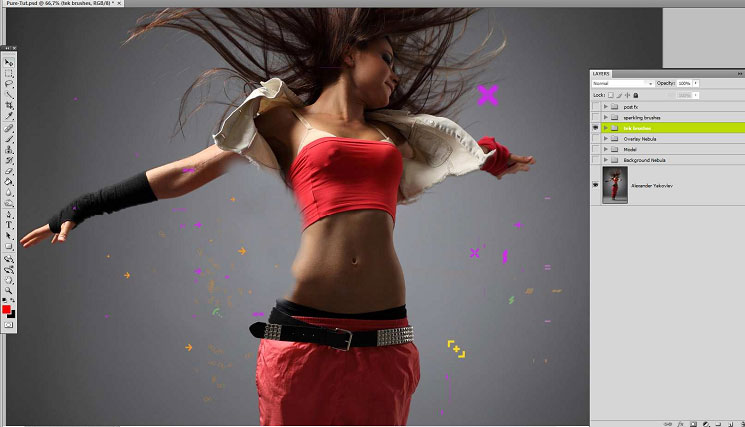
Let's begin with the tek brushes. I figured it would be cool if they only show in the area between the arms and the hips of our dancer. You need to work with a really small brush and need to zoom in quite a bit.
But other than that there is really no challenge to this step. The shapes are already created for you. So create another folder, name it "tek brushes" and start brushing. How? Well, if you are really good you can try by creating a layer and start painting on it. I myself created a couple of layers. Every time I zoomed in to concentrate on a particular area I created a new layer and started painting on it. When I thought it looks alright I zoomed out and zoomed in somewhere else. In the end I got a layer for every zoom-area I worked on. This makes my overall effect really flexible.Sometimes your effects look really good but as soon as you zoom out you begin to realize that you always had the same pattern - it doesn't look like you put much love into creating this. If that is the case I can simply delete the area I don't want by selecting the corresponding layer and don't have to start all over again. I just need to re-do that one area which wasn't as awesome as the other ones.
The next image shows you my final content of the "tek brush" folder. I used many layers, can't be wrong for you to do the same. So have a look at what colors I used and how I placed the tek brushes
Please note: It's a very special moment for Photoshop this day. This is one of the rare times where I can simply say to you "paint this area yellow and this one red". Usually when you work in Photoshop you get a color-code in hexadecimal because you need to be super-precise about everything. But this isn't the case here. Why? I'll tell you in a minute. For now, just look at my shapes I created with the help of this brush set and think "yellow shape, purple shape, orange shape" and so on:
close-ups of the above image (clockwise):
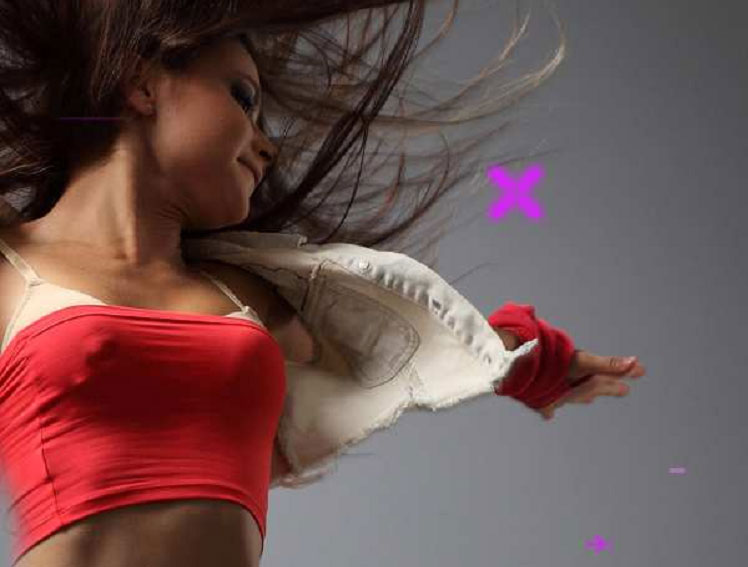
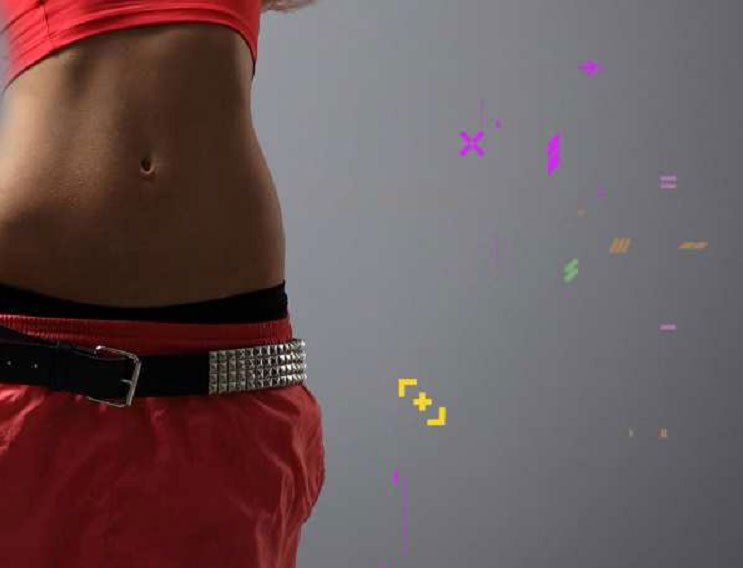
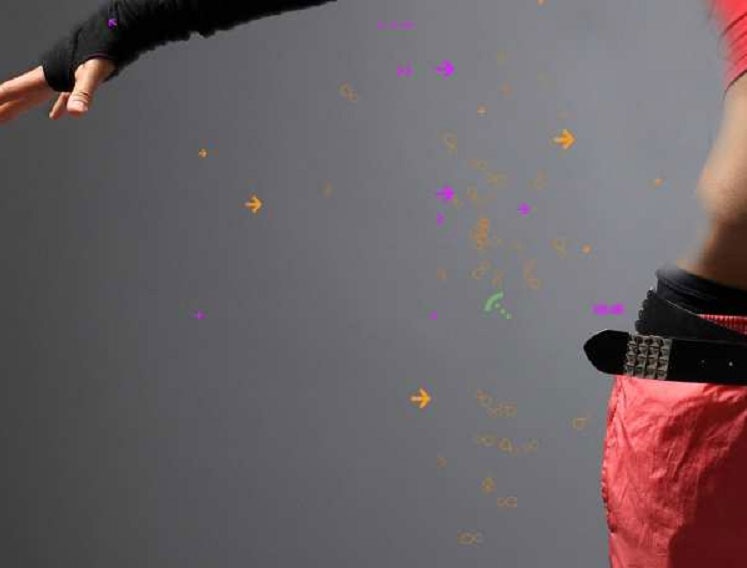
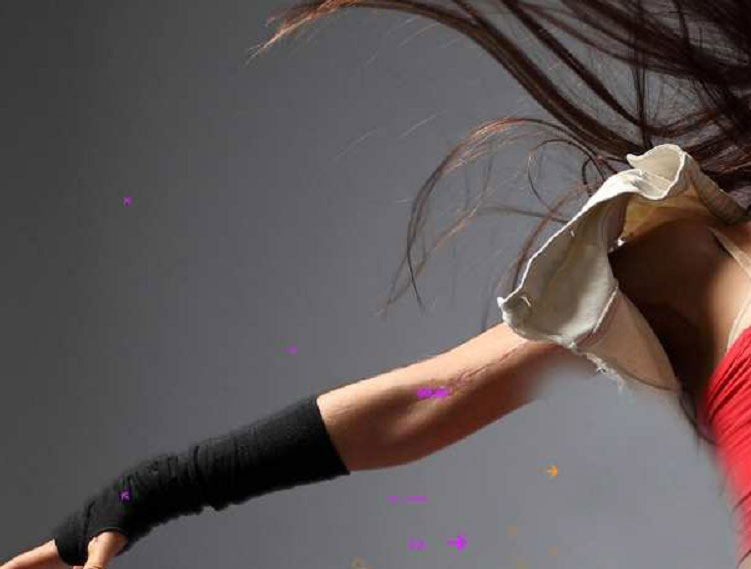
i think we all agree that there is no right or wrong here. Place the brushes as you want, just don't over do it and variate the colors a litte.
To make this work with our whole image, select the folder of the tek brushes itself and choose the blending mode
Color Dodge
By selecting a blending mode while having a folder active Photoshop will apply the chosen blending mode to every single layer. Also, the colors of the brushes aren't that important anymore, what matters is the variety of color. If you don't believe me just finish this image and try black brushes. You will see that black won't really work with the blending mode but almost any other color will.
I guess it's time for another folder, the "sparkling brushes" folder. Create one (if you haven't already).
Create a new layer and repeat what you just did for the tek brushes. This time you will only need a purple-ish color. If you have the urge to peek at my outcome, here you go:
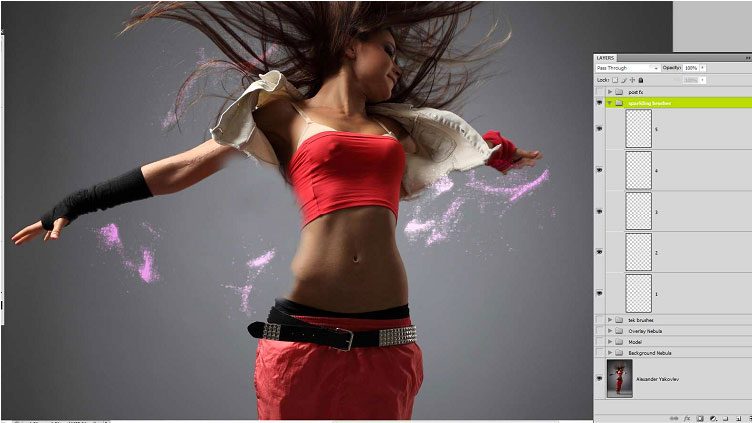
Only 5 layers (one brush per layer) did the job for me. Vary the number of layers and shapes as you like. Just keep in mind that we want to name our piece of art "pure" and not "chaotic", so be gentle.
To finish this, re-do the trick with the blending mode of the folder by clicking on the sparkle brush folder icon and select Color Dodge as the blending mode. Turn on all the layers we have created so far and it should look like this:
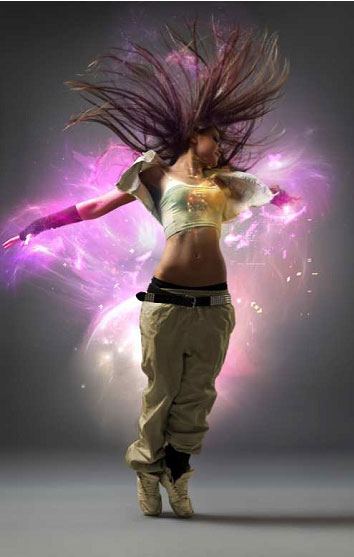
Step 9: Posteffects
On top of everything create a new folder called "post fx".
This final step will define the overall color of our image, as well as the contrast, the focus and so many more things. From Step 1 to 8 we simply concentrated on letting things we add go in harmony. It didn't matter that our nebula layer was purple as long as all the others were as well. Our brushes are supposed to stand out, we need a bright color for that, but which one exactly? This will be defined now.
Only 6 more layers to go.
First, create a new Curves layer inside our new folder. Re-create my curve or simply choose the "strong contrast" default setting: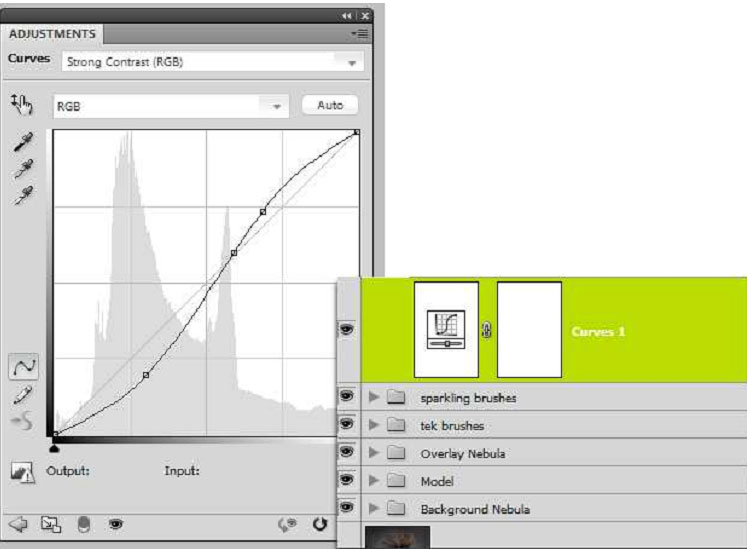
Set the opacity of this Curves layer to 25%.
Next up: A "Selective Color" adjustment layer. Create one and use the following settings:

Leave the other color channels unchanged.
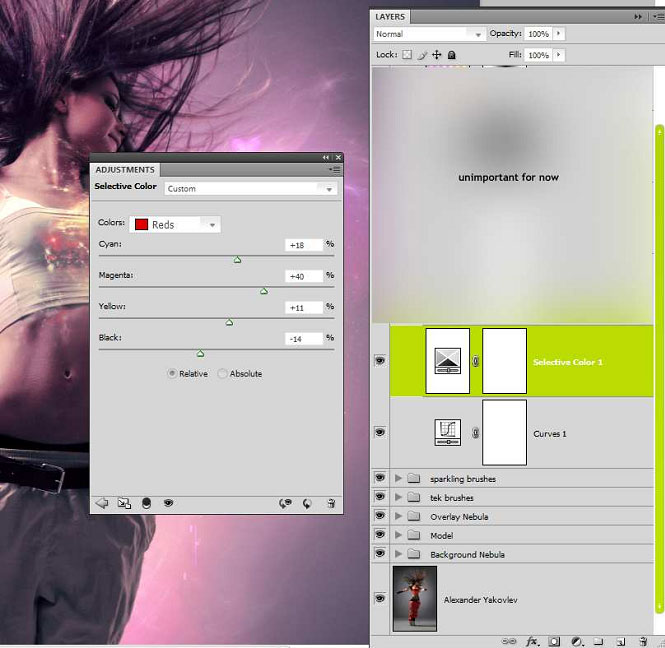
On top of that layer, create a "Channel Mixer" adjustment layer with the following settings:

Our image looks really green-ish right now. But don't worry, rescue is on it's way. One can only see the effect of every single layer we are about to create after everything is finished. Again: You only see things that are missing, not the ones that are present.
Next up: A "Color Balance" adjustment layer. Settings:

Keep "Preserve Luminosity" activated.
On top of that create a Gradient Map layer. In Photoshop CS4 you will also find that layer inside the "Adjustment Layer" panel box of the user interface.
Go with the following gradient:
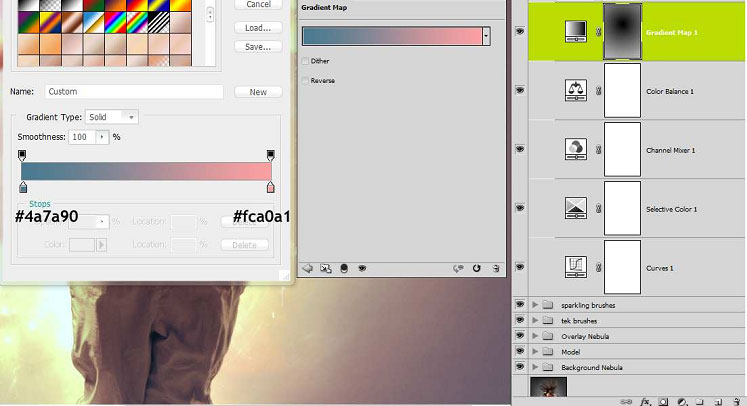
Set the blending mode of this Gradient Map layer to Linear Dodge.
Also notice my layer mask for this layer. I didn't change the opacity of this layer but the layer mask is almost totally black. In the head area of the model it is pure black and it transforms into grey on it's way to the edges of the image. In other words: Make sure this gradient map is only applied around the model, not exactly in the area of her face and use the already given layer mask to achieve that goal of yours.
I think it is time for the last layer.
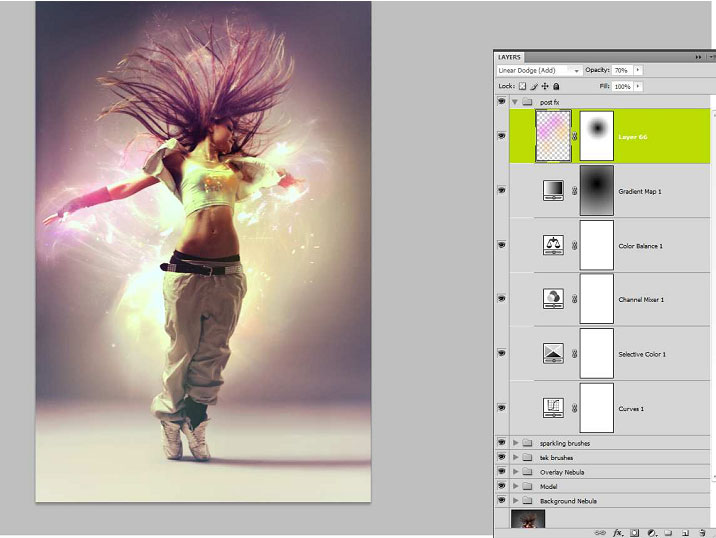
Create a new blank layer. Set the blending mode to Linear Dodge.
Grab a really huge brush and click four times, one click per image corner. For the first two clicks in the top corners choose purple, for the other two choose yellow. After that use a Gaussian Blur
(Filter - Blur - Gaussian Blur)
to make the layer fade away a little. In addition to that lower the opacity of the layer to around 70%.
Here is my final layer in a "normal blending mode" so you can actually see where I painted (after I used a Gaussian Blur with a radius above 200):
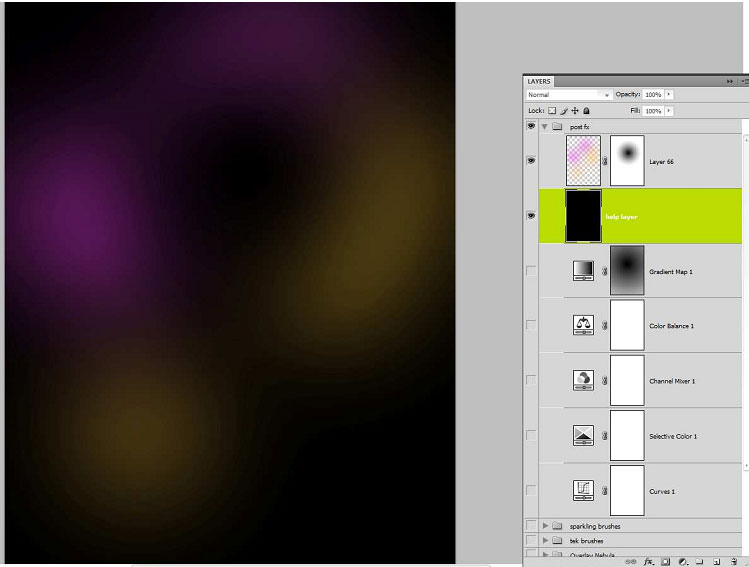
(Of course there is no black background for you, it's just to give you the idea on how I created this layer.)
The last step is to make the face of the model immune to this layer. It's almost the same techniqu we used on the Gradient Map layer. Even simpler.
Just use a big black brush on the layer mask of this Color layer and paint it black around the area of your models head. If you choose not to create a layer mask for this particular layer it is fine by me.
But by manipulating every single pixel in the picture this color overlay would just look like a color filter, a camera fix or whatever. But if the model's face is different and has a more natural look the eye will think that nothing was done (since the face looks O.K.) and the effects around the model are actually looking the way they do now.
So that's it, here is my final screenshot:
Thanks for reading, I hope you enjoyed my tutorial and were able to advance your skills.

Related Posts:
- How to Create a Porcelain Skin Effect in Adobe Photshop CS6
- Vintage Yourself! The Easiest Way to Create Vintage Photo Effect
- St Valentine's Day Photo Manipulation (Exclusive Tutorial)
- Night of Spells(Exclusive Tutorial)
- When the Dreams Come True(Exclusive Tutorial)
- Na vi avatar photo manipulation exclusive tutorial
About the author
Copyright © . All Rights Reserved
